Felicity noted that until yesterday, when inserting graphics, text boxes, WordArt, and etc. into her documents she was able to view, select, and manipulate them in Print Layout view. Now the only view in which they show is in print preview, and when I select one of the items, all the editing and formatting tools are grayed out. Felicity is wondering why she can't work with these items as she previously did.
It sounds like the problem is that the Picture Placeholders setting has been turned on. You can control this setting in this manner:
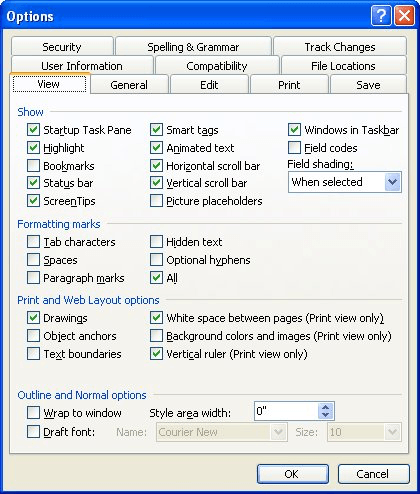
Figure 1. The View tab of the Options dialog box.
Your pictures should now again be accessible as you are editing your document.
WordTips is your source for cost-effective Microsoft Word training. (Microsoft Word is the most popular word processing software in the world.) This tip (10355) applies to Microsoft Word 97, 2000, 2002, and 2003.

Learning Made Easy! Quickly teach yourself how to format, publish, and share your content using Word 2021 or Microsoft 365. With Step by Step, you set the pace, building and practicing the skills you need, just when you need them! Check out Microsoft Word Step by Step today!
When you insert an object into your document, it is anchored to a paragraph. If you want to change the paragraph to which ...
Discover MoreGot a bunch of graphics in a document that need replacing? (Perhaps you need to replace an old logo with a new one.) Word ...
Discover MoreIf you have a document with many graphics, you know that Word can sometimes be slow in displaying all those graphics. ...
Discover MoreFREE SERVICE: Get tips like this every week in WordTips, a free productivity newsletter. Enter your address and click "Subscribe."
There are currently no comments for this tip. (Be the first to leave your comment—just use the simple form above!)
Got a version of Word that uses the menu interface (Word 97, Word 2000, Word 2002, or Word 2003)? This site is for you! If you use a later version of Word, visit our WordTips site focusing on the ribbon interface.
Visit the WordTips channel on YouTube

FREE SERVICE: Get tips like this every week in WordTips, a free productivity newsletter. Enter your address and click "Subscribe."
Copyright © 2026 Sharon Parq Associates, Inc.
Comments