Please Note: This article is written for users of the following Microsoft Word versions: 97, 2000, 2002, and 2003. If you are using a later version (Word 2007 or later), this tip may not work for you. For a version of this tip written specifically for later versions of Word, click here: Understanding Object Anchors.
Objects can be placed in your document in two ways: either inline or floating. Inline objects are those that reside on the same layer as your text and are positioned within the stream of text that surrounds the object. Floating objects are those that are placed on a layer over the text. The thing that indicates essentially where a floating object is located in relation to the text in your document is referred to as an object anchor.
Object anchors can only be seen in Print Layout view, but even then they are not always visible. In other words, you can control the display of the anchors. If you select a graphic object in your document and you see a boat-anchor icon appear in the left margin of the document, then you know you have the display of object anchors enabled. You can change this setting by following these steps:
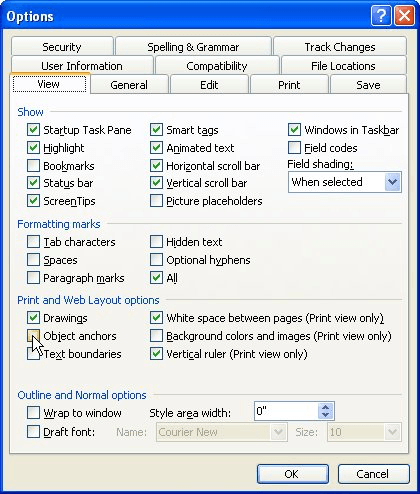
Figure 1. The View tab of the Options dialog box.
Object anchors are used to specify the paragraph with which an object is associated. Why is that important? Because it can affect the positioning of the object within the document. For instance, if you select a picture and then choose Picture from the Format menu, you will see the Format Picture dialog box. The Position tab of that dialog box allows you to set the vertical position of the picture in relation to the paragraph to which it is anchored. Thus, seeing the object anchor helps you to understand the positioning of the picture.
In addition, the Position tab allows you to select a check box named Lock Anchor. This option causes Word to always paginate your document so that the object (the picture) is always on the same page as the object anchor. This is the best way to ensure that a picture is on the same page as the paragraph that describes what is in the picture.
WordTips is your source for cost-effective Microsoft Word training. (Microsoft Word is the most popular word processing software in the world.) This tip (1439) applies to Microsoft Word 97, 2000, 2002, and 2003. You can find a version of this tip for the ribbon interface of Word (Word 2007 and later) here: Understanding Object Anchors.

Create Custom Apps with VBA! Discover how to extend the capabilities of Office 365 applications with VBA programming. Written in clear terms and understandable language, the book includes systematic tutorials and contains both intermediate and advanced content for experienced VB developers. Designed to be comprehensive, the book addresses not just one Office application, but the entire Office suite. Check out Mastering VBA for Microsoft Office 365 today!
When you position objects (such as text boxes or graphics) on a page, one of the things you can do is to anchor the ...
Discover MoreWhen processing a document using a macro, you may need for your macro to figure out the sizes of the images in your ...
Discover MoreYou use the rotation handle in Word 2002 and Word 2003 to, well, rotate graphics around a center point. But if you hold ...
Discover MoreFREE SERVICE: Get tips like this every week in WordTips, a free productivity newsletter. Enter your address and click "Subscribe."
There are currently no comments for this tip. (Be the first to leave your comment—just use the simple form above!)
Got a version of Word that uses the menu interface (Word 97, Word 2000, Word 2002, or Word 2003)? This site is for you! If you use a later version of Word, visit our WordTips site focusing on the ribbon interface.
Visit the WordTips channel on YouTube

FREE SERVICE: Get tips like this every week in WordTips, a free productivity newsletter. Enter your address and click "Subscribe."
Copyright © 2026 Sharon Parq Associates, Inc.
 Please Note:
This article is written for users of the following Microsoft Word versions: 97, 2000, 2002, and 2003. If you are using a later version (Word 2007 or later), this tip may not work for you. For a version of this tip written specifically for later versions of Word, click here:
Please Note:
This article is written for users of the following Microsoft Word versions: 97, 2000, 2002, and 2003. If you are using a later version (Word 2007 or later), this tip may not work for you. For a version of this tip written specifically for later versions of Word, click here:
Comments