Written by Allen Wyatt (last updated April 30, 2022)
This tip applies to Word 97, 2000, 2002, and 2003
There are many times when you are putting together a document that you need to make sure that certain references are consistent. For instance, you may need to refer to a particular tolerance on a piece of machinery, and it is imperative that the references be precise and accurate throughout the document.
There are several ways you can handle this situation using Word. The first is to use the mail merge feature, another is to use bookmarks, the third is to use search and replace, the fourth is to use AutoText, and the fifth is to use document properties. If your document only has a couple of references that you need to update whenever you print, you can set up the document as a mail merge document and use merge codes to insert the proper value. In that way you only need to change the information in the merge data file to have the references throughout the finished document be accurate.
The second way is to use bookmarks. In this method you would perform the following steps:
You will want to make sure that you update your fields before printing if you use the bookmark method just described. The third method you can use is to contrive some sort of shorthand notation for the values or text you want to be consistent. For instance, you might devise n45 as shorthand for 45,000. Then, when you are done with your document, you can search for all instances of n45 and replace it with 45,000.
The fourth method involves using AutoText entries. When you first use your value or text, assign it to an AutoText entry. (AutoText entries were discussed in a previous issue of WordTips.) For instance, you might assign 45,000 to the AutoText name n45. Then, whenever you type n45, you can press F3 and the name is expanded to the full number. To provide greater flexibility, you can bypass the F3 method and follow these steps:
You may notice that this series of steps is very similar to the bookmark method. The advantage of using AutoText in this way is that it can be easily updated. Simply change the AutoText entry, update your fields, and all instances are automatically changed throughout the document. If you use the F3 approach, your AutoText entry cannot be automatically updated.
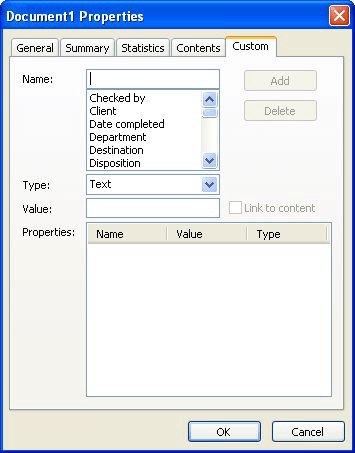
The fifth (and final) method entails using document properties. Most Word users know that Word maintains a series of properties for your documents. These properties include things like the size of the document, the last time it was updated, and the like. You can also define custom properties that act like variables for your document. To define a custom property, follow these steps:

Figure 1. The Custom tab of the Properties dialog box.
Now you are ready to use the new document property within your document. You do this in much the same way as you use bookmarks and AutoText entries for this same purpose.
WordTips is your source for cost-effective Microsoft Word training. (Microsoft Word is the most popular word processing software in the world.) This tip (15) applies to Microsoft Word 97, 2000, 2002, and 2003.

Discover the Power of Microsoft Office This beginner-friendly guide reveals the expert tips and strategies you need to skyrocket your productivity and use Office 365 like a pro. Mastering software like Word, Excel, and PowerPoint is essential to be more efficient and advance your career. Simple lessons guide you through every step, providing the knowledge you need to get started. Check out Microsoft Office 365 For Beginners today!
Word can do some simple calculations for you, if you add a little-known tool to your toolbar. Here's how to add and use ...
Discover MoreHow to get around Word's AutoCorrect feature for having uncapitalized words at the start of a sentence.
Discover MoreWhen getting rid of text from your document, Word allows you to delete, clear, or cut. Here are the differences between ...
Discover MoreFREE SERVICE: Get tips like this every week in WordTips, a free productivity newsletter. Enter your address and click "Subscribe."
There are currently no comments for this tip. (Be the first to leave your comment—just use the simple form above!)
Got a version of Word that uses the menu interface (Word 97, Word 2000, Word 2002, or Word 2003)? This site is for you! If you use a later version of Word, visit our WordTips site focusing on the ribbon interface.
Visit the WordTips channel on YouTube
FREE SERVICE: Get tips like this every week in WordTips, a free productivity newsletter. Enter your address and click "Subscribe."
Copyright © 2026 Sharon Parq Associates, Inc.
Comments