Written by Allen Wyatt (last updated March 5, 2020)
This tip applies to Word 97, 2000, 2002, and 2003
If you teach other people how to use Word, it is not unusual to prepare sample documents that your students can use while learning. If you need to teach them how to work with macros, you may even attach some sample macros to the documents you prepare for them. This is easy enough to do, but making it so your students can utilize the macros in the documents may not be so easy.
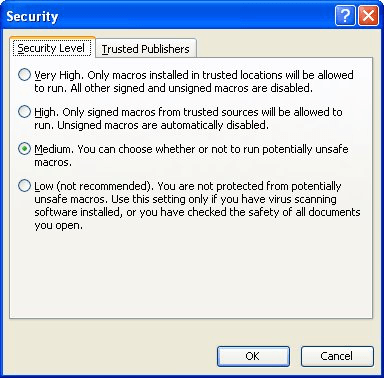
When the student opens your sample document (with sample macros attached), he or she may see a message indicating that the macros have been disabled. This behavior is normal for Word, and there is no way to disable it from within the macro or the document itself. The behavior is controlled by the security settings on the student's machine. Your student can check these settings in this manner:

Figure 1. The Security Level tab of the Security dialog box.
Notice that there are three or four possible settings on the tab depending on your version of Word: Low, Medium, High, and Very High. If High or Very High are selected, then any macros attached to a document are automatically disabled, and your students won't be able to use your sample macros. The solution, then, is for your students to choose either the Medium or Low setting. The problem with choosing these lower settings, of course, is that there is a greater risk that the student could inadvertently load a document that contains malicious macro code. (Not your sample document, of course, but perhaps from a downloaded document or a friend's document.)
In some networked environments that have strong security measures in place, the student may not be able to change the security settings in Word. Instead, your network administrator may need to make the changes. This could take some negotiation on your part, as instructor, to see if you can get the settings changed.
Another possible solution is to place your sample macros in a template that is accessible to all the students through a network folder. Once in the template, then your students can create a document based on that template, and the macros should be available.
Perhaps the best solution, however, is to find a way to digitally sign your macros so that they are "trusted." If Word believes that macros are from a trusted source, it will load them automatically, even if the student has their security setting on High. Information on how to do this is quite involved. A good place to start looking for information is in the Word online Help system. Do a search for "Security Levels in Word."
Note:
WordTips is your source for cost-effective Microsoft Word training. (Microsoft Word is the most popular word processing software in the world.) This tip (578) applies to Microsoft Word 97, 2000, 2002, and 2003.

Do More in Less Time! An easy-to-understand guide to the more advanced features available in the Microsoft 365 version of Word. Enhance the quality of your documents and boost productivity in any field with this in-depth resource. Complete your Word-related tasks more efficiently as you unlock lesser-known tools and learn to quickly access the features you need. Check out Microsoft 365 Word For Professionals For Dummies today!
Macros are part of the document and template that are loaded into memory when you open a file. If you have "junk" macros ...
Discover MoreDid you recently upgrade from Word 97 to a later version of Word, only to find that your macros no longer work? Here's ...
Discover MorePart of documenting macros is to provide a good, succinct description of what they do. Changing the description of an ...
Discover MoreFREE SERVICE: Get tips like this every week in WordTips, a free productivity newsletter. Enter your address and click "Subscribe."
There are currently no comments for this tip. (Be the first to leave your comment—just use the simple form above!)
Got a version of Word that uses the menu interface (Word 97, Word 2000, Word 2002, or Word 2003)? This site is for you! If you use a later version of Word, visit our WordTips site focusing on the ribbon interface.
Visit the WordTips channel on YouTube
FREE SERVICE: Get tips like this every week in WordTips, a free productivity newsletter. Enter your address and click "Subscribe."
Copyright © 2026 Sharon Parq Associates, Inc.
Comments