Please Note: This article is written for users of the following Microsoft Word versions: 97, 2000, 2002, and 2003. If you are using a later version (Word 2007 or later), this tip may not work for you. For a version of this tip written specifically for later versions of Word, click here: Printing Index Field Codes.
Written by Allen Wyatt (last updated March 25, 2023)
This tip applies to Word 97, 2000, 2002, and 2003
Jim is creating an index for his document, which obviously involves inserting XE field codes throughout the document. He wonders if there is a way to print text that includes the XE codes on the printed pages. Even with "print field codes instead of their values" turned on, those codes, which do display on-screen, do not show when he prints a page of text. Printing them would be a quick and valuable way for Jim to proof his document for the completeness and accuracy of indexing.
The reason you cannot see the XE codes on your printouts is because they are formatted, automatically by Word, as hidden text. Take a look at the codes, as they are visible on the screen. You should see that there is a small, dotted underline under the field code. This indicates that the hidden attribute is applied.
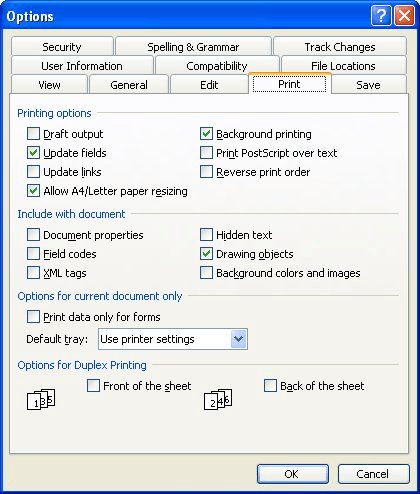
Word allows you to control the printing and viewing of hidden text independent of each other. Thus, you can see the XE codes on the screen, but unless you enable the printing of hidden text, you won't be able to see them on a printout. Here's how to turn on the printing of hidden text:

Figure 1. The Print tab of the Options dialog box.
That's it; if you now print your document with fields codes turned on, you should see the XE field codes on the printout.
WordTips is your source for cost-effective Microsoft Word training. (Microsoft Word is the most popular word processing software in the world.) This tip (12490) applies to Microsoft Word 97, 2000, 2002, and 2003. You can find a version of this tip for the ribbon interface of Word (Word 2007 and later) here: Printing Index Field Codes.

Discover the Power of Microsoft Office This beginner-friendly guide reveals the expert tips and strategies you need to skyrocket your productivity and use Office 365 like a pro. Mastering software like Word, Excel, and PowerPoint is essential to be more efficient and advance your career. Simple lessons guide you through every step, providing the knowledge you need to get started. Check out Microsoft Office 365 For Beginners today!
Word keeps track of each time you print your document, and you can automatically insert the last printing date anywhere ...
Discover MorePeople don't normally think of using fields to do any calculations. Even so, you can use fields to perform a simple ...
Discover MoreAutomatically putting today's date at the top of a report is easy. Putting a different date, automatically, can be more ...
Discover MoreFREE SERVICE: Get tips like this every week in WordTips, a free productivity newsletter. Enter your address and click "Subscribe."
There are currently no comments for this tip. (Be the first to leave your comment—just use the simple form above!)
Got a version of Word that uses the menu interface (Word 97, Word 2000, Word 2002, or Word 2003)? This site is for you! If you use a later version of Word, visit our WordTips site focusing on the ribbon interface.
Visit the WordTips channel on YouTube
FREE SERVICE: Get tips like this every week in WordTips, a free productivity newsletter. Enter your address and click "Subscribe."
Copyright © 2026 Sharon Parq Associates, Inc.
Comments