Please Note: This article is written for users of the following Microsoft Word versions: 97, 2000, 2002, and 2003. If you are using a later version (Word 2007 or later), this tip may not work for you. For a version of this tip written specifically for later versions of Word, click here: Blocking the First Sentence from File Info.
Suppose you want to type a Word document and save it, password protected. Suppose further that you intended the first sentence to capture the intended reader's attention, but you didn't want the entire world to read it.
You chose "Save As" so that you could use the Tools dropdown and the Security Options to set a password. You notice that most of your inflammatory first sentence has been placed into the filename field by default as Word always does, so you highlight the incriminating phrase and gave your document a new, innocuous name. You save it to the desktop.
Now minimize all windows and go to the desktop. Hover the mouse pointer over the icon for your new file. Up pops a window that shows the type, author and size, and, for good measure, right there in plain text for the world to see, most of the first sentence of your document—no password required!
What you are actually seeing when you hover the mouse over the icon is the document's title. This title is displayed automatically, unless you have an older version of Windows that doesn't display information balloons about files. While you can hack the Windows registry to turn off the balloons, it is easier to just get rid of the title within Word. Follow these steps:
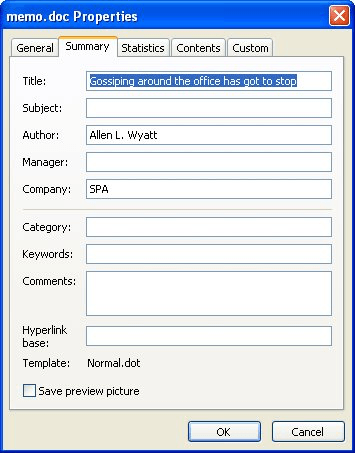
Figure 1. The Summary tab of the Properties dialog box.
The Title property is set automatically when you first save a document. Word puts the initial document text (up to the first punctuation mark) in the Title property, and uses the same text as a suggested file name. Changing the file name when you save the document does not result in the Title property being changed; you must do is separately, as described above.
So that you don't forget to change the Title property when first saving a document, it is a good idea to configure Word to prompt you for the properties. Here are the steps:
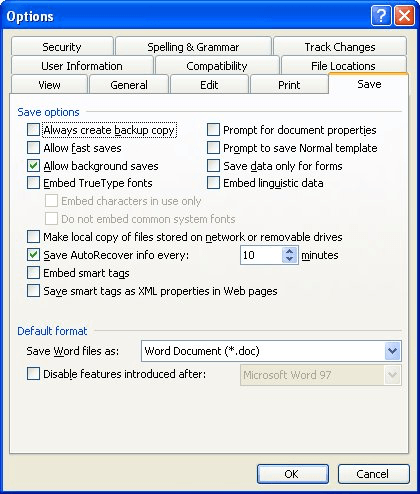
Figure 2. The Save tab of the Options dialog box.
WordTips is your source for cost-effective Microsoft Word training. (Microsoft Word is the most popular word processing software in the world.) This tip (3911) applies to Microsoft Word 97, 2000, 2002, and 2003. You can find a version of this tip for the ribbon interface of Word (Word 2007 and later) here: Blocking the First Sentence from File Info.

Create Custom Apps with VBA! Discover how to extend the capabilities of Office 365 applications with VBA programming. Written in clear terms and understandable language, the book includes systematic tutorials and contains both intermediate and advanced content for experienced VB developers. Designed to be comprehensive, the book addresses not just one Office application, but the entire Office suite. Check out Mastering VBA for Microsoft Office 365 today!
Many companies (and some individuals) use specific formats for naming their documents. If you want Word to recognize your ...
Discover MoreNeed to force users to save their work? It may be as simple as implementing a couple of macros that get a bit more ...
Discover MoreAfter using Word for a while, it is easy to accumulate quite a few documents. At some point you may want to make a change ...
Discover MoreFREE SERVICE: Get tips like this every week in WordTips, a free productivity newsletter. Enter your address and click "Subscribe."
There are currently no comments for this tip. (Be the first to leave your comment—just use the simple form above!)
Got a version of Word that uses the menu interface (Word 97, Word 2000, Word 2002, or Word 2003)? This site is for you! If you use a later version of Word, visit our WordTips site focusing on the ribbon interface.
Visit the WordTips channel on YouTube

FREE SERVICE: Get tips like this every week in WordTips, a free productivity newsletter. Enter your address and click "Subscribe."
Copyright © 2026 Sharon Parq Associates, Inc.
 Please Note:
This article is written for users of the following Microsoft Word versions: 97, 2000, 2002, and 2003. If you are using a later version (Word 2007 or later), this tip may not work for you. For a version of this tip written specifically for later versions of Word, click here:
Please Note:
This article is written for users of the following Microsoft Word versions: 97, 2000, 2002, and 2003. If you are using a later version (Word 2007 or later), this tip may not work for you. For a version of this tip written specifically for later versions of Word, click here:
Comments