Please Note: This article is written for users of the following Microsoft Word versions: 97, 2000, 2002, and 2003. If you are using a later version (Word 2007 or later), this tip may not work for you. For a version of this tip written specifically for later versions of Word, click here: Stop Graphics and Text from Jumping Around.

Stopping Text from Jumping Around

Written by Allen Wyatt (last updated August 11, 2018)
This tip applies to Word 97, 2000, 2002, and 2003


Deborah had some problems with an AutoShape (a block arrow) placed behind the text of a table with rows of fixed width. When Deborah would try to nudge the arrow into position, the text would jump around, even after setting the Wrapping Style for the AutoShape to Behind Text.

The first thing to check, of course, is that the wrapping style didn't somehow get inadvertently changed. Select the block arrow, then choose Format | AutoShape | Layout | Behind Text. If this is the setting that was already made, then the next thing to check is where the AutoShape is anchored. Follow these steps:

  1. Choose Options from the Tools menu. Word displays the Options dialog box.
  2. Make sure the View tab is selected.
  3. Select the Object Anchors check box.
  4. Click on OK.
  5. In Print Layout view, select the AutoShape (the block arrow). The object anchor for the AutoShape should appear—it looks like an anchor.
  6. Click on the object anchor—not the actual block arrow—and move the anchor until it is located to the left of a paragraph that will remain constant in the document. A good choice would be to place it to the left of the paragraph just before the table or just after the table, depending on which one will be on the same page as the table.
  7. Choose the AutoShape option from the Format menu. Word displays the Format AutoShape dialog box.
  8. Make sure the Position tab is selected. If there is no Position tab in your version of Word, display the Layout tab, and then click on Advanced. Word displays the Advanced Layout dialog box. (See Figure 1.)
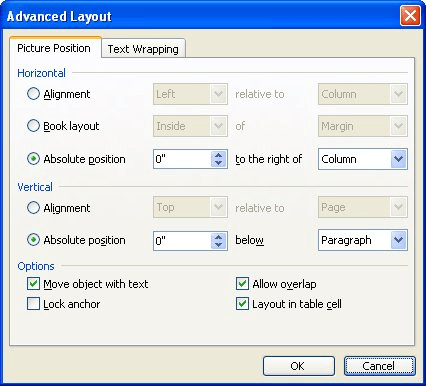
  9. Figure 1. The Advanced Layout dialog box.

  10. Make sure the Move Object With Text check box is selected.
  11. Make sure the Lock Anchor check box is selected.
  12. Make sure the Allow Overlap check box is selected.
  13. If you are working in the Advanced Layout dialog box, click on OK to dismiss it.
  14. Click on OK to close the Format AutoShape dialog box.

At this point you should still see the object anchor, but a little padlock appears next to it to indicate that it is locked. Now you should be able to adjust the positioning of the block arrow itself without your text jumping around.

WordTips is your source for cost-effective Microsoft Word training. (Microsoft Word is the most popular word processing software in the world.) This tip (1649) applies to Microsoft Word 97, 2000, 2002, and 2003. You can find a version of this tip for the ribbon interface of Word (Word 2007 and later) here: Stop Graphics and Text from Jumping Around.

Author Bio

Allen Wyatt

With more than 50 non-fiction books and numerous magazine articles to his credit, Allen Wyatt is an internationally recognized author. He is president of Sharon Parq Associates, a computer and publishing services company. ...

MORE FROM ALLEN

Header and Footer Formatting Codes

When creating headers and footers in an Excel worksheet, you can use special codes to add or format information. This tip ...

Discover More

Moving from Sheet to Sheet

Need to move quickly through the worksheets in a workbook? Learn the keyboard shortcuts and you can make short work of ...

Discover More

Repeating Actions

Need to repeat an action a whole bunch of times? You can do it a time or two using keyboard shortcuts, but you'll need a ...

Discover More

Learning Made Easy! Quickly teach yourself how to format, publish, and share your content using Word 2021 or Microsoft 365. With Step by Step, you set the pace, building and practicing the skills you need, just when you need them! Check out Microsoft Word Step by Step today!

More WordTips (menu)

Selecting Drawing Objects

Word allows you to create all sorts of drawings using a wide assortment of tools. When you need to take an action upon ...

Discover More

Moving Drawing Objects

When you need to move a drawing object around your document, you use the mouse after you select the object. This tip ...

Discover More

Using the Drawing Grid

One of the lesser-known drawing tools provided in Word is the drawing grid. You can easily turn this feature on and use ...

Discover More
Subscribe

FREE SERVICE: Get tips like this every week in WordTips, a free productivity newsletter. Enter your address and click "Subscribe."

View most recent newsletter.

Comments

If you would like to add an image to your comment (not an avatar, but an image to help in making the point of your comment), include the characters [{fig}] (all 7 characters, in the sequence shown) in your comment text. You’ll be prompted to upload your image when you submit the comment. Maximum image size is 6Mpixels. Images larger than 600px wide or 1000px tall will be reduced. Up to three images may be included in a comment. All images are subject to review. Commenting privileges may be curtailed if inappropriate images are posted.

What is seven less than 8?

There are currently no comments for this tip. (Be the first to leave your comment—just use the simple form above!)


This Site

Got a version of Word that uses the menu interface (Word 97, Word 2000, Word 2002, or Word 2003)? This site is for you! If you use a later version of Word, visit our WordTips site focusing on the ribbon interface.

Videos
Subscribe

FREE SERVICE: Get tips like this every week in WordTips, a free productivity newsletter. Enter your address and click "Subscribe."

(Your e-mail address is not shared with anyone, ever.)

View the most recent newsletter.