Please Note: This article is written for users of the following Microsoft Word versions: 97, 2000, 2002, and 2003. If you are using a later version (Word 2007 or later), this tip may not work for you. For a version of this tip written specifically for later versions of Word, click here: Retaining Explicit Formatting after Applying Styles.
Written by Allen Wyatt (last updated July 28, 2022)
This tip applies to Word 97, 2000, 2002, and 2003
I often get documents that have a hodgepodge of styles, and I need to format them in addition to editing them. When I click in a paragraph and apply a paragraph style, Word is not supposed to wipe out any explicit character formatting in the paragraph, such as italics. Sometimes it does and sometimes it doesn't; this probably has something to do with the way the documents were put together, and over which I have no control.
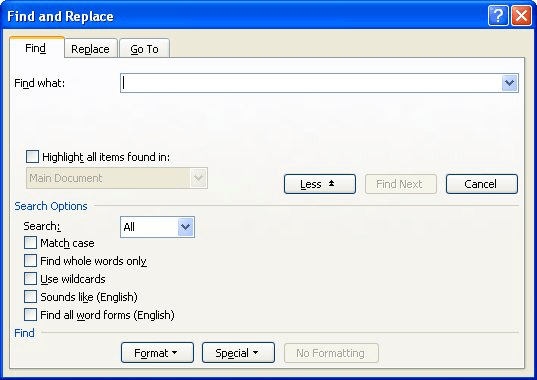
This led me to search for a way to preserve any italics within the paragraphs. I came up with the following general steps:

Figure 1. The Find tab of the Find and Replace dialog box.
At this point you can click the Italics button on the Formatting toolbar until all the selected text is shown in italics. You can then click the Highlight tool, again, which removes all the highlighting.
WordTips is your source for cost-effective Microsoft Word training. (Microsoft Word is the most popular word processing software in the world.) This tip (359) applies to Microsoft Word 97, 2000, 2002, and 2003. You can find a version of this tip for the ribbon interface of Word (Word 2007 and later) here: Retaining Explicit Formatting after Applying Styles.

Do More in Less Time! An easy-to-understand guide to the more advanced features available in the Microsoft 365 version of Word. Enhance the quality of your documents and boost productivity in any field with this in-depth resource. Complete your Word-related tasks more efficiently as you unlock lesser-known tools and learn to quickly access the features you need. Check out Microsoft 365 Word For Professionals For Dummies today!
You can use the Find and Replace capabilities of Word to search for a wide variety of information. One thing you can look ...
Discover MoreIf you use hanging indents for some of your paragraphs, you may wonder why they don't look right when they wrap on the ...
Discover MoreThere is no need to press Enter a second time at the end of each paragraph. Let Word take care of the spacing ...
Discover MoreFREE SERVICE: Get tips like this every week in WordTips, a free productivity newsletter. Enter your address and click "Subscribe."
2019-11-08 13:27:51
Liam Hickey
Allen, great site! Thanks for what you do for all of us.
The Format Painter has an unseen (and quicker) way of doing what you are talking about above. Click the Format Painter, then click *right in front of the first letter* of a paragraph you want to change. It will apply the style while retaining the bold, italics, etc. There are also a keyboard shortcuts for the Format Painter that keep the desired style (like double clicking the Format Painter icon) while allowing you to use your cursor for other things. Those keyboard shortcuts Ctrl+Shift+C to activate the Format Painter and Ctrl+Shift+V to apply the style.
HTH!
2015-12-24 19:14:22
Sdixit
I have word 2000. It was working fine till two days back, then suddenly I got the message ' information required in registry is missing, so the application is terminated, run setup. I then right clicked word icon and ran the word as an administrator. It is a home computer so there is no administrator. When I clicked run as an administrator it opened Winword.exe and asked whether we will allow it to make changes to our computer, since there was no other alternative, I clicked OK. It then oened the word and I was able to use it. But evertime I need to run Word I have to run it as an administrator. There is one more problem. I need to uncheck a lot of checked boxes in Autoformat and Autoformat while typing, spelling check etc. If I make those changes they remain there as long as I do not close word. If I close word and open it again, all those changes go away. I have to make the changes again. I never had to do that till two days back. Once changes were made they remained in the Word. I could close the Word open new document, the changes would still be there. Not anymore. Why is this happening?
Got a version of Word that uses the menu interface (Word 97, Word 2000, Word 2002, or Word 2003)? This site is for you! If you use a later version of Word, visit our WordTips site focusing on the ribbon interface.
Visit the WordTips channel on YouTube
FREE SERVICE: Get tips like this every week in WordTips, a free productivity newsletter. Enter your address and click "Subscribe."
Copyright © 2026 Sharon Parq Associates, Inc.
Comments