Please Note: This article is written for users of the following Microsoft Word versions: 97, 2000, 2002, and 2003. If you are using a later version (Word 2007 or later), this tip may not work for you. For a version of this tip written specifically for later versions of Word, click here: Making Pictures Show in Word.
Have you ever placed a picture in your Word document, only to have the picture not be visible when you are later working in the document? This seems to be a common occurrence, and there are several reasons for this.
Word implements what is called a "layered" approach to documents. Each document has several different layers. You are probably most familiar with the text layer, in which your text actually resides. There are two other layers, as well. First is the header/footer layer, which contains both the header and footer information that appears on every page in your final document. The other layer is the drawing layer, which contains graphic objects.
In reality, text can appear in all three layers of your document. For instance, headers and footers are composed primarily of text, text obviously appears in the text layer, and text boxes can appear in the graphics layer.
Similarly, graphics can appear on all three layers. People don't normally place graphics on the header/footer layer, but they can. Graphics are much more common on both the text layer and the graphics layer. If you place an inline graphic in your document, it is on the text layer; if you place a floating graphic in your document, it is on the graphics layer.
What does this discussion about layers have to do with whether pictures show up in Word? There are a number of ways to view your document, each accessible from the menus or by clicking on one of the View buttons in the lower-left corner of your screen. Most people do their writing and editing in Normal or Print Layout views. If you are using Normal view, Word displays only the contents of the text layer of your document. Thus, any pictures residing in the header/footer layer or, more commonly, on the drawing layer are not visible. In order to see the pictures on these other layers, you need to switch to Print Layout view. Of course, some pictures are visible when working on your document in Normal view. Why? Because some pictures—inline pictures—are stored on the text layer, and this is the layer being displayed.
You can switch a drawing from the drawing layer to the text layer (or vice versa) by changing whether it is floating or inline. You do that by following these steps:
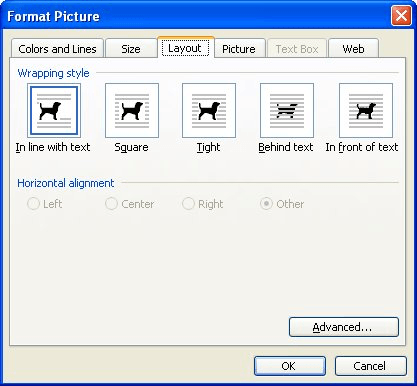
Figure 1. The Layout tab of the Format Picture dialog box.
Note that you can switch a drawing to the text layer (make it In Line with Text) only if it is a picture that you placed in your document. If it is a graphic object that you created with the Drawing toolbar, you cannot do this; the In Line with Text option is not available. Graphic objects such as these can only reside on the drawing layer. This is why Word switches to Print Layout view whenever you choose to insert drawing objects in your document—it knows that these are only visible in Print Layout view.
Despite the foregoing explanation, there are other settings in Word that can affect the visibility of graphics in a document. If you cannot see a drawing that you believe should be visible, you may want to check these:
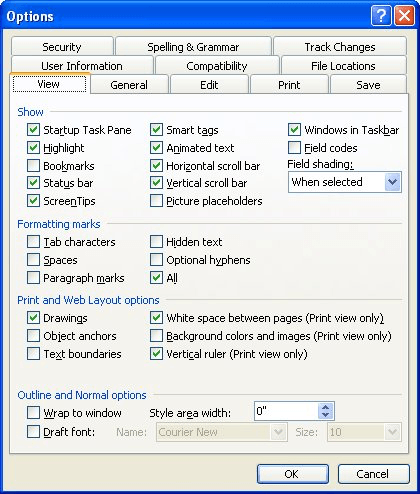
Figure 2. The View tab of the Options dialog box.
Another thing to remember is that Word treats different types of graphics differently when displaying them. For instance, if you are placing an EPS graphic in your document, and the graphic was not saved with a "preview," then Word won't display it, but will instead display a gray box that shows where the graphic will print. This type of behavior illustrates that graphic filters can affect what you see in a document.
You must also have the proper graphic filters installed in Word (depending on your version) in order to display different types of graphics, but it is not always necessary to have a graphic filter installed to insert a graphic you're your document. This may sound confusing, but according to the Word Help system for some versions of Word, this is exactly the case when it comes to JPG files. It states that you "must have the JPEG filter installed to insert a .jpg file into a Word document as a Microsoft Clip Gallery object or a Photo Editor object. However, to insert a .jpg file directly into a Word document, you don't need the JPEG filter." This means that some JPG files require the filter, and others don't. (Go figure.) The best solution is to simply make sure you have the JPG filters installed, along with filters for all the graphic formats you will be using.
WordTips is your source for cost-effective Microsoft Word training. (Microsoft Word is the most popular word processing software in the world.) This tip (54) applies to Microsoft Word 97, 2000, 2002, and 2003. You can find a version of this tip for the ribbon interface of Word (Word 2007 and later) here: Making Pictures Show in Word.

Do More in Less Time! An easy-to-understand guide to the more advanced features available in the Microsoft 365 version of Word. Enhance the quality of your documents and boost productivity in any field with this in-depth resource. Complete your Word-related tasks more efficiently as you unlock lesser-known tools and learn to quickly access the features you need. Check out Microsoft 365 Word For Professionals For Dummies today!
Drawing objects can be placed in a document in such a way that they overlap with each other. If you want to arrange those ...
Discover MoreWhen positioning images in a document, you may want them to appear behind text, so that the text shows up over the top of ...
Discover MoreWorking with a single document is easy. Working with thousands of documents becomes much harder. If you need to get rid ...
Discover MoreFREE SERVICE: Get tips like this every week in WordTips, a free productivity newsletter. Enter your address and click "Subscribe."
There are currently no comments for this tip. (Be the first to leave your comment—just use the simple form above!)
Got a version of Word that uses the menu interface (Word 97, Word 2000, Word 2002, or Word 2003)? This site is for you! If you use a later version of Word, visit our WordTips site focusing on the ribbon interface.
Visit the WordTips channel on YouTube

FREE SERVICE: Get tips like this every week in WordTips, a free productivity newsletter. Enter your address and click "Subscribe."
Copyright © 2026 Sharon Parq Associates, Inc.
 Please Note:
This article is written for users of the following Microsoft Word versions: 97, 2000, 2002, and 2003. If you are using a later version (Word 2007 or later), this tip may not work for you. For a version of this tip written specifically for later versions of Word, click here:
Please Note:
This article is written for users of the following Microsoft Word versions: 97, 2000, 2002, and 2003. If you are using a later version (Word 2007 or later), this tip may not work for you. For a version of this tip written specifically for later versions of Word, click here:
Comments