
Please Note: This article is written for users of the following Microsoft Word versions: 97, 2000, 2002, and 2003. If you are using a later version (Word 2007 or later), this tip may not work for you. For a version of this tip written specifically for later versions of Word, click here: Working with Form Fields.
The easiest way to insert fields in a form is to use the Forms toolbar. You display this toolbar by choosing the Toolbars option from the View menu, and making sure the Forms check box is selected. There are three types of form fields that you can insert in a document: text, pull-down, and check box. Each of these form fields allows the user of the form to select or enter information of the type that you deem appropriate.
As an example, let's say you are creating an order form and you need a field where a user can enter the name of the person making the order. Further, you want to allow only up to 25 characters to be entered in the field. To accomplish this, follow these steps:
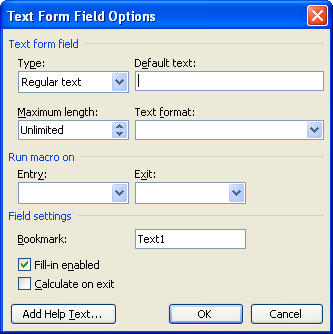
Figure 1. The Text Form Field Options dialog box.
You can repeat these steps for all the fields in your form. The only difference would be the type of field entered (which should be appropriate to the type of information you want entered) and the options you set for each field.
The trickiest option you can set is the Maximum Length option, which only appears when you are working with text fields. By default, this option is set to Unlimited, which means the user can enter any amount of information desired. If the information being entered exceeds the right margin of your document, the field height increases and the text entry continues on the next line. If you don't want this effect in your form, then the only way around it is to set some maximum length for the field. For instance, if you don't want your field to wrap to the next line, then you need to set a maximum length which is guaranteed to fit on a single line. Calculating such a length can be difficult, particularly if you are using a proportional font. For this reason, some people like to set the font of their fields to a monospace font (such as Courier) which makes calculating field lengths easier.
One way around the potential "overrun" problem is to create a table to contain your form fields. The advantage to this is that you can define the width and height of every cell in your table, which limits the vertical movement of text fields if they should be too long. The disadvantage is that some information is not readily displayed in tabular format, and if the entered text is too long, it is not all displayed on the screen or printout. (If the text overruns the size of a static table cell, the additional information is suppressed.
As you set the options for your various fields, notice that you can also define macros which can be executed when the field is entered (first selected) and when it is exited. These allow you to process the information provided in the field.
When a form is being used, the information entered into a field is assigned to a bookmark name. This name is specified in the Options dialog box for each field. Through the use of other bookmark-related fields, you can thus reference field contents elsewhere in your document.
WordTips is your source for cost-effective Microsoft Word training. (Microsoft Word is the most popular word processing software in the world.) This tip (1011) applies to Microsoft Word 97, 2000, 2002, and 2003. You can find a version of this tip for the ribbon interface of Word (Word 2007 and later) here: Working with Form Fields.

Create Custom Apps with VBA! Discover how to extend the capabilities of Office 365 applications with VBA programming. Written in clear terms and understandable language, the book includes systematic tutorials and contains both intermediate and advanced content for experienced VB developers. Designed to be comprehensive, the book addresses not just one Office application, but the entire Office suite. Check out Mastering VBA for Microsoft Office 365 today!
Word doesn't require you to protect entire documents. Instead, you can protect different sections within a document, as ...
Discover MoreWhen entering information into protected form fields, Word doesn't apply the formatting inherent in the AutoFormat As You ...
Discover MoreIf you have ever created several documents that contain the same basic information with only a few minor differences, ...
Discover MoreFREE SERVICE: Get tips like this every week in WordTips, a free productivity newsletter. Enter your address and click "Subscribe."
There are currently no comments for this tip. (Be the first to leave your comment—just use the simple form above!)
Got a version of Word that uses the menu interface (Word 97, Word 2000, Word 2002, or Word 2003)? This site is for you! If you use a later version of Word, visit our WordTips site focusing on the ribbon interface.
Visit the WordTips channel on YouTube

FREE SERVICE: Get tips like this every week in WordTips, a free productivity newsletter. Enter your address and click "Subscribe."
Copyright © 2026 Sharon Parq Associates, Inc.
 Please Note:
This article is written for users of the following Microsoft Word versions: 97, 2000, 2002, and 2003. If you are using a later version (Word 2007 or later), this tip may not work for you. For a version of this tip written specifically for later versions of Word, click here:
Please Note:
This article is written for users of the following Microsoft Word versions: 97, 2000, 2002, and 2003. If you are using a later version (Word 2007 or later), this tip may not work for you. For a version of this tip written specifically for later versions of Word, click here: 
Comments