Please Note: This article is written for users of the following Microsoft Word versions: 97, 2000, 2002, and 2003. If you are using a later version (Word 2007 or later), this tip may not work for you. For a version of this tip written specifically for later versions of Word, click here: Changing the Return Address Location.

Changing the Return Address Location

Written by Allen Wyatt (last updated July 8, 2023)
This tip applies to Word 97, 2000, 2002, and 2003


Word includes an Envelopes feature that makes it pretty easy to create your own professional-looking envelopes. The feature makes certain assumptions about where different parts of the envelope should be printed, but what if you want to change the positioning of the return address?

The Envelopes and Labels tool in Word depends on a predefined style when creating an envelope. The style used for the return address, appropriately enough, is named Envelope Return. When you click on either the Print or Add to Document buttons in the Envelopes and Labels dialog box, this style is grabbed and used for the return address area itself.

The style is defined to use a frame, and that frame is defined to appear at a very specific location on the envelope. If you want to change where the return address appears, simply change where the frame is defined to appear. To do this, use these steps if you are using Word 2002 or Word 2003:
  1. Click on the New tool on the toolbar to open a new document based on the Normal.dot template. (If you want to fix this problem in other templates, you should open the template directly or create a blank document based on that template.)
  2. Choose Styles and Formatting from the Format menu. Word displays the Styles and Formatting task pane.
  3. In the Show drop-down list at the bottom of the dialog box, make sure you select All Styles.
  4. Scroll through the list of styles until you see the Envelope Return style.
  5. Hover the mouse pointer over the style name, and then click on the down-arrow that appears at the right side of the style name. A drop-down menu appears.
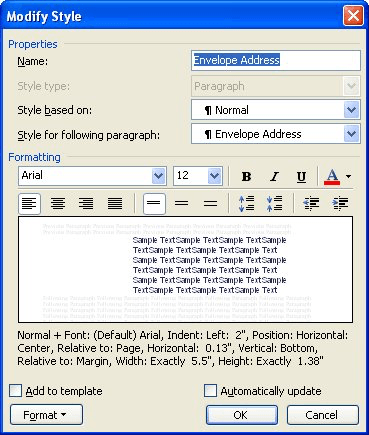
  6. Click on Modify. Word displays the Modify Style dialog box. (See Figure 1.)
  7. Figure 1. The Modify Style dialog box.
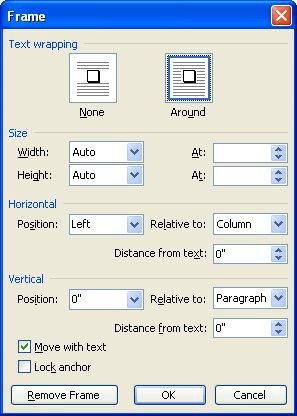
  8. Click on the Format button and choose Frame. This displays the Frame dialog box. (See Figure 2.)
  9. Figure 2. The Frame dialog box.

  10. Adjust the information in the Horizontal and Vertical areas of the dialog box to reflect the position you want for the return address. (Hint: Try setting Relative To equal to Page, and then typing values in the Position controls.)
  11. Click on OK to close the Frame dialog box.
  12. Make sure the Add to Template check box is selected, at the bottom of the Modify Style dialog box.
  13. Click on OK.
  14. Close the Styles and Formatting task pane.

If you are using Word 97 or Word 2000 the steps are a bit different:

  1. Click on the New tool on the toolbar to open a new document based on the Normal.dot template. (If you want to fix this problem in other templates, you should open the template directly or create a blank document based on that template.)
  2. Choose the Style option from the Format menu. This displays the Style dialog box.
  3. In the List drop-down list at the bottom of the dialog box, make sure you select All Styles.
  4. In the list of styles, select Envelope Return.
  5. Click on Modify. Word displays the Modify Style dialog box.
  6. Click on the Format button and choose Frame. This displays the Frame dialog box.
  7. Adjust the information in the Horizontal and Vertical areas of the dialog box to reflect the position you want for the return address. (Hint: Try setting Relative To equal to Page, and then typing values in the Position controls.)
  8. Click on OK to close the Frame dialog box.
  9. Make sure the Add to Template check box is selected, at the bottom of the Modify Style dialog box.
  10. Click on OK.
  11. Click on Cancel to close the Style dialog box.

Now, when you save your document or close Word, you are asked if you want to save your changes to the template. Make sure you do this. Your envelopes, when created in a document that uses this template, should now have your return address exactly where you specified.

WordTips is your source for cost-effective Microsoft Word training. (Microsoft Word is the most popular word processing software in the world.) This tip (898) applies to Microsoft Word 97, 2000, 2002, and 2003. You can find a version of this tip for the ribbon interface of Word (Word 2007 and later) here: Changing the Return Address Location.

Author Bio

Allen Wyatt

With more than 50 non-fiction books and numerous magazine articles to his credit, Allen Wyatt is an internationally recognized author. He is president of Sharon Parq Associates, a computer and publishing services company. ...

MORE FROM ALLEN

Discovering Where Word Stores Settings

How to find your setting information in Word.

Discover More

Condensing Figure Caption References

Word can automatically add captions to your figures. You can then reference those captions from within your document. If ...

Discover More

Sorting a Range of Cells

When you sort data in a worksheet, you don't need to sort everything at once. You can sort just a portion of your data by ...

Discover More

Create Custom Apps with VBA! Discover how to extend the capabilities of Office 2013 (Word, Excel, PowerPoint, Outlook, and Access) with VBA programming, using it for writing macros, automating Office applications, and creating custom applications. Check out Mastering VBA for Office 2013 today!

More WordTips (menu)

Delivery Address Won't Print on Envelopes

Word includes a feature that allows you to easily create and print envelopes, based on the addresses you insert in your ...

Discover More

Multiple Envelopes in One Document

Want to save a bunch of envelopes in a single document so that you can print them all out as a group? Here's how to ...

Discover More

Setting the Return Address Used in Word

When you create envelopes with Word, it normally displays a return address by default. If you can't get Word to retain ...

Discover More
Subscribe

FREE SERVICE: Get tips like this every week in WordTips, a free productivity newsletter. Enter your address and click "Subscribe."

View most recent newsletter.

Comments

If you would like to add an image to your comment (not an avatar, but an image to help in making the point of your comment), include the characters [{fig}] (all 7 characters, in the sequence shown) in your comment text. You’ll be prompted to upload your image when you submit the comment. Maximum image size is 6Mpixels. Images larger than 600px wide or 1000px tall will be reduced. Up to three images may be included in a comment. All images are subject to review. Commenting privileges may be curtailed if inappropriate images are posted.

What is 4 - 1?

There are currently no comments for this tip. (Be the first to leave your comment—just use the simple form above!)


This Site

Got a version of Word that uses the menu interface (Word 97, Word 2000, Word 2002, or Word 2003)? This site is for you! If you use a later version of Word, visit our WordTips site focusing on the ribbon interface.

Videos
Subscribe

FREE SERVICE: Get tips like this every week in WordTips, a free productivity newsletter. Enter your address and click "Subscribe."

(Your e-mail address is not shared with anyone, ever.)

View the most recent newsletter.