Please Note: This article is written for users of the following Microsoft Word versions: 97, 2000, 2002, and 2003. If you are using a later version (Word 2007 or later), this tip may not work for you. For a version of this tip written specifically for later versions of Word, click here: Preventing Styles from Changing.
Written by Allen Wyatt (last updated June 25, 2018)
This tip applies to Word 97, 2000, 2002, and 2003
Don has run into a problem in his office regarding styles. It seems that when there are multiple authors using a single document, the styles sometimes change unexpectedly. If Don saves a file with certain styles in place and someone else with access to the server opens and saves the same file, then when Don subsequently opens the file, invariably the style definitions have changed.
There are a couple of things to check when this happens. First of all, you need to check to make sure that all users have dynamic style updating turned off. This feature of Word causes changes to a style definition when someone applies an explicit formatting change to something in the document. Thus, with the feature turned on, if someone makes a change to an individual paragraph, the change is also applied to the underlying style, which in turn affects every other paragraph in the document that uses that style. To turn this feature off, all of the users will need to perform these steps if you are using Word 97 or Word 2000:
If you are using Word 2002 or Word 2003, the steps are different:
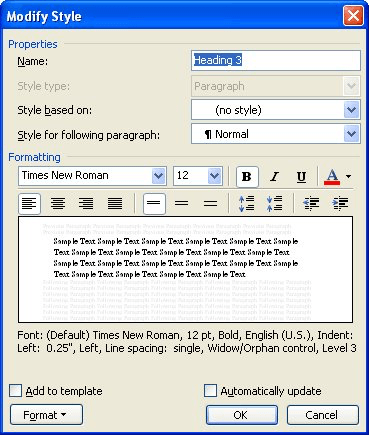
Figure 1. The Modify Style dialog box.
Notice that these steps affect only a single style in a document. That's right—Word allows dynamic style updating to be set on a style-by-style basis. This means that you will need to go through each and every style in your document and follow these same steps. That can obviously get rather tedious if you have a lot of styles in the document. In that case, you may want to use a macro to go through all the styles and change the setting. The following macro will do this rather nicely:
Sub RemoveAutoUpdate()
    Dim s As Style
    For Each s In ActiveDocument.Styles
        If s.Type = wdStyleTypeParagraph Then
            s.AutomaticallyUpdate = False
        End If
    Next s
End Sub
The problem could also be related to the template attached to your document. If, for instance, the document uses Normal.dot and each user's Normal.dot template is different, then this can affect the appearance of the document. The way around this problem is to make sure that the document uses a template other than Normal.dot (preferably one stored on the server and accessible by all users) or that everyone's Normal.dot template is the same.
You might also check to make sure that all of the users have the same fonts installed on their systems. If a document uses a font that is on your system, and then that document is opened on a system that doesn't have the same font, Word will substitute a different font for the missing one. This can affect the appearance of the document, even when you subsequently open it back on your original system. To stave off this issue, make sure that you have Word configured so it will embed TrueType fonts with the document:
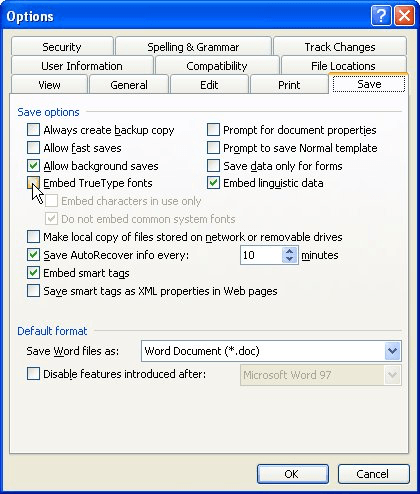
Figure 2. The Save tab of the Options dialog box.
Note:
WordTips is your source for cost-effective Microsoft Word training. (Microsoft Word is the most popular word processing software in the world.) This tip (423) applies to Microsoft Word 97, 2000, 2002, and 2003. You can find a version of this tip for the ribbon interface of Word (Word 2007 and later) here: Preventing Styles from Changing.

Discover the Power of Microsoft Office This beginner-friendly guide reveals the expert tips and strategies you need to skyrocket your productivity and use Office 365 like a pro. Mastering software like Word, Excel, and PowerPoint is essential to be more efficient and advance your career. Simple lessons guide you through every step, providing the knowledge you need to get started. Check out Microsoft Office 365 For Beginners today!
Need to get rid of direct, explicit formatting applied to a document? Here's an easy way to do it using familiar Word tools.
Discover MoreWhen you apply styles to a paragraph, you may periodically see a message asking if you want to reapply the style or ...
Discover MoreStyles are a great boon for applying styles in a powerfully consistent manner. How Word applies styles, however, depends ...
Discover MoreFREE SERVICE: Get tips like this every week in WordTips, a free productivity newsletter. Enter your address and click "Subscribe."
2021-05-28 09:09:30
Satyajay Mandal
Hey Allen
Could you tell me how can I do the same in my Windows XP laptop? I have Word 2007 installed in it and I have a document in it which needs to be made from 3 pages to 2 pages and that needs to be done without affecting the font size of any of its text?, its title is "Revised Syllabus for BA Programme" only
Best of Luck
Satyajay Mandal
2021-05-03 22:22:08
Tim Heymans
Hi Allen,
I would like to make a custom style that DOESN'T CHANGE THE FONT SIZE. Only font & colour should be changed.
Is that possible at all? :)
Unfortunately, while there is a thing like "auto-color", a notion of "auto font size" seems to be lacking in Word...
So I guess it can't be done the regular way.
Maybe with a macro?
If so, which one? :d
Thanks in advance for your time & your advice.
Kind regards,
Tim Heymans
2019-12-04 10:36:55
Jessica Davis
Hi Allen,
I have couple of related questions about styles.
1. Some document or template that I've used had renamed Heading 2 and Heading 3 styles. I've gone through my building blocks, templates, and docs modifying the style to set the name back to the default. Yet, fairly often, they seem to revert to the renamed version. I don't want to turn off displaying renamed style names. Any idea why they are reverting when the template has the correct name?
2. I use styles for everything including bullets and numbered lists. Every once in a while, the bullet character will simply be gone from my bullet style. I have to modify the style and reapply the bullets attribute to fix the issue. Any idea what might be causing this?
Thanks,
Jessica
2019-12-04 10:30:14
Jessica Davis
Hi Sergio,
If you are working on a PC, launch the Styles pane. At the bottom of the pane, there is a Show Preview checkbox. Clear the box and the styles names will appear instead of the preview. This resolution reflects Word 2016 functionality. The functions may be slightly different in other versions, but once you know the option exists, it's usually pretty easy to figure out how to do it in your version.
Thanks,
Jessica
2019-12-03 19:51:33
Hi Allen,
Thanks for your advice. It's very helpful for all styles except Normal.
I use Word for Mac, and I can't find "Automatically Update" check box in the Normal Style.
So it keeps changing when I update Microsoft Office. Do you have any idea?
Thanks
2018-11-18 00:25:58
Sergio
Hello Allen,
Do you know if there is any way to avoid previewing the style of a font in the word source list?
I mean, I created a font of special symbols, and those symbols appear in the list, not the name of the font.
(see Figure 1 below)
So, I would like to know if there is any way to force Word to display the name of the font instead of the symbols, hopefully when creating the font.
Thanks
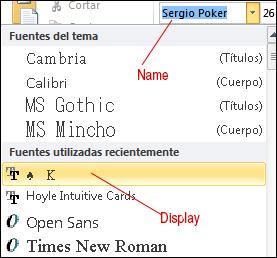
Figure 1. Symbols displayed in the list
Got a version of Word that uses the menu interface (Word 97, Word 2000, Word 2002, or Word 2003)? This site is for you! If you use a later version of Word, visit our WordTips site focusing on the ribbon interface.
Visit the WordTips channel on YouTube

FREE SERVICE: Get tips like this every week in WordTips, a free productivity newsletter. Enter your address and click "Subscribe."
Copyright © 2026 Sharon Parq Associates, Inc.
 Please Note:
This article is written for users of the following Microsoft Word versions: 97, 2000, 2002, and 2003. If you are using a later version (Word 2007 or later), this tip may not work for you. For a version of this tip written specifically for later versions of Word, click here:
Please Note:
This article is written for users of the following Microsoft Word versions: 97, 2000, 2002, and 2003. If you are using a later version (Word 2007 or later), this tip may not work for you. For a version of this tip written specifically for later versions of Word, click here:
Comments