Please Note: This article is written for users of the following Microsoft Word versions: 97, 2000, 2002, and 2003. If you are using a later version (Word 2007 or later), this tip may not work for you. For a version of this tip written specifically for later versions of Word, click here: Losing All Formatting in a Document.
Written by Allen Wyatt (last updated August 26, 2023)
This tip applies to Word 97, 2000, 2002, and 2003
Emily has a concern about how she keeps losing document formatting. Every time she highlights a section of text and then changes the font or margin alignment, Word changes the whole document into that new font or margin.
Before explaining how to fix this, it is necessary to do a bit of a review about how formatting is handled in Word. In general, there are two types of formatting in Word: implicit and explicit. Implicit formatting, which is formatting done by "default," is implemented through the use of styles. Explicit formatting is done through the use of formatting commands, such as those found on the toolbars, in the menus, and in various dialog boxes.
All default formatting in Word begins with styles. You can't get away from them; they are always there, even if you try to ignore them. If you change what is within the definition of a style, then you've changed the formatting applied across all paragraphs or characters that use that style. If you create new styles, you are creating new "default" formatting that can be applied to various elements of your document. If you try to ignore styles, then most, if not all, of your paragraphs use the Normal style.
Any explicit formatting you do is always done as an overlay to the underlying style-based formatting. For instance, if you select a few words in a paragraph and then click the Bold tool, the selected text is formatted as bold, but you haven't removed the style that controlled how the text was originally formatted. You can't remove it; you can only override it.
Word also makes it possible for explicit formatting to not just override the implicit formatting, but to become the implicit format. This happens because Word can "absorb" explicit formatting changes into the underlying style. When this occurs, any other document elements that used that style automatically change to reflect the newly applied format.
This behavior (of absorbing explicit formatting into the underlying style) really muddies the water for people just learning how Word handles formatting. All of a sudden, local formats can be propagated globally, and that results in what appears to be strange behavior on the part of Word.
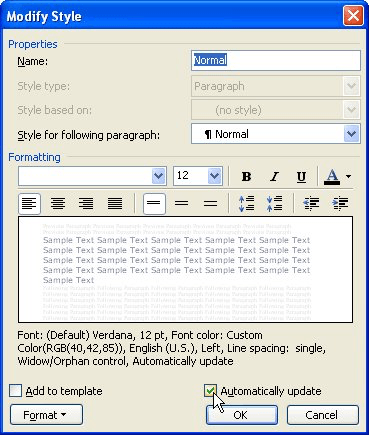
How to solve the problem? Turn off the setting in Word that causes explicit formatting to be absorbed into the underlying styles. You do that by following these steps if you are using Word 2002 or Word 2003:

Figure 1. The Modify Style dialog box.
Finally, follow these steps if you are using Word 97 or Word 2000:
That's it; that's how you stop Word from applying the explicit changes to the underlying style. Of course, if you've inadvertently changed styles earlier (because the Automatically Update check box was selected), then you'll need to go back and change the style definition so that text appears as you want it to. You'll also need to go through and perform these same steps on any other styles in the template or document.
WordTips is your source for cost-effective Microsoft Word training. (Microsoft Word is the most popular word processing software in the world.) This tip (93) applies to Microsoft Word 97, 2000, 2002, and 2003. You can find a version of this tip for the ribbon interface of Word (Word 2007 and later) here: Losing All Formatting in a Document.

Create Custom Apps with VBA! Discover how to extend the capabilities of Office 365 applications with VBA programming. Written in clear terms and understandable language, the book includes systematic tutorials and contains both intermediate and advanced content for experienced VB developers. Designed to be comprehensive, the book addresses not just one Office application, but the entire Office suite. Check out Mastering VBA for Microsoft Office 365 today!
When using styles in a document, you can increase your productivity by letting Word know what paragraph style you expect ...
Discover MoreThere may be some paragraphs in a document that you don't want Word to spell- or grammar-check. You can "turn off" the ...
Discover MoreAs documents evolve, so do your needs for various styles. You may create new ones and, invariably, old ones need to be ...
Discover MoreFREE SERVICE: Get tips like this every week in WordTips, a free productivity newsletter. Enter your address and click "Subscribe."
There are currently no comments for this tip. (Be the first to leave your comment—just use the simple form above!)
Got a version of Word that uses the menu interface (Word 97, Word 2000, Word 2002, or Word 2003)? This site is for you! If you use a later version of Word, visit our WordTips site focusing on the ribbon interface.
Visit the WordTips channel on YouTube
FREE SERVICE: Get tips like this every week in WordTips, a free productivity newsletter. Enter your address and click "Subscribe."
Copyright © 2026 Sharon Parq Associates, Inc.
Comments