Dave reported a situation in which one of his Word users had somehow completely lost the menu bar. Theoretically, the menu bar should not be "losable," so when such an event does occur, it is a good sign that something is wrong.
There are a few things you can check. First, because the menu bar is treated pretty much like a toolbar, it is possible to undock it and move it anywhere desired on the screen. If you run Windows at a high resolution, undock the menu bar and move it to the far right of the screen, and then change to a lower resolution in Windows, it is possible that the menu bar won't be visible because it is now outside the area of the screen you can see.
If you suspect this is the case, trying changing back to the higher resolution—just temporarily—and moving the menu bar back where it belongs. When you later switch to the lower resolution, the menu bar should still be visible.
If this doesn't do it, try these steps:
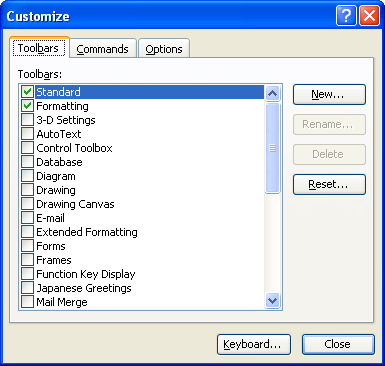
Figure 1. The Toolbars tab of the Customize dialog box.
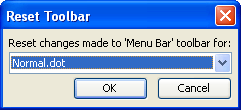
Figure 2. The Reset Toolbar dialog box.
Hopefully, this will display your menu bar. If it doesn't, try starting Word from the command line with the /a switch. Depending on the problem that may be causing the missing menu bar, this could trigger Word to do some repairs to itself. You can also try exiting Word and deleting or renaming the Normal.dot file, which is the default location for saving many customizations in Word.
If the menu bar is still not visible, there is one other macro-based solution you can try. Run the following macro:
Sub FindBars()
    Dim cb As CommandBar
    For Each cb In Application.CommandBars
        If cb.Position = msoBarFloating And cb.Visible = True Then
            cb.Position = msoBarTop
        End If
    Next
End Sub
This macro steps through every one of the command bars (which means both menu bars and toolbars) and, if they are floating and visible, puts them back in their default position at the top of the Word window.
If you are wondering how you can run the macro when you cannot get to the VBA Editor by using menus you cannot see, remember that you can display the Macros dialog box by pressing Alt+F8, or you can jump directly to the VBA Editor by pressing Alt+F11.
If you continue to have problems with the menu bar, then more drastic action is necessary. There is an excellent article at the Word MVP site that indicates some of the steps (including the drastic ones) that you can take:
http://wordmvp.com/FAQs/AppErrors/MissingMenusEtc.htm
WordTips is your source for cost-effective Microsoft Word training. (Microsoft Word is the most popular word processing software in the world.) This tip (59) applies to Microsoft Word 97, 2000, 2002, and 2003.

Do More in Less Time! An easy-to-understand guide to the more advanced features available in the Microsoft 365 version of Word. Enhance the quality of your documents and boost productivity in any field with this in-depth resource. Complete your Word-related tasks more efficiently as you unlock lesser-known tools and learn to quickly access the features you need. Check out Microsoft 365 Word For Professionals For Dummies today!
Do you want the Properties dialog box to appear when you first save a Word document? You can configure Word so that it ...
Discover MoreDialog boxes are prevalent in a program like Word, and they can contain dozens (if not hundreds) of options. This tip ...
Discover MoreWord allows you to specify the unit of measurement you would like used in dialog boxes throughout the program. It can get ...
Discover MoreFREE SERVICE: Get tips like this every week in WordTips, a free productivity newsletter. Enter your address and click "Subscribe."
There are currently no comments for this tip. (Be the first to leave your comment—just use the simple form above!)
Got a version of Word that uses the menu interface (Word 97, Word 2000, Word 2002, or Word 2003)? This site is for you! If you use a later version of Word, visit our WordTips site focusing on the ribbon interface.
Visit the WordTips channel on YouTube

FREE SERVICE: Get tips like this every week in WordTips, a free productivity newsletter. Enter your address and click "Subscribe."
Copyright © 2026 Sharon Parq Associates, Inc.
Comments