Please Note: This article is written for users of the following Microsoft Word versions: 97, 2000, 2002, and 2003. If you are using a later version (Word 2007 or later), this tip may not work for you. For a version of this tip written specifically for later versions of Word, click here: Getting Rid of Hidden Text in Many Files.
Written by Allen Wyatt (last updated January 27, 2017)
This tip applies to Word 97, 2000, 2002, and 2003
Word allows you to apply many attributes to text. For instance, you can make text bold, italic, or underlined; these are all text attributes. Another attribute applicable to text is that it can be made hidden. Hidden text is often used for comments and other text not intended for inclusion in the final document.
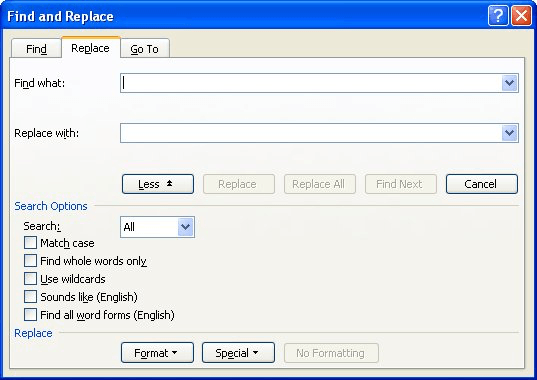
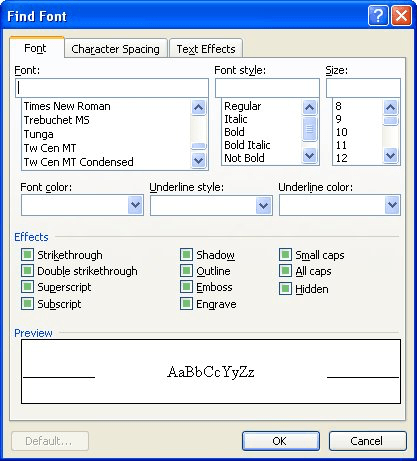
Removing hidden text from a document is rather easy—just use Word's Find and Replace feature. You search for text with the hidden attribute turned on, and replace it with nothing, as is done in these steps:

Figure 1. The Replace tab of the Find and Replace dialog box.

Figure 2. The Find Font dialog box.
Lickety split, all the hidden text in the document is deleted. If you want to strip all the hidden text from a group of documents, then the only way to do it is with a macro. The macro basically needs to load each document, perform the replacements as detailed above, save the document, and close it. Any number of macros could be written to perform such a task (loading a document, processing it, and then saving it); some have been detailed in other issues of WordTips. If you need such a macro, consider this macro at the Word MVP Web site:
http://wordmvp.com/FAQs/MacrosVBA/BatchFR.htm
WordTips is your source for cost-effective Microsoft Word training. (Microsoft Word is the most popular word processing software in the world.) This tip (6398) applies to Microsoft Word 97, 2000, 2002, and 2003. You can find a version of this tip for the ribbon interface of Word (Word 2007 and later) here: Getting Rid of Hidden Text in Many Files.

Discover the Power of Microsoft Office This beginner-friendly guide reveals the expert tips and strategies you need to skyrocket your productivity and use Office 365 like a pro. Mastering software like Word, Excel, and PowerPoint is essential to be more efficient and advance your career. Simple lessons guide you through every step, providing the knowledge you need to get started. Check out Microsoft Office 365 For Beginners today!
Use Word to create a form, and you can easily collect standardized data from a large number of users. When it comes time ...
Discover MoreWord has a feature called AutoRecover that helps you when Word or Windows crashes. If your Normal template gets messed up ...
Discover MoreThink you might have a corrupt document? There is no easy way to tell if this is the case, but there are some things you ...
Discover MoreFREE SERVICE: Get tips like this every week in WordTips, a free productivity newsletter. Enter your address and click "Subscribe."
There are currently no comments for this tip. (Be the first to leave your comment—just use the simple form above!)
Got a version of Word that uses the menu interface (Word 97, Word 2000, Word 2002, or Word 2003)? This site is for you! If you use a later version of Word, visit our WordTips site focusing on the ribbon interface.
Visit the WordTips channel on YouTube
FREE SERVICE: Get tips like this every week in WordTips, a free productivity newsletter. Enter your address and click "Subscribe."
Copyright © 2026 Sharon Parq Associates, Inc.
Comments