Please Note: This article is written for users of the following Microsoft Word versions: 97, 2000, 2002, and 2003. If you are using a later version (Word 2007 or later), this tip may not work for you. For a version of this tip written specifically for later versions of Word, click here: Squaring Table Cells.

Squaring Table Cells

Written by Allen Wyatt (last updated December 23, 2023)
This tip applies to Word 97, 2000, 2002, and 2003


Tables can be very handy for organizing information in a document. Word provides the tools you need to create, edit, and format tables. In formatting a table, you may wonder about the best way to "square" all the cells in the table so that they are the same height and width. The answer depends on which version of Word you are using.

Follow these general steps if you are using Word 2000, Word 2002, or Word 2003:

  1. Insert the table as you normally would, making sure it has the desired number of rows and columns.
  2. Select the entire table.
  3. Make sure that the paragraphs in the table are formatted so there is no space before or after. (Choose Format | Paragraph and set Before and After to zero.)
  4. Choose Table Properties from the Table menu. Word displays the Table Properties dialog box.
  5. Make sure the Column tab is displayed. (See Figure 1.)
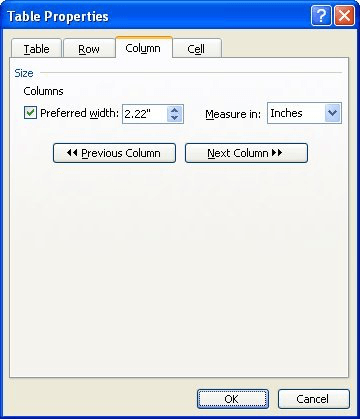
  6. Figure 1. The Column tab of the Table Properties dialog box.

  7. In the Preferred Width box, enter the width you want used for each column.
  8. Display the Row tab. (See Figure 2.)
  9. Figure 2. The Row tab of the Table Properties dialog box.

  10. Make sure the Specify Height check box is selected, then specify the same height and measurement units you used for the column width in step 6.
  11. Make sure the Row Height Is drop-down list is set to Exactly.
  12. Display the Table tab, then click on Options. Word displays the Table Options dialog box.
  13. Make sure all four cell margins are set to the same value.
  14. Clear the Automatically Resize to Fit Contents check box.
  15. Close all the open dialog boxes.

If you are using Word 97, the steps are a bit different:

  1. Insert the table as you normally would, making sure it has the desired number of rows and columns.
  2. Select the entire table.
  3. Make sure that the paragraphs in the table are formatted so there is no space before or after. (Choose Format | Paragraph and set Before and After to zero.)
  4. Choose Cell Height and Width from the Table menu. Word displays the Cell Height and Width dialog box.
  5. Make sure the Column tab is displayed.
  6. In the Width of Columns box, enter the width you want used for each column.
  7. Display the Row tab.
  8. Make sure the Height of Rows drop-down list is set to Exactly.
  9. Enter the same value in the At box as you used in the step 6. You should note that the default measurement units in this box is points, while the default measurement units in step 6 is inches. Make sure you use the same measurement units here. (For instance, if you want the height to be .75 inches, you enter .75".)
  10. Close all the open dialog boxes.

WordTips is your source for cost-effective Microsoft Word training. (Microsoft Word is the most popular word processing software in the world.) This tip (3890) applies to Microsoft Word 97, 2000, 2002, and 2003. You can find a version of this tip for the ribbon interface of Word (Word 2007 and later) here: Squaring Table Cells.

Author Bio

Allen Wyatt

With more than 50 non-fiction books and numerous magazine articles to his credit, Allen Wyatt is an internationally recognized author. He is president of Sharon Parq Associates, a computer and publishing services company. ...

MORE FROM ALLEN

Using Document Properties to Ensure Consistent References

If you need to refer to the same information over and over in a document, you may be interested in using custom document ...

Discover More

Setting Up Multi-page Columns

Do you need a page layout that features columns that progress vertically across pages instead of horizontally across a ...

Discover More

Hiding Macros

Need to hide some macros in your workbook? There are three ways you can do it, as covered in this discussion.

Discover More

Do More in Less Time! An easy-to-understand guide to the more advanced features available in the Microsoft 365 version of Word. Enhance the quality of your documents and boost productivity in any field with this in-depth resource. Complete your Word-related tasks more efficiently as you unlock lesser-known tools and learn to quickly access the features you need. Check out Microsoft 365 Word For Professionals For Dummies today!

More WordTips (menu)

Creating a Split Page

In WordPerfect terminology, a split page allows you to put information side-by-side on opposite halves of the page. If ...

Discover More

Quickly Inserting Table Rows

Need to pop a few extra rows into a table? It is easy to do using the same tools you used to create the table in the ...

Discover More

Converting Tables to Text

Need to convert all the tables in your document into plain text? This tip provides a macro that can make quick work of a ...

Discover More
Subscribe

FREE SERVICE: Get tips like this every week in WordTips, a free productivity newsletter. Enter your address and click "Subscribe."

View most recent newsletter.

Comments

If you would like to add an image to your comment (not an avatar, but an image to help in making the point of your comment), include the characters [{fig}] (all 7 characters, in the sequence shown) in your comment text. You’ll be prompted to upload your image when you submit the comment. Maximum image size is 6Mpixels. Images larger than 600px wide or 1000px tall will be reduced. Up to three images may be included in a comment. All images are subject to review. Commenting privileges may be curtailed if inappropriate images are posted.

What is six less than 9?

There are currently no comments for this tip. (Be the first to leave your comment—just use the simple form above!)


This Site

Got a version of Word that uses the menu interface (Word 97, Word 2000, Word 2002, or Word 2003)? This site is for you! If you use a later version of Word, visit our WordTips site focusing on the ribbon interface.

Videos
Subscribe

FREE SERVICE: Get tips like this every week in WordTips, a free productivity newsletter. Enter your address and click "Subscribe."

(Your e-mail address is not shared with anyone, ever.)

View the most recent newsletter.