Please Note: This article is written for users of the following Microsoft Word versions: 97, 2000, 2002, and 2003. If you are using a later version (Word 2007 or later), this tip may not work for you. For a version of this tip written specifically for later versions of Word, click here: Selecting Different Trays in a Mail Merge.
The mail merge feature in Word is quite powerful, allowing you to create customized letters, forms, labels, and other documents. If you create a form letter for a mail merge, you might want to print one page of each letter on paper from one printer tray, and the subsequent pages from paper in a different paper tray. (For instance, you might have letterhead in one tray, for the first page, and regular paper in a different tray for the rest of the pages.)
There are a couple of ways that you can approach this problem. If you want to specify a different paper tray for the first page of your form letter, you can follow these steps:
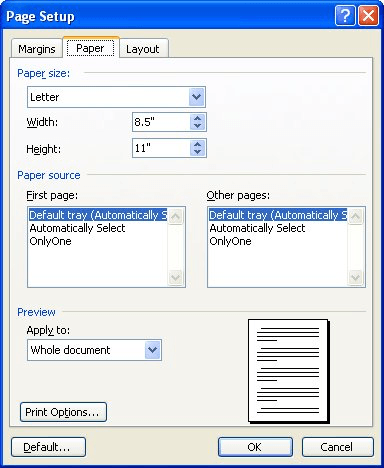
Figure 1. The Paper tab of the Page Setup dialog box.
You can now save your form letter and merge as normal. If your paper tray selections are a little more complex, then you need to adapt these steps somewhat. For instance, if you need to specify a different paper tray for a page in the middle of the document, then you should divide your form letter into sections, using section breaks where appropriate. Then, follow the above steps to set a different paper source for each section of the letter. All you need to do is make sure you place the insertion point within the section you want to affect, and then follow the steps. Also, make sure that the Applies To field (on the Paper or Paper Source tab of the Page Setup dialog box) is set to This Section instead of Whole Document.
Another way you can approach the problem is to embed PRINT fields within your document. This particular field is used to send commands directly to your printer, without processing by the output routines of Word. If you know the printer codes necessary to select a specific paper tray, then you can use the PRINT fields to issue those commands to your printer. For more information about how this approach works, see the following Knowledge Base article:
http://support.microsoft.com/kb/135569
Even though the Knowledge Base article has not been updated in a while (as of this writing it shows that it is for Word 6 through 97), the information it contains will work just fine with later versions of Word.
WordTips is your source for cost-effective Microsoft Word training. (Microsoft Word is the most popular word processing software in the world.) This tip (3519) applies to Microsoft Word 97, 2000, 2002, and 2003. You can find a version of this tip for the ribbon interface of Word (Word 2007 and later) here: Selecting Different Trays in a Mail Merge.

Learning Made Easy! Quickly teach yourself how to format, publish, and share your content using Word 2021 or Microsoft 365. With Step by Step, you set the pace, building and practicing the skills you need, just when you need them! Check out Microsoft Word Step by Step today!
Ever need to print the mirror image of your document? This tip explains how to reverse your image so it can be used for ...
Discover MoreIf you go to print a document and find out that your quotation marks aren't printing properly, there could be a number of ...
Discover MoreIf you need to put information on a label that has both left- and right-aligned information on the same line, it can be ...
Discover MoreFREE SERVICE: Get tips like this every week in WordTips, a free productivity newsletter. Enter your address and click "Subscribe."
There are currently no comments for this tip. (Be the first to leave your comment—just use the simple form above!)
Got a version of Word that uses the menu interface (Word 97, Word 2000, Word 2002, or Word 2003)? This site is for you! If you use a later version of Word, visit our WordTips site focusing on the ribbon interface.
Visit the WordTips channel on YouTube

FREE SERVICE: Get tips like this every week in WordTips, a free productivity newsletter. Enter your address and click "Subscribe."
Copyright © 2026 Sharon Parq Associates, Inc.
 Please Note:
This article is written for users of the following Microsoft Word versions: 97, 2000, 2002, and 2003. If you are using a later version (Word 2007 or later), this tip may not work for you. For a version of this tip written specifically for later versions of Word, click here:
Please Note:
This article is written for users of the following Microsoft Word versions: 97, 2000, 2002, and 2003. If you are using a later version (Word 2007 or later), this tip may not work for you. For a version of this tip written specifically for later versions of Word, click here:
Comments