Barbara notes that when she addresses an envelope in Word she usually chooses the "add to document" option, as she normally has other changes to make. When she does so, she notes that Word adds little red dots under the address line for the street address. These aren't the red wavy lines used to indicate a spelling error, nor are they the green wavy lines indicating a grammatical error—they are little red dots. Barbara has tried everything she can think of to find out what they are and how to remove them.
The little red dots (actually Microsoft says they're purple) are called Smart Tags. You can hover the mouse pointer over them and a Smart Tag indicator (a small circle with a informational "i" within it) will appear to the side of the underlined text. The box lists options you can choose depending on the type of Smart Tag triggered.
The appearance of Smart Tags depends entirely on the type of information you routinely use in your document. While addresses can trigger the appearance of a smart tag, so can other bits of information, such as stock symbols. Some people may never see a Smart Tag appear simply because they don't use documents that contain information that trigger the Smart Tags.
There is no doubt that the appearance of the Smart Tag dots can be distracting. Fortunately, Word provides a way that you can either turn off the Smart Tag capability completely or at least hide the Smart Tag underlines.
To hide the display of the Smart Tags, follow these steps if you are using Word 2002 or Word 2003:
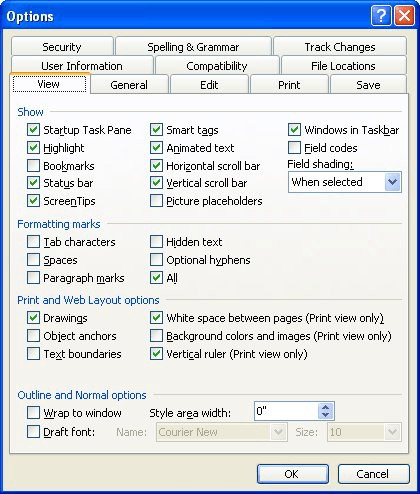
Figure 1. The View tab of the Options dialog box.
If you want to turn off Smart Tags all together (so that they aren't even recognized by Word), then follow these steps:
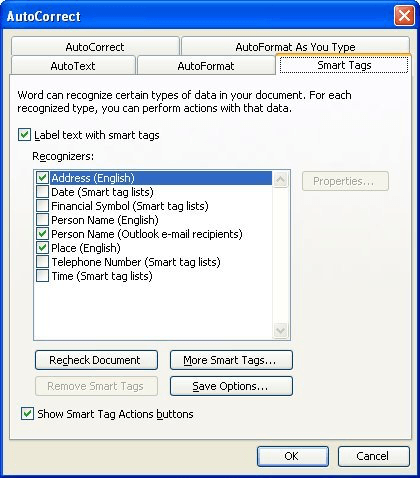
Figure 2. The Smart Tags tab of the AutoCorrect Options dialog box.
WordTips is your source for cost-effective Microsoft Word training. (Microsoft Word is the most popular word processing software in the world.) This tip (3347) applies to Microsoft Word 2002 and 2003.

Discover the Power of Microsoft Office This beginner-friendly guide reveals the expert tips and strategies you need to skyrocket your productivity and use Office 365 like a pro. Mastering software like Word, Excel, and PowerPoint is essential to be more efficient and advance your career. Simple lessons guide you through every step, providing the knowledge you need to get started. Check out Microsoft Office 365 For Beginners today!
Want to add a small pop-up window over a word in your document? There is no way to do this directly in Word, but you can ...
Discover MoreTips for getting your Discussion started.
Discover MoreThe versioning feature in Word can be very handy as you develop your documents. Here's how to set it up so that a new ...
Discover MoreFREE SERVICE: Get tips like this every week in WordTips, a free productivity newsletter. Enter your address and click "Subscribe."
There are currently no comments for this tip. (Be the first to leave your comment—just use the simple form above!)
Got a version of Word that uses the menu interface (Word 97, Word 2000, Word 2002, or Word 2003)? This site is for you! If you use a later version of Word, visit our WordTips site focusing on the ribbon interface.
Visit the WordTips channel on YouTube

FREE SERVICE: Get tips like this every week in WordTips, a free productivity newsletter. Enter your address and click "Subscribe."
Copyright © 2026 Sharon Parq Associates, Inc.
Comments