Please Note: This article is written for users of the following Microsoft Word versions: 97, 2000, 2002, and 2003. If you are using a later version (Word 2007 or later), this tip may not work for you. For a version of this tip written specifically for later versions of Word, click here: Hiding Graphics.
Written by Allen Wyatt (last updated January 6, 2022)
This tip applies to Word 97, 2000, 2002, and 2003
If you are preparing documents that contain graphics, you may want to print the graphics on one version of the document, but not print them on another. For example, you might be preparing a test for students, and the test requires them to draw a graph. You would want the printout of the student version of the test to leave space for drawing a graph, but the printout of the answer sheet should include the graphic showing how the students should answer.
There are many ways you can go about approaching this task. One method is to create two versions of the same document—one with the answers and one without. This approach takes quite a bit of "synchronizing" to make sure it works, however. If you forget to make a change in both documents, they can quickly get out of sync.
To overcome this problem you will want to create a single file that contains the answers. Assuming the answers are graphic files, the easiest way is to print the student version using draft mode. Follow these steps
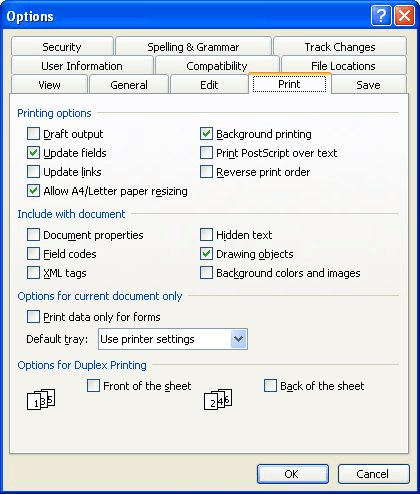
Figure 1. The Print tab of the Options dialog box.
Word prints the document very quickly, leaving blank space where graphics would normally appear. Obviously this is an either/or situation: either you print the graphics or you don't. If you have some graphics you want to appear in the document, and others you don't, this solution will not work.
In this instance (some graphics need to print, others don't) you will need to resort to individual formatting of the graphics you don't want to print on the student version. One approach is to select the graphic and adjust its brightness to its highest level. This "washes out" the graphic to the point that it appears completely white when printed.
Another approach is to use hidden text. The Hidden attribute can be applied to both graphics and text, which means you can use hidden text for all your answers. If you print with hidden text turned on, then you are creating an answer sheet; with it turned off you are printing a student test. To work with the hidden text method, follow these steps:
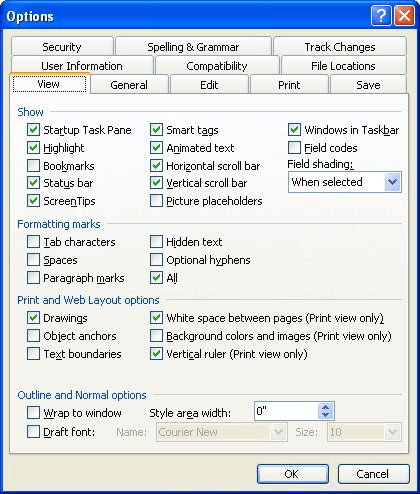
Figure 2. The View tab of the Options dialog box.
There is one thing you may need to do when using this approach. If the student test is "collapsed" (meaning there is no room left for them to draw their answers), you may need to play with the line spacing for each question. You can do this by using the Paragraph option from the Format menu for each question. This may, of course, take a bit of trial and error to get the desired effect.
Yet another option you can use is to take advantage of an intrinsic difference in how Word handles inline graphics as opposed to floating graphics. Say you had two graphics files—one for the student test and the other for the answer sheet. Put your test document together by following these guidelines:
When you are ready to print your tests, use the following steps:
The setting of the Drawing Objects check box controls, essentially, whether floating graphics are printed or not. These types of graphics are inserted not in the midst of your text, but "over" your text, on what Microsoft calls the drawing layer. Thus, when the check box is cleared, the drawing layer is ignored in the printout.
WordTips is your source for cost-effective Microsoft Word training. (Microsoft Word is the most popular word processing software in the world.) This tip (1811) applies to Microsoft Word 97, 2000, 2002, and 2003. You can find a version of this tip for the ribbon interface of Word (Word 2007 and later) here: Hiding Graphics.

The First and Last Word on Word! Bestselling For Dummies author Dan Gookin puts his usual fun and friendly candor back to work to show you how to navigate Word 2019. Spend more time working and less time trying to figure it all out! Check out Word 2019 For Dummies today!
An explanation of the way Word imports graphics.
Discover MoreNeed your hide some of the outside edges of a graphic? You can instruct Word to crop (or hide) those outside edges by ...
Discover MoreWindows provides a way of "capturing" the image on the screen into the clipboard. You can then paste the image from the ...
Discover MoreFREE SERVICE: Get tips like this every week in WordTips, a free productivity newsletter. Enter your address and click "Subscribe."
There are currently no comments for this tip. (Be the first to leave your comment—just use the simple form above!)
Got a version of Word that uses the menu interface (Word 97, Word 2000, Word 2002, or Word 2003)? This site is for you! If you use a later version of Word, visit our WordTips site focusing on the ribbon interface.
Visit the WordTips channel on YouTube

FREE SERVICE: Get tips like this every week in WordTips, a free productivity newsletter. Enter your address and click "Subscribe."
Copyright © 2026 Sharon Parq Associates, Inc.
 Please Note:
This article is written for users of the following Microsoft Word versions: 97, 2000, 2002, and 2003. If you are using a later version (Word 2007 or later), this tip may not work for you. For a version of this tip written specifically for later versions of Word, click here:
Please Note:
This article is written for users of the following Microsoft Word versions: 97, 2000, 2002, and 2003. If you are using a later version (Word 2007 or later), this tip may not work for you. For a version of this tip written specifically for later versions of Word, click here:
Comments