Using the Organizer to Manage Toolbars

Written by Allen Wyatt (last updated August 26, 2023)
This tip applies to Word 97, 2000, 2002, and 2003


You already know that Word allows you to extensively customize toolbars, or even to create your own toolbars. (The procedures to do these tasks have been covered in past issues of WordTips.) You may not know, however, that custom toolbars (the new ones you create) are stored in a document and can be stored with a template.

Developing custom toolbars can be particularly time-consuming. Fortunately, you can use the Organizer to copy toolbars from one document or template to another. You can also use it to delete or rename toolbars, although you may already know how to perform those tasks in other ways. To manage your toolbars, follow these steps:

  1. Start the Organizer.
  2. Make sure the Toolbars tab is selected. (See Figure 1.)
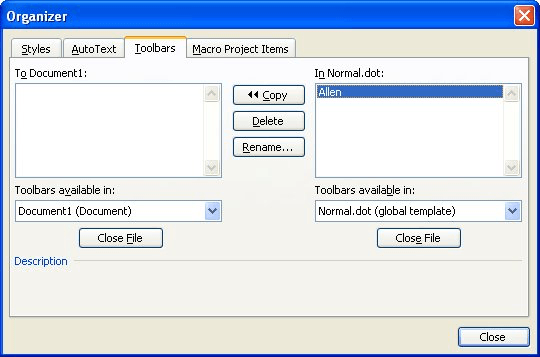
  3. Figure 1. The Toolbars tab of the Organizer.

  4. Examine the left and right side of the Organizer. Each side can display user-defined toolbars in either a document or a template.
  5. Use the pull-down lists on either the left or right to indicate the template or document whose toolbars you want to manage.
  6. If you cannot locate the desired template or document using the pull-down lists, click on the Close button on one side to "free up" an area. Then click on the Open button to locate and open the desired template or document.
  7. Select the custom toolbar you want to copy, rename, or delete.
  8. Click on the Copy button to copy the toolbar to the other document or template. If the target file already has a toolbar with the name of the toolbar being copied, you are asked if you want to replace it.
  9. Click on the Rename button to change the name of the selected toolbar. The Organizer prompts you for a new name.
  10. Click on the Remove button to delete the toolbar. The Organizer asks you to confirm your action.
  11. Repeat steps 6 through 9 for each toolbar you want to affect.
  12. Click on Close when done.

WordTips is your source for cost-effective Microsoft Word training. (Microsoft Word is the most popular word processing software in the world.) This tip (1352) applies to Microsoft Word 97, 2000, 2002, and 2003.

Author Bio

Allen Wyatt

With more than 50 non-fiction books and numerous magazine articles to his credit, Allen Wyatt is an internationally recognized author. He is president of Sharon Parq Associates, a computer and publishing services company. ...

MORE FROM ALLEN

Changing Subdocument Status

Creating a system of master documents and subdocuments can help with your productivity. What if you need to change ...

Discover More

Filtering Columns for Unique Values

Given a long list of names, part numbers, or what-have-you, you may need to determine the unique values within the list. ...

Discover More

Setting Default Attributes for Lines and Arrows

Don't like the way that Excel formats lines and arrows? You can easily make your own formatting changes, and then use ...

Discover More

Comprehensive VBA Guide Visual Basic for Applications (VBA) is the language used for writing macros in all Office programs. This complete guide shows both professionals and novices how to master VBA in order to customize the entire Office suite for their needs. Check out Mastering VBA for Office 2010 today!

More WordTips (menu)

Hiding Smart Tags

If you don't want to see Smart Tags displayed in your document, you can instruct Word to hide them. Here's how to make ...

Discover More

Changing the Office Assistant

How to change the Office Assistant character in Word.

Discover More

Changing Document Links

If your document contains links to information in other documents, you can modify the source document that is linked to ...

Discover More
Subscribe

FREE SERVICE: Get tips like this every week in WordTips, a free productivity newsletter. Enter your address and click "Subscribe."

View most recent newsletter.

Comments

If you would like to add an image to your comment (not an avatar, but an image to help in making the point of your comment), include the characters [{fig}] (all 7 characters, in the sequence shown) in your comment text. You’ll be prompted to upload your image when you submit the comment. Maximum image size is 6Mpixels. Images larger than 600px wide or 1000px tall will be reduced. Up to three images may be included in a comment. All images are subject to review. Commenting privileges may be curtailed if inappropriate images are posted.

What is six less than 8?

There are currently no comments for this tip. (Be the first to leave your comment—just use the simple form above!)


This Site

Got a version of Word that uses the menu interface (Word 97, Word 2000, Word 2002, or Word 2003)? This site is for you! If you use a later version of Word, visit our WordTips site focusing on the ribbon interface.

Videos
Subscribe

FREE SERVICE: Get tips like this every week in WordTips, a free productivity newsletter. Enter your address and click "Subscribe."

(Your e-mail address is not shared with anyone, ever.)

View the most recent newsletter.