Using the Organizer to Manage AutoText

Written by Allen Wyatt (last updated March 24, 2018)
This tip applies to Word 97, 2000, 2002, and 2003


Word includes a laborsaving feature that allows you to easily expand the text you are typing; this is referred to as AutoText. Text that you frequently type (or graphics) can be saved under a mnemonic name that is then used to refer to the text (or graphic) in the future.

Many people invest quite a bit of time in developing AutoText entries that closely reflect the type of work they do on a daily basis. As new templates or documents are created, you may wonder how you can quickly copy AutoText entries from one template or document to another. The easy way to do this is to use the Organizer. Follow these general steps:

  1. Start the Organizer, as described in other issues of WordTips.
  2. Make sure the AutoText tab is selected. (See Figure 1.)
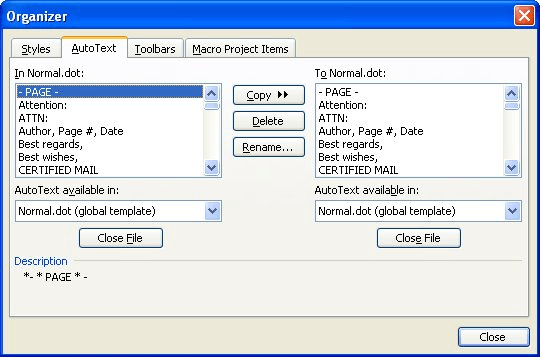
  3. Figure 1. The AutoText tab of the Organizer.

  4. Examine the left and right side of the Organizer. Each side can display AutoText in either a document or a template.
  5. Use the pull-down lists on either the left or right to indicate the template or document whose AutoText entries you want to manage.
  6. If you cannot locate the desired template or document using the pull-down lists, click on the Close File button on one side to "free up" an area. Then click on the Open button to locate and open the desired template or document.
  7. Select the AutoText entry you want to copy, rename, or delete.
  8. Click on the Copy button to copy the entry to the other document or template. If the target file already has an AutoText entry with the name of the entry being copied, you are asked if you want to replace it.
  9. Click on the Rename button to change the name of the selected AutoText entry. The Organizer prompts you for a new name.
  10. Click on the Delete button to remove the AutoText entry. The Organizer asks you to confirm your action.
  11. Repeat steps 6 through 9 for each AutoText entry you want to affect.
  12. Click on Close when done.

WordTips is your source for cost-effective Microsoft Word training. (Microsoft Word is the most popular word processing software in the world.) This tip (1339) applies to Microsoft Word 97, 2000, 2002, and 2003.

Author Bio

Allen Wyatt

With more than 50 non-fiction books and numerous magazine articles to his credit, Allen Wyatt is an internationally recognized author. He is president of Sharon Parq Associates, a computer and publishing services company. ...

MORE FROM ALLEN

Nudging an Equation

You can adjust where an equation is printed by moving it minute amounts in any direction.

Discover More

Understanding MRU Files

Don't you love all the acronyms used in computer terminology? One such acronym--"pertinent to Word users--"is MRU. This ...

Discover More

Printing an Entire Workbook by Default

Need to print an entire workbook? It's as easy as adding a single line of code to your macros.

Discover More

Create Custom Apps with VBA! Discover how to extend the capabilities of Office 365 applications with VBA programming. Written in clear terms and understandable language, the book includes systematic tutorials and contains both intermediate and advanced content for experienced VB developers. Designed to be comprehensive, the book addresses not just one Office application, but the entire Office suite. Check out Mastering VBA for Microsoft Office 365 today!

More WordTips (menu)

Using the Organizer to Manage Toolbars

The Organizer is a great tool for managing different elements that can be stored in documents and templates. This tip ...

Discover More

Using the Organizer to Manage Styles

One of the things that the Organizer is great at doing is managing styles. You can use it to move them between templates ...

Discover More

Starting a Discussion

Tips for getting your Discussion started.

Discover More
Subscribe

FREE SERVICE: Get tips like this every week in WordTips, a free productivity newsletter. Enter your address and click "Subscribe."

View most recent newsletter.

Comments

If you would like to add an image to your comment (not an avatar, but an image to help in making the point of your comment), include the characters [{fig}] (all 7 characters, in the sequence shown) in your comment text. You’ll be prompted to upload your image when you submit the comment. Maximum image size is 6Mpixels. Images larger than 600px wide or 1000px tall will be reduced. Up to three images may be included in a comment. All images are subject to review. Commenting privileges may be curtailed if inappropriate images are posted.

What is 5 - 3?

There are currently no comments for this tip. (Be the first to leave your comment—just use the simple form above!)


This Site

Got a version of Word that uses the menu interface (Word 97, Word 2000, Word 2002, or Word 2003)? This site is for you! If you use a later version of Word, visit our WordTips site focusing on the ribbon interface.

Videos
Subscribe

FREE SERVICE: Get tips like this every week in WordTips, a free productivity newsletter. Enter your address and click "Subscribe."

(Your e-mail address is not shared with anyone, ever.)

View the most recent newsletter.