If you are using Word to help with an advertising campaign that utilized direct mail, you may want to take advantage of some of the automation features allowed by the US Postal Service. These include the delivery point barcode (as described in a different WordTip) and the FIM barcode. FIM is an acronym for Facing Identification Mark, and is used by the Post Office to determine the type of mail being processed.
There are two types of FIM barcodes. The first is called an FIM-A barcode, and is used to identify courtesy reply mail. The other is called an FIM-C barcode, and identifies business reply mail. Word helps you insert an FIM-A barcode by following these steps:
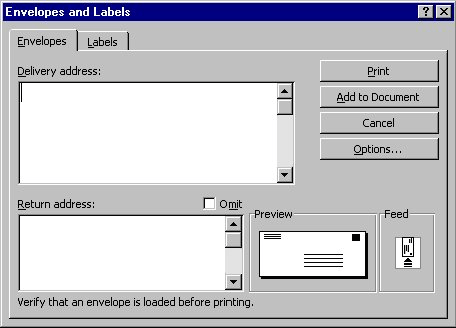
Figure 1. The Envelopes tab of the Envelopes and Labels dialog box.
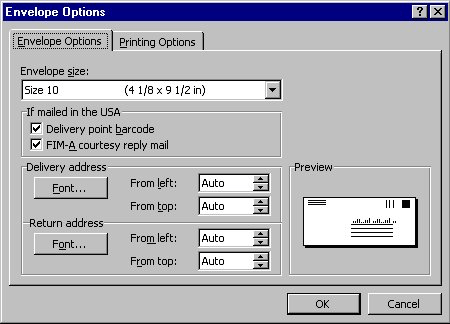
Figure 2. The Envelope Options dialog box.
You should note that Word only allows you to insert the FIM-A barcode in this manner. If you want to use the FIM-C barcode, you should follow the above steps and make sure you include the envelope with the current document. Then, follow these steps:
BARCODE ENV_ZIPCODE1\b \u \f "A"
WordTips is your source for cost-effective Microsoft Word training. (Microsoft Word is the most popular word processing software in the world.) This tip (896) applies to Microsoft Word 97, 2000, 2002, and 2003.

Do More in Less Time! An easy-to-understand guide to the more advanced features available in the Microsoft 365 version of Word. Enhance the quality of your documents and boost productivity in any field with this in-depth resource. Complete your Word-related tasks more efficiently as you unlock lesser-known tools and learn to quickly access the features you need. Check out Microsoft 365 Word For Professionals For Dummies today!
It can take a while to get an envelope to appear just the way you need. Why throw your work away when you are done with ...
Discover MoreText boxes can be a great design feature to use in laying out a document. You may want to add one to an envelope, ...
Discover MoreWord includes a feature that allows you to easily create and print envelopes, based on the addresses you insert in your ...
Discover MoreFREE SERVICE: Get tips like this every week in WordTips, a free productivity newsletter. Enter your address and click "Subscribe."
There are currently no comments for this tip. (Be the first to leave your comment—just use the simple form above!)
Got a version of Word that uses the menu interface (Word 97, Word 2000, Word 2002, or Word 2003)? This site is for you! If you use a later version of Word, visit our WordTips site focusing on the ribbon interface.
Visit the WordTips channel on YouTube

FREE SERVICE: Get tips like this every week in WordTips, a free productivity newsletter. Enter your address and click "Subscribe."
Copyright © 2026 Sharon Parq Associates, Inc.
Comments