Please Note: This article is written for users of the following Microsoft Word versions: 97, 2000, 2002, and 2003. If you are using a later version (Word 2007 or later), this tip may not work for you. For a version of this tip written specifically for later versions of Word, click here: Applying Bullets from the Keyboard.
Written by Allen Wyatt (last updated June 4, 2022)
This tip applies to Word 97, 2000, 2002, and 2003
Word includes a handy-dandy tool on the toolbar that allows you to add bullets to a paragraph in a jiffy, and just as easily remove them. Unfortunately, there is no just-as-easy way to do the same thing using the keyboard.
If you are bound and determined to use the keyboard to apply (and remove) bullets, there are a couple of things you can look at. The first is to use styles and define keystrokes that apply your styles. There are numerous other benefits to using styles, but most of those have been covered in other WordTips.
Closely related to this approach are two built-in shortcuts provided by Word. If you press Ctrl+Shift+L, Word is supposed to automatically apply the predefined List Bullet style to your paragraph. Unfortunately, there are many reports of this not working reliably. (On some systems it won't apply the style, even though the shortcut is still "attached" to it.) To remove bullets, you could also use the Ctrl+Shift+N shortcut, which applies the Normal style.
While these may work for what you want done, they don't take the same approach to formatting as the Bullets tool on the toolbar. If you want to have that same functionality from the keyboard, you must customize your keyboard. You do this by displaying the Customize Keyboard dialog box. (See Figure 1.) How you display the dialog box depends on the version of Word you are using.
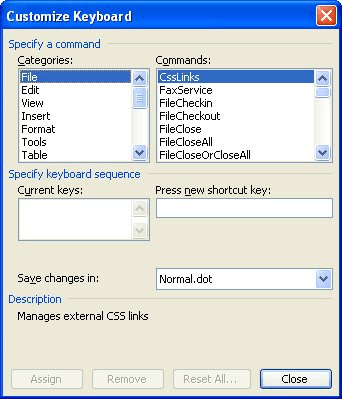
Figure 1. The Customize Keyboard dialog box.
Once the Customize Keyboard dialog box is displayed, follow these steps:
Now, whenever you press the keystroke you chose in step 4, it is the same as clicking on the Bullets tool. Press the keystroke again, and the bullets are gone. (Of course, you can also press Ctrl+Q to remove the bullets by returning to the default paragraph formatting.)
WordTips is your source for cost-effective Microsoft Word training. (Microsoft Word is the most popular word processing software in the world.) This tip (87) applies to Microsoft Word 97, 2000, 2002, and 2003. You can find a version of this tip for the ribbon interface of Word (Word 2007 and later) here: Applying Bullets from the Keyboard.

Discover the Power of Microsoft Office This beginner-friendly guide reveals the expert tips and strategies you need to skyrocket your productivity and use Office 365 like a pro. Mastering software like Word, Excel, and PowerPoint is essential to be more efficient and advance your career. Simple lessons guide you through every step, providing the knowledge you need to get started. Check out Microsoft Office 365 For Beginners today!
The Insert key can be used for different purposes, depending on how you configure the program. This tip explains those ...
Discover MoreCreating a numbered list is often done by using tools on the toolbars or the ribbon. With a bit of preparation you can ...
Discover MoreWant to assign some fancy characters to keyboard keys for characters you seldom use? There are a couple of ways you can ...
Discover MoreFREE SERVICE: Get tips like this every week in WordTips, a free productivity newsletter. Enter your address and click "Subscribe."
2023-07-09 21:38:24
Anonymous
Thank you so much! I was searching for ages for how to quickly format bullet points with the keyboard; it makes it so much easier for me to take notes quickly in my classes.
Got a version of Word that uses the menu interface (Word 97, Word 2000, Word 2002, or Word 2003)? This site is for you! If you use a later version of Word, visit our WordTips site focusing on the ribbon interface.
Visit the WordTips channel on YouTube

FREE SERVICE: Get tips like this every week in WordTips, a free productivity newsletter. Enter your address and click "Subscribe."
Copyright © 2026 Sharon Parq Associates, Inc.
 Please Note:
This article is written for users of the following Microsoft Word versions: 97, 2000, 2002, and 2003. If you are using a later version (Word 2007 or later), this tip may not work for you. For a version of this tip written specifically for later versions of Word, click here:
Please Note:
This article is written for users of the following Microsoft Word versions: 97, 2000, 2002, and 2003. If you are using a later version (Word 2007 or later), this tip may not work for you. For a version of this tip written specifically for later versions of Word, click here:
Comments