Please Note: This article is written for users of the following Microsoft Word versions: 97, 2000, 2002, and 2003. If you are using a later version (Word 2007 or later), this tip may not work for you. For a version of this tip written specifically for later versions of Word, click here: Endnotes by Chapter.
David has a book manuscript that consists of twenty chapters. Each chapter is in its own document file, and each chapter has its own endnotes. He would like to create one large, single document file for the manuscript, with the endnotes properly separated by chapter at the end, and renumbered from 1-X in each endnote section, as they are now.
This can be done rather easily, as Word allows you to specify that endnotes should appear at one of two places in a document: either the end of each section or at the end of the document itself. Follow these general steps:
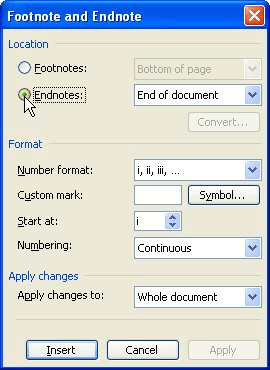
Figure 1. The Footnote and Endnote dialog box.
What you end up with is each chapter divided by sections breaks, with the endnotes configured to appear at the end of each section. Numbering of the endnotes will begin at 1 in each section.
The only time this approach will present a problem is if you have section breaks within a chapter. For instance, if you switch from a one-column to a two-column layout within a chapter, then the layout change requires the insertion of a section break. Since endnotes are configured to appear at the end of each section, that means you may have endnotes that appear at the end of your one-column layout and then at the end of the section that marks the end of the chapter. This is probably not what you want.
You can suppress the endnotes for some sections in your document (such as the first part of the chapter, before the layout change), but that presents additional problems with numbering. Since numbering is designed to start at 1 for each section, you may end up with two (or more) endnotes numbered "1" in a single chapter. You can get around this by applying continuous endnote numbering for the entire document, instead of restarting the number in each section.
WordTips is your source for cost-effective Microsoft Word training. (Microsoft Word is the most popular word processing software in the world.) This tip (3854) applies to Microsoft Word 97, 2000, 2002, and 2003. You can find a version of this tip for the ribbon interface of Word (Word 2007 and later) here: Endnotes by Chapter.

Do More in Less Time! An easy-to-understand guide to the more advanced features available in the Microsoft 365 version of Word. Enhance the quality of your documents and boost productivity in any field with this in-depth resource. Complete your Word-related tasks more efficiently as you unlock lesser-known tools and learn to quickly access the features you need. Check out Microsoft 365 Word For Professionals For Dummies today!
Need to move the contents of a footnote up into the main body of your document? You can use normal editing techniques to ...
Discover MoreWhen inserting footnotes and endnotes in a document, most of us don't give much thought to the format used in the ...
Discover MoreWhen laying out how your printed pages will look, you might want to place your footnotes into more than one column. This ...
Discover MoreFREE SERVICE: Get tips like this every week in WordTips, a free productivity newsletter. Enter your address and click "Subscribe."
2021-09-07 07:28:10
Christopher Webber
In Word 2016, create all the section breaks first, then add each file to each section. When you choose Insert-Object, click on the drop-down arrow and choose "text from file".
Got a version of Word that uses the menu interface (Word 97, Word 2000, Word 2002, or Word 2003)? This site is for you! If you use a later version of Word, visit our WordTips site focusing on the ribbon interface.
Visit the WordTips channel on YouTube

FREE SERVICE: Get tips like this every week in WordTips, a free productivity newsletter. Enter your address and click "Subscribe."
Copyright © 2026 Sharon Parq Associates, Inc.
 Please Note:
This article is written for users of the following Microsoft Word versions: 97, 2000, 2002, and 2003. If you are using a later version (Word 2007 or later), this tip may not work for you. For a version of this tip written specifically for later versions of Word, click here:
Please Note:
This article is written for users of the following Microsoft Word versions: 97, 2000, 2002, and 2003. If you are using a later version (Word 2007 or later), this tip may not work for you. For a version of this tip written specifically for later versions of Word, click here:
Comments