Please Note: This article is written for users of the following Microsoft Word versions: 97, 2000, 2002, and 2003. If you are using a later version (Word 2007 or later), this tip may not work for you. For a version of this tip written specifically for later versions of Word, click here: Automatically Formatting Text within Quotes.
Written by Allen Wyatt (last updated October 4, 2025)
This tip applies to Word 97, 2000, 2002, and 2003
Sandy asked how to find all text between quotation marks and format it to be bold. The solution needs to be able to handle multiple words between the quote marks—entire phrases that need to be bold. This is an interesting question, and there are several ways that it can be approached.
One approach is to use Word's powerful Find and Replace feature to do just what you need. Follow these steps:
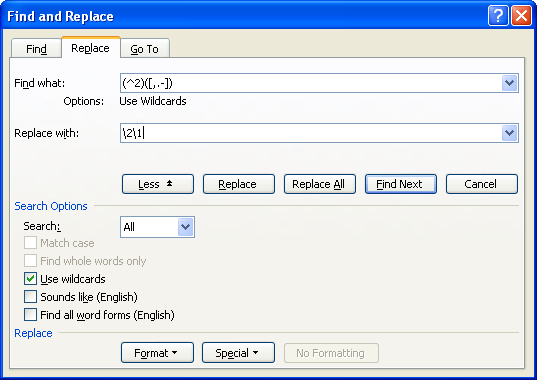
Figure 1. The Replace tab of the Find and Replace dialog box.
["|"]*["|"]
Notice that when Word is done with this search and replace, it will have bolded not only the text within the quotes, but the quotes themselves. If you want to change the quotes back to normal, you can do another wildcard search, this time looking for simply ["|"|"] (step 2, with the last two quotes being opening and closing smart quotes) and replacing it with Not Bold formatting (step 5).
It is interesting to note that you must search for ["|"]*["|"] and not simply for "*". The reason for this is quite simple. If you are getting your documents (the ones you are formatting) from someone else, you don't know right off the bat if they used smart quotes, regular quotes, or a combination of both. By using the brackets surrounding the two types of quotes on both sides of a vertical bar, you are telling Word to match with either type of opening or closing quote. When you have Use Wildcards selected, Word discriminates between regular and smart quotes. (It doesn't discriminate if you are using Search and Replace without wildcards turned on.)
If you need to do quite a bit of formatting of information between quotes in this manner, the best bet is to create a macro that you can then add to a menu choice or a toolbar button. Perhaps the easiest way is to simply use the macro recorder to record the above steps. If you prefer, you can utilize the following VBA macro to do the trick:
Sub BoldBetweenQuotes()
' base for a quotes finding macro
    Dim blnSearchAgain As Boolean
    ' move to start of doc
    Selection.HomeKey Unit:=wdStory
     ' start of loop
    Do
        ' set up find of first of quote pair
        With Selection.Find
            .ClearFormatting
            .Text = Chr(34)
            .Replacement.Text = ""
            .Forward = True
            .Wrap = wdFindStop
            .Execute
        End With
        If Selection.Find.Found Then
            Selection.MoveRight Unit:=wdCharacter, Count:=1
            ' switch on selection extend mode
            Selection.Extend
            ' find second quote of this pair
            Selection.Find.Execute
            If Selection.Find.Found Then
                Selection.MoveLeft Unit:=wdCharacter, Count:=1
                ' make it bold
                Selection.Font.Bold = True
                Selection.Collapse Direction:=wdCollapseEnd
                Selection.MoveRight Unit:=wdCharacter, Count:=1
                blnSearchAgain = True
            Else
                blnSearchAgain = False
            End If
        Else
            blnSearchAgain = False
        End If
    Loop While blnSearchAgain
End Sub
Note:
WordTips is your source for cost-effective Microsoft Word training. (Microsoft Word is the most popular word processing software in the world.) This tip (1500) applies to Microsoft Word 97, 2000, 2002, and 2003. You can find a version of this tip for the ribbon interface of Word (Word 2007 and later) here: Automatically Formatting Text within Quotes.

Create Custom Apps with VBA! Discover how to extend the capabilities of Office 365 applications with VBA programming. Written in clear terms and understandable language, the book includes systematic tutorials and contains both intermediate and advanced content for experienced VB developers. Designed to be comprehensive, the book addresses not just one Office application, but the entire Office suite. Check out Mastering VBA for Microsoft Office 365 today!
Imagine you start typing in a new document, and when you press the Enter key the cursor jumps a huge distance to the ...
Discover MoreIf you want to have a blank page at the end of a document section, you can insert one manually or you can use the ...
Discover MoreContext menus appear when you right-click on different items in Word. These menus can be edited to add items, such as ...
Discover MoreFREE SERVICE: Get tips like this every week in WordTips, a free productivity newsletter. Enter your address and click "Subscribe."
There are currently no comments for this tip. (Be the first to leave your comment—just use the simple form above!)
Got a version of Word that uses the menu interface (Word 97, Word 2000, Word 2002, or Word 2003)? This site is for you! If you use a later version of Word, visit our WordTips site focusing on the ribbon interface.
Visit the WordTips channel on YouTube

FREE SERVICE: Get tips like this every week in WordTips, a free productivity newsletter. Enter your address and click "Subscribe."
Copyright © 2026 Sharon Parq Associates, Inc.
 Please Note:
This article is written for users of the following Microsoft Word versions: 97, 2000, 2002, and 2003. If you are using a later version (Word 2007 or later), this tip may not work for you. For a version of this tip written specifically for later versions of Word, click here:
Please Note:
This article is written for users of the following Microsoft Word versions: 97, 2000, 2002, and 2003. If you are using a later version (Word 2007 or later), this tip may not work for you. For a version of this tip written specifically for later versions of Word, click here:
Comments