Please Note: This article is written for users of the following Microsoft Word versions: 97, 2000, 2002, and 2003. If you are using a later version (Word 2007 or later), this tip may not work for you. For a version of this tip written specifically for later versions of Word, click here: How to Stop a Table Row from Splitting Over Two Pages.
For some documents, it is par for the course to have tables extend from one page to another. As your tables get larger, Word automatically breaks tables so the most information can get on each page. This may mean that a row of your table may start on one page and end on the following page. Obviously, this is not acceptable for some tables. You may have the need to make sure that entire rows of your table stay together.
To make sure that Word doesn't break a particular row of your table, follow these steps if you are using Word 97:
If you are using Word 2000, Word 2002, or Word 2003 the process is slightly different. Follow these steps, instead:
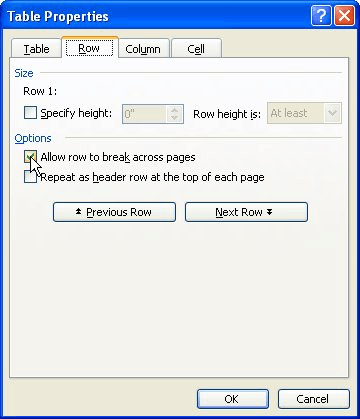
Figure 1. The Row tab of the Table Properties dialog box.
If you are not sure about where a table may break (or even if it will), but you want to make sure that no row of the table is divided, you simply need to select the entire table in step 1 rather than selecting a single row.
Remember that these steps won't stop a table from splitting across two pages; it only stops individual rows from splitting across pages.
WordTips is your source for cost-effective Microsoft Word training. (Microsoft Word is the most popular word processing software in the world.) This tip (1827) applies to Microsoft Word 97, 2000, 2002, and 2003. You can find a version of this tip for the ribbon interface of Word (Word 2007 and later) here: How to Stop a Table Row from Splitting Over Two Pages.

Learning Made Easy! Quickly teach yourself how to format, publish, and share your content using Word 2021 or Microsoft 365. With Step by Step, you set the pace, building and practicing the skills you need, just when you need them! Check out Microsoft Word Step by Step today!
When working with tables, you can adjust the height of individual rows. How you go about such adjustments depends on the ...
Discover MoreYou may spend some time getting the color in a portion of a table just right, only to be faced with the task of copying ...
Discover MoreWhen working with tables (particularly those created by others), you can spend a large amount of time getting the ...
Discover MoreFREE SERVICE: Get tips like this every week in WordTips, a free productivity newsletter. Enter your address and click "Subscribe."
2021-11-18 13:31:18
Taylor
yeah... that doesn't work. I have tried this along with modifying the paragraph style and selected "keep with next." Neither of these methods work. What else am I missing?
2021-02-17 10:01:32
Hareem Gillani
I have done this step over 10 times, but I am not able to get it right. I cleared the "Allow rows to break across pages" but it still doesn't seem to work. I am completing my Cambridge CIEs past papers of ICT and I am not able to do it. Hope you could guide me through it.
2020-11-01 16:27:42
This doesn't work entirely, you may have to turn on the Paragraph setting called "Keep with Next" to keep the rows together and not split up.
Got a version of Word that uses the menu interface (Word 97, Word 2000, Word 2002, or Word 2003)? This site is for you! If you use a later version of Word, visit our WordTips site focusing on the ribbon interface.
Visit the WordTips channel on YouTube

FREE SERVICE: Get tips like this every week in WordTips, a free productivity newsletter. Enter your address and click "Subscribe."
Copyright © 2026 Sharon Parq Associates, Inc.
 Please Note:
This article is written for users of the following Microsoft Word versions: 97, 2000, 2002, and 2003. If you are using a later version (Word 2007 or later), this tip may not work for you. For a version of this tip written specifically for later versions of Word, click here:
Please Note:
This article is written for users of the following Microsoft Word versions: 97, 2000, 2002, and 2003. If you are using a later version (Word 2007 or later), this tip may not work for you. For a version of this tip written specifically for later versions of Word, click here:
Comments