Please Note: This article is written for users of the following Microsoft Word versions: 97, 2000, 2002, and 2003. If you are using a later version (Word 2007 or later), this tip may not work for you. For a version of this tip written specifically for later versions of Word, click here: Understanding WordArt.
Written by Allen Wyatt (last updated June 29, 2024)
This tip applies to Word 97, 2000, 2002, and 2003
WordArt is a program that allows you to treat text as a graphic. You can use the program to add special effects and flourishes to text, and then insert the text in your document. It is useful for creating special text elements such as logos, mastheads, or titles. Exactly how you access WordArt depends on the version of Word you are using.
Word 97 includes WordArt 2.0, although it is not automatically installed when you install Word. You can tell if WordArt is installed by trying to access WordArt. If it is not installed, then you can run the Word Setup program again and install WordArt on your system.
You access WordArt using either of these methods in Word 97:
When WordArt if running, you see the WordArt dialog box, and most of your Word 97 menus and toolbars are hidden. It is a good idea to periodically update your Word document from within WordArt. This is done by clicking on the Apply button in the WordArt dialog box. When you do this, your changes will be updated in both the WordArt preview area and in your Word document. When you are through using WordArt, you can exit the program simply by using the mouse to click somewhere else in your Word document. (You can also press Esc to exit WordArt.)
Word 2000, 2002, and 2003 use a more integrated approach to WordArt. In these versions of Word you should follow these steps:
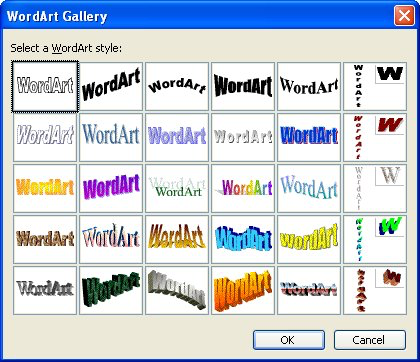
Figure 1. The WordArt Gallery.
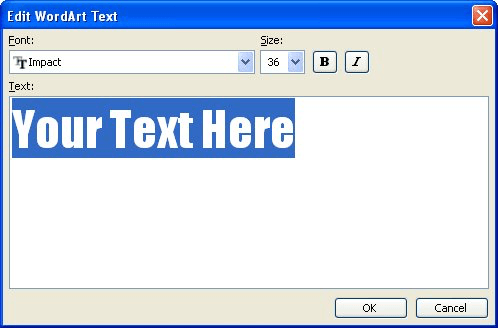
Figure 2. The Edit WordArt Text dialog box.
At this point, the WordArt graphic is created and added to your document. You should also see the WordArt toolbar, which includes commands specific to working with WordArt objects. To hide the toolbar, simply click a different place in your document so that the WordArt object isn't selected.
WordTips is your source for cost-effective Microsoft Word training. (Microsoft Word is the most popular word processing software in the world.) This tip (1816) applies to Microsoft Word 97, 2000, 2002, and 2003. You can find a version of this tip for the ribbon interface of Word (Word 2007 and later) here: Understanding WordArt.

Do More in Less Time! An easy-to-understand guide to the more advanced features available in the Microsoft 365 version of Word. Enhance the quality of your documents and boost productivity in any field with this in-depth resource. Complete your Word-related tasks more efficiently as you unlock lesser-known tools and learn to quickly access the features you need. Check out Microsoft 365 Word For Professionals For Dummies today!
WordArt can be a handy tool for creating all sorts of flourishes on traditional text. If you want to save the graphic ...
Discover MoreWordArt is a great add-in that allows you to insert creative wording into your document. This tip shows how you can ...
Discover MoreWordArt is a program that allows you to insert fancily formatted text, as a graphic, in your document. If you want your ...
Discover MoreFREE SERVICE: Get tips like this every week in WordTips, a free productivity newsletter. Enter your address and click "Subscribe."
There are currently no comments for this tip. (Be the first to leave your comment—just use the simple form above!)
Got a version of Word that uses the menu interface (Word 97, Word 2000, Word 2002, or Word 2003)? This site is for you! If you use a later version of Word, visit our WordTips site focusing on the ribbon interface.
Visit the WordTips channel on YouTube

FREE SERVICE: Get tips like this every week in WordTips, a free productivity newsletter. Enter your address and click "Subscribe."
Copyright © 2026 Sharon Parq Associates, Inc.
 Please Note:
This article is written for users of the following Microsoft Word versions: 97, 2000, 2002, and 2003. If you are using a later version (Word 2007 or later), this tip may not work for you. For a version of this tip written specifically for later versions of Word, click here:
Please Note:
This article is written for users of the following Microsoft Word versions: 97, 2000, 2002, and 2003. If you are using a later version (Word 2007 or later), this tip may not work for you. For a version of this tip written specifically for later versions of Word, click here:
Comments