Please Note: This article is written for users of the following Microsoft Word versions: 97, 2000, 2002, and 2003. If you are using a later version (Word 2007 or later), this tip may not work for you. For a version of this tip written specifically for later versions of Word, click here: Increasing Envelope Address Lines.
Written by Allen Wyatt (last updated January 20, 2024)
This tip applies to Word 97, 2000, 2002, and 2003
If you routinely use very long addresses in the envelopes you create in Word, you may have noticed that Word limits the number of lines you can put in an address. This limit does not make itself manifest while you are using the Envelopes and Labels option from the Tools menu, where you can enter as many lines as you like. Instead, Word just may decide to not print all your address lines when you actually print or create the envelope. Different readers report an ability to print anywhere from six to eight lines, depending on font size.
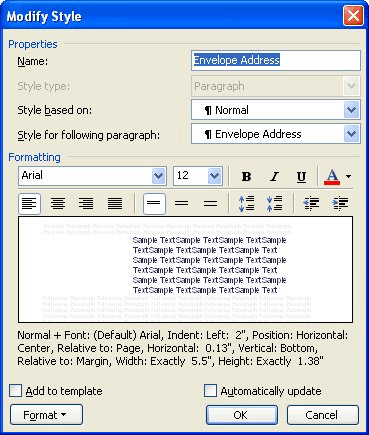
The reason for this is quite simple. The Envelopes and Labels tool in Word depends on a predefined style when creating an envelope. The address style, appropriately enough, is named Envelope Address. When you click on either the Print or Add to Document buttons in the Envelopes and Labels dialog box, this style is grabbed and used for the address area itself.
The problem is that the style is defined to use a frame, which in and of itself is not a problem. The problem is that the frame is defined to be exactly a certain height. If the text won't fit in that frame, the bottom portion of your text is just cut off.
There is a simple fix to this problem: All you need to do is change the style. To do this, and get rid of this problem, follow these steps when using Word 97 or Word 2000:
If you are using Word 2002 or Word 2003, the process for changing the style is a bit different:

Figure 1. The Modify Style dialog box.
When you save your document or close Word, you are asked if you want to save your changes to the template. Make sure you do this. Now you will be able to have as many lines in your envelope as you desire, since the frame used by the Envelope Address style will grow to accommodate the length of any text you enter.
There is one caveat to this, of course: Envelopes are not physically infinite in size. This means that eventually your frame will overrun the bottom of the physical envelope. There is no real way to guard against this; you need to simply make sure that you manually limit the number of lines in your address.
For those who are familiar with frames, one way around this problem is to modify the other frame attributes used by the Envelope Address style. You can adjust the frame so it appears higher on the envelope, and simply change the "Exactly" height so the frame won't run off the page. You can also change other style attributes, such as the font size used. How you handle this is entirely up to you and the types of envelopes you create.
WordTips is your source for cost-effective Microsoft Word training. (Microsoft Word is the most popular word processing software in the world.) This tip (1727) applies to Microsoft Word 97, 2000, 2002, and 2003. You can find a version of this tip for the ribbon interface of Word (Word 2007 and later) here: Increasing Envelope Address Lines.

Learning Made Easy! Quickly teach yourself how to format, publish, and share your content using Word 2021 or Microsoft 365. With Step by Step, you set the pace, building and practicing the skills you need, just when you need them! Check out Microsoft Word Step by Step today!
Got a reply envelope you want to create? Why not put a placeholder for the stamp on the envelope? It's easy to do if you ...
Discover MoreUsing the Envelopes and Labels dialog box to print envelopes is quick and easy. It can also be frustrating, however, ...
Discover MoreNeed to print envelopes quite often? An easy way to do it is to create an envelope template, as described in this tip.
Discover MoreFREE SERVICE: Get tips like this every week in WordTips, a free productivity newsletter. Enter your address and click "Subscribe."
There are currently no comments for this tip. (Be the first to leave your comment—just use the simple form above!)
Got a version of Word that uses the menu interface (Word 97, Word 2000, Word 2002, or Word 2003)? This site is for you! If you use a later version of Word, visit our WordTips site focusing on the ribbon interface.
Visit the WordTips channel on YouTube
FREE SERVICE: Get tips like this every week in WordTips, a free productivity newsletter. Enter your address and click "Subscribe."
Copyright © 2026 Sharon Parq Associates, Inc.
Comments