Please Note: This article is written for users of the following Microsoft Word versions: 97, 2000, 2002, and 2003. If you are using a later version (Word 2007 or later), this tip may not work for you. For a version of this tip written specifically for later versions of Word, click here: Saving Your Work Automatically.
We've all done it. You're working along for several hours on a document, when suddenly the power goes out. Or you kick the reset button on your computer, or your three-year-old pulls the power cord out of the wall. The list goes on, but the bottom line is that you lost the past couple of hours of work. Many things spring to mind at a time like this. Most of them can't be printed in a nice, family-oriented newsletter like this. But hopefully you learned a lesson when this happened to you.
Word allows you to protect yourself by automatically saving your work for you. To set the automatic saving feature, follow these steps:
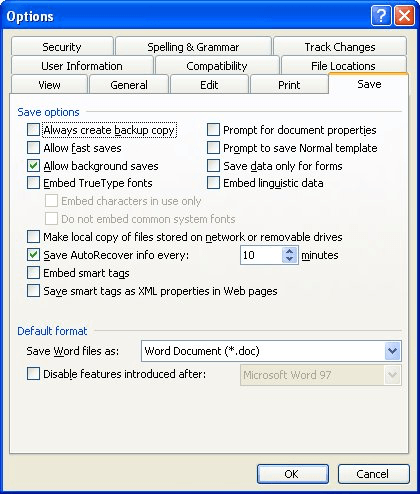
Figure 1. The Save tab of the Options dialog box.
When designating an AutoSave frequency, you should probably not select a time under 10 minutes. More frequent saves can waste time and become counterproductive.
You should also note that AutoSave does not really save your file. What it does is to save information that Word can use to try to recover your file if Word stops unexpectedly.
WordTips is your source for cost-effective Microsoft Word training. (Microsoft Word is the most popular word processing software in the world.) This tip (1009) applies to Microsoft Word 97, 2000, 2002, and 2003. You can find a version of this tip for the ribbon interface of Word (Word 2007 and later) here: Saving Your Work Automatically.

Discover the Power of Microsoft Office This beginner-friendly guide reveals the expert tips and strategies you need to skyrocket your productivity and use Office 365 like a pro. Mastering software like Word, Excel, and PowerPoint is essential to be more efficient and advance your career. Simple lessons guide you through every step, providing the knowledge you need to get started. Check out Microsoft Office 365 For Beginners today!
Word allows you to save your documents in a variety of different formats. You can specify the format when you actually ...
Discover MoreGot a bunch of text that you've imported from a text file? Need to make it look better? You can take a stab at it with ...
Discover MoreWindows Explorer is a great way to browse through the files available on your system. If you see a document file you want ...
Discover MoreFREE SERVICE: Get tips like this every week in WordTips, a free productivity newsletter. Enter your address and click "Subscribe."
There are currently no comments for this tip. (Be the first to leave your comment—just use the simple form above!)
Got a version of Word that uses the menu interface (Word 97, Word 2000, Word 2002, or Word 2003)? This site is for you! If you use a later version of Word, visit our WordTips site focusing on the ribbon interface.
Visit the WordTips channel on YouTube

FREE SERVICE: Get tips like this every week in WordTips, a free productivity newsletter. Enter your address and click "Subscribe."
Copyright © 2026 Sharon Parq Associates, Inc.
 Please Note:
This article is written for users of the following Microsoft Word versions: 97, 2000, 2002, and 2003. If you are using a later version (Word 2007 or later), this tip may not work for you. For a version of this tip written specifically for later versions of Word, click here:
Please Note:
This article is written for users of the following Microsoft Word versions: 97, 2000, 2002, and 2003. If you are using a later version (Word 2007 or later), this tip may not work for you. For a version of this tip written specifically for later versions of Word, click here:
Comments