Written by Allen Wyatt (last updated January 24, 2026)
This tip applies to Word 97, 2000, 2002, and 2003
Linda ran into a problem where, all of a sudden, Word was starting to operate "backwards." Comments entered in the text were right-aligned, even though they were formatted as left-aligned. Her arrow keys also worked the opposite of the way they should: the left arrow moved the cursor to the right and vice versa.
This problem is undoubtedly related to the language settings in Word, and possibly within Office. Word (and Office) supports many different languages, including languages that are written from right to left, such as Arabic, Hebrew, Chinese, and many other languages.
The solution is to figure out where--exactly--the language change has been made, and then undo it. One thing you can try is to get out of Word and rename your Normal.dot file. This file can contain the default language setting for Word; renaming the file and then restarting Word causes the old Normal.dot to be ignored and a new one created.
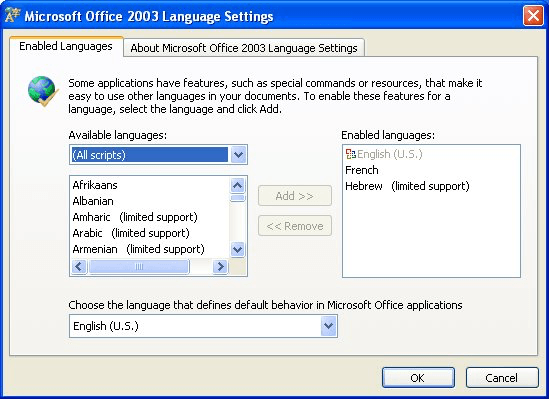
Of course, renaming Normal.dot also means that other settings contained within the file are also lost. If you don't want to do that (or if renaming the file doesn't solve the problem), then you need to make sure that the language settings for Office are set the way you want them. Follow these steps, assuming you are using Word 2000 or later:

Figure 1. The Office Language Settings program.
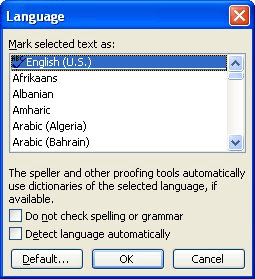
Now that you are through making sure that Office understands which language you want to use, make sure that you set the default language in Word itself. Follow these steps:

Figure 2. The Language dialog box.
These steps set the default language in whatever template is loaded in Word at the time. Since you started (in step 1) with a blank document, this means that the default language for the Normal.dot template was set. If you use other templates, you will want to make sure that you load a new document based on each of those templates, in turn, and go through these same steps to change their language settings.
For additional information, check out Word's Help system and search for an article entitled "Change Paragraph Direction."
WordTips is your source for cost-effective Microsoft Word training. (Microsoft Word is the most popular word processing software in the world.) This tip (291) applies to Microsoft Word 97, 2000, 2002, and 2003.

Learning Made Easy! Quickly teach yourself how to format, publish, and share your content using Word 2021 or Microsoft 365. With Step by Step, you set the pace, building and practicing the skills you need, just when you need them! Check out Microsoft Word Step by Step today!
There you are typing along, minding your own business, when wham! You end up in an entirely different language and you ...
Discover MoreNeed to format a paragraph (or some selected text) so that it is a language other than English? You can do so easily by ...
Discover MoreWord is a program designed to work in and with multiple languages. This can lead to some problems, however, for those ...
Discover MoreFREE SERVICE: Get tips like this every week in WordTips, a free productivity newsletter. Enter your address and click "Subscribe."
There are currently no comments for this tip. (Be the first to leave your comment—just use the simple form above!)
Got a version of Word that uses the menu interface (Word 97, Word 2000, Word 2002, or Word 2003)? This site is for you! If you use a later version of Word, visit our WordTips site focusing on the ribbon interface.
Visit the WordTips channel on YouTube
FREE SERVICE: Get tips like this every week in WordTips, a free productivity newsletter. Enter your address and click "Subscribe."
Copyright © 2026 Sharon Parq Associates, Inc.
Comments