Please Note: This article is written for users of the following Microsoft Word versions: 97, 2000, 2002, and 2003. If you are using a later version (Word 2007 or later), this tip may not work for you. For a version of this tip written specifically for later versions of Word, click here: Last-Row Border Formatting.
Written by Allen Wyatt (last updated November 26, 2016)
This tip applies to Word 97, 2000, 2002, and 2003
Subscriber Smokey Lynne Bare recently wrote about a problem encountered with formatting a table in Word. The table was formatted so the outline border used double lines, and the inside borders used single lines. Everything looked fine until the table extended to a second page. Then, the last line of the last row on the first page didn't switch to a double line, instead remaining a single line.
Before getting into how you can fix this, you should first make sure that you are looking at the table in the proper manner. If you look at the table in Normal view, it won't appear that the table is outlined properly at the page break. Instead, you must view the document in Page Layout view, or in Print Preview. In both of those views you should see the proper outline on the table.
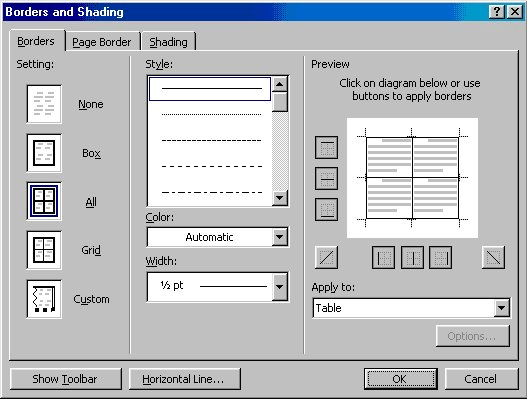
If you still don't, then follow these steps:

Figure 1. The Borders and Shading Dialog Box
Now, when you view a multi-page table using Page Layout view or Print Preview, the table should be outlined in double lines on each page where the table appears. Only the interior lines should be single. If, for some reason, your table still doesn't behave in the described manner, it could be related to your printer driver. Make sure you have the most current driver for your printer, and try again.
WordTips is your source for cost-effective Microsoft Word training. (Microsoft Word is the most popular word processing software in the world.) This tip (878) applies to Microsoft Word 97, 2000, 2002, and 2003. You can find a version of this tip for the ribbon interface of Word (Word 2007 and later) here: Last-Row Border Formatting.

Learning Made Easy! Quickly teach yourself how to format, publish, and share your content using Word 2021 or Microsoft 365. With Step by Step, you set the pace, building and practicing the skills you need, just when you need them! Check out Microsoft Word Step by Step today!
When working with tables (particularly those created by others), you can spend a large amount of time getting the ...
Discover MoreWant to add a border diagonally, through the middle of a table cell? It's easy if you follow the formatting steps ...
Discover MoreIf you need to format a number so that it appears as currency, it is not as easy to do in Word as it is in Excel. You can ...
Discover MoreFREE SERVICE: Get tips like this every week in WordTips, a free productivity newsletter. Enter your address and click "Subscribe."
There are currently no comments for this tip. (Be the first to leave your comment—just use the simple form above!)
Got a version of Word that uses the menu interface (Word 97, Word 2000, Word 2002, or Word 2003)? This site is for you! If you use a later version of Word, visit our WordTips site focusing on the ribbon interface.
Visit the WordTips channel on YouTube
FREE SERVICE: Get tips like this every week in WordTips, a free productivity newsletter. Enter your address and click "Subscribe."
Copyright © 2025 Sharon Parq Associates, Inc.
Comments