Please Note: This article is written for users of the following Microsoft Word versions: 97, 2000, 2002, and 2003. If you are using a later version (Word 2007 or later), this tip may not work for you. For a version of this tip written specifically for later versions of Word, click here: Counting Fields in a Document.
Barry has a fairly large Word document (about 50 pages) that contains hundreds of XE fields used to build an index. He wonders if there is a way to produce a count of how many XE fields exist in the document that doesn't involve counting them by hand.
There are a few ways that you can approach this need. The first is to rely on Word's Find and Replace capabilities. Here are the simple steps:
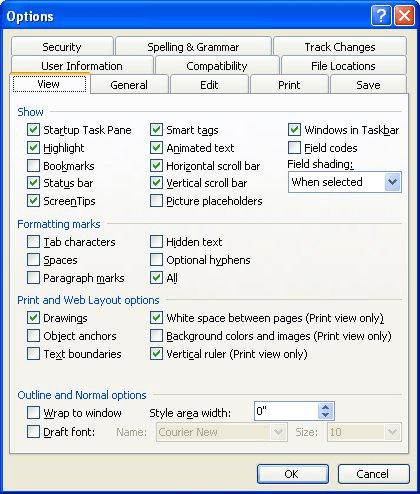
Figure 1. The View tab of the Options dialog box.
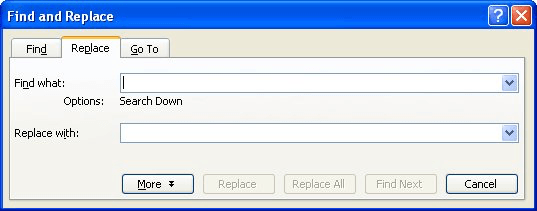
Figure 2. The Replace tab of the Find and Replace dialog box.
Word finds all the XE fields and displays a count of how many replacements were made. This is your desired count. The code ^19 (in step 6) is the character code for the opening field brace that indicates only fields should be matched. You can, if desired, now turn off the display of Hidden text.
There are a couple of things to note about this sequence of steps. First, some folks may think that there is a step missing in the above: pressing Alt+F9 to displays all the field codes in the document. Actually, this step isn't required because XE fields are always displayed, as long as hidden text is visible. In other words, pressing Alt+F9 doesn't affect their display one way or the other. If, however, you are counting a field other than the XE field, you'll want to display the field codes before doing the steps.
Another thing to note is that Word is rather lenient when it comes to the number of spaces that can follow an opening field brace. The steps above only finds XE fields in which a single space separates the opening field brace (^19) and the XE code. If your fields contain more spaces (or no spaces), then those instances of the field won't be counted. For this reason, you may want to simply search for XE (without the ^19 code and space) and turn on the Match Case check box. This will work as long as there are no other instances of capitalized XE characters within your document.
There are also some simple macros you can use to count the XE fields. If the only fields in your document are the XE fields, then the macro is very simple, indeed:
Sub CountFields()
    Dim iCnt As Integer

    iCnt = ActiveDocument.Fields.Count
    MsgBox "There are " & iCnt & " fields in the document."
End Sub
This approach won't work, however, if there are other fields in your document. Remember—fields are used to actually place your index in a document. So if you are using XE fields for index entries, you are probably using a field to insert the actual index itself. And, of course, there could be many other fields in your document for other purposes. In this likelihood, your macro needs to examine each field and determine if it is an XE field or not.
Sub CountXEFields()
    Dim iCnt As Integer
    Dim f As Field

    For Each f In ActiveDocument.Fields
        If f.Type = wdFieldIndexEntry Then iCnt = iCnt + 1
    Next
    MsgBox "There are " & iCnt & " XE fields in the document."
End Sub
This macro checks the Type property of each Field object to make sure it is an XE field. If so, it is added to the count and then the count is displayed at the end of the macro.
Note:
WordTips is your source for cost-effective Microsoft Word training. (Microsoft Word is the most popular word processing software in the world.) This tip (11752) applies to Microsoft Word 97, 2000, 2002, and 2003. You can find a version of this tip for the ribbon interface of Word (Word 2007 and later) here: Counting Fields in a Document.

Learning Made Easy! Quickly teach yourself how to format, publish, and share your content using Word 2021 or Microsoft 365. With Step by Step, you set the pace, building and practicing the skills you need, just when you need them! Check out Microsoft Word Step by Step today!
Got a bunch of info that is common to a lot of your documents? Here's a way to get that information standardized among ...
Discover MoreThe AUTOTEXTLIST field is one of those esoteric fields that you may know nothing about. The cool thing it does is allow ...
Discover MorePeople don't normally think of using fields to do any calculations. Even so, you can use fields to perform a simple ...
Discover MoreFREE SERVICE: Get tips like this every week in WordTips, a free productivity newsletter. Enter your address and click "Subscribe."
There are currently no comments for this tip. (Be the first to leave your comment—just use the simple form above!)
Got a version of Word that uses the menu interface (Word 97, Word 2000, Word 2002, or Word 2003)? This site is for you! If you use a later version of Word, visit our WordTips site focusing on the ribbon interface.
Visit the WordTips channel on YouTube

FREE SERVICE: Get tips like this every week in WordTips, a free productivity newsletter. Enter your address and click "Subscribe."
Copyright © 2026 Sharon Parq Associates, Inc.
 Please Note:
This article is written for users of the following Microsoft Word versions: 97, 2000, 2002, and 2003. If you are using a later version (Word 2007 or later), this tip may not work for you. For a version of this tip written specifically for later versions of Word, click here:
Please Note:
This article is written for users of the following Microsoft Word versions: 97, 2000, 2002, and 2003. If you are using a later version (Word 2007 or later), this tip may not work for you. For a version of this tip written specifically for later versions of Word, click here:
Comments