Please Note: This article is written for users of the following Microsoft Word versions: 97, 2000, 2002, and 2003. If you are using a later version (Word 2007 or later), this tip may not work for you. For a version of this tip written specifically for later versions of Word, click here: Putting Your Index after Your Endnotes.

Putting Your Index after Your Endnotes

Written by Allen Wyatt (last updated January 30, 2016)
This tip applies to Word 97, 2000, 2002, and 2003


1

When you start adding different elements to your documents, you may wonder how to order those elements. For instance, Word allows you to easily add elements such as tables of contents, other special tables, footnotes, endnotes, and indexes. If your document contains both endnotes and an index, you may wonder how you can place your index after your endnotes.

The reason for this confusion typically crops up because Word allows you to specify where your endnotes are placed—at the end of a section or the end of the document. You obviously don't want the endnotes at the end of your document if you want your index to appear after the endnotes. So, the solution is to add a "next page" section break after the end of your document's body and just before the index. Your document should now contain two sections—one for the body of the document and one for the index. So, in the main body of the document format your endnotes so that they appear at the end of the section. You can do that in Word 2002 or Word 2003 by following these steps:
  1. Position the insertion point within the section that contains your endnotes (the main body of your document).
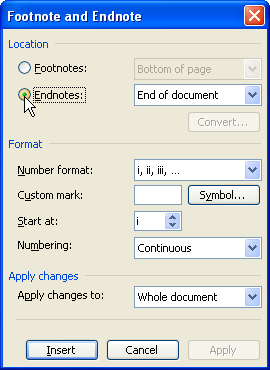
  2. Choose Reference from the Insert menu, and then choose Footnote from the resulting submenu. Word displays the Footnote and Endnote dialog box.
  3. Click the Endnotes radio button. (See Figure 1.)
  4. Figure 1. The Footnote and Endnote dialog box.

  5. Using the drop-down list to the right of the Endnotes radio button, choose End of Section.
  6. Click the Apply button.
  7. Click Cancel to close the Footnote and Endnote dialog box.

If you are using Word 97 or Word 2000, follow these steps instead:

  1. Position the insertion point within the section that contains your endnotes (the main body of your document).
  2. Choose Footnote from the Insert menu. Word displays the Footnote and Endnote dialog box.
  3. Click the Options button. Word displays the Note Options dialog box.
  4. Make sure the All Endnotes tab is displayed.
  5. Using the Place At drop-down list, choose End of Section.
  6. Close all the open dialog boxes.

Word then automatically places the endnotes before your index, just as you want.

Of course, if you are already using multiple sections in your document, then this simple approach won't work as you expect. You can still place your endnotes where you want, however, providing you are using Word 2002 or Word 2003:
  1. Place the "next page" section break just before your index, as described earlier in this tip.
  2. Choose Reference from the Insert menu, and then choose Footnote from the resulting submenu. Word displays the Footnote and Endnote dialog box.
  3. Click the Endnotes radio button.
  4. Using the drop-down list to the right of the Endnotes radio button, choose End of Section.
  5. Using the Numbering drop down list, choose Continuous.
  6. Using the Apply Changes To drop-down list, choose Whole Document.
  7. Click the Apply button.
  8. Click Cancel to close the Footnote and Endnote dialog box.
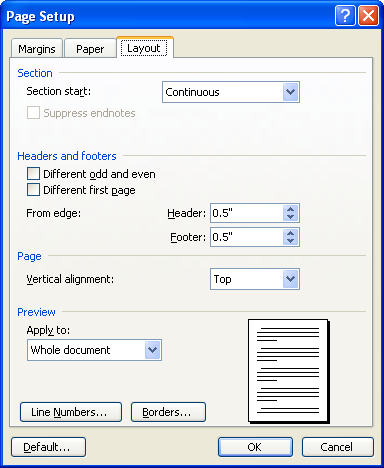
  9. Choose Page Setup from the File menu. Word displays the Page Setup dialog box.
  10. Make sure the Layout tab is selected. (See Figure 2.)
  11. Figure 2. The Layout tab of the Page Setup dialog box.

  12. Choose the Suppress Endnotes check box. (The check box is only accessible if two conditions are met: There are actually endnotes in your document and you've set the endnotes to appear at the end of the section instead of the end of the document.)
  13. Using the Apply To drop-down list, choose Whole Document.
  14. Click on OK.
  15. Position the insertion point in the section just before the section that contains the index. (In other words, put it in the section after which you want the endnotes to appear.)
  16. Choose Page Setup from the File menu. Word again displays the Page Setup dialog box.
  17. Make sure the Layout tab is selected.
  18. Clear the Suppress Endnotes checkbox.
  19. Using the Apply To drop-down list, choose This Section.
  20. Click on OK.

Now Word suppresses the endnotes for all the sections except the one you specified (in step X), so all your endnotes appear there—just before your index.

WordTips is your source for cost-effective Microsoft Word training. (Microsoft Word is the most popular word processing software in the world.) This tip (7910) applies to Microsoft Word 97, 2000, 2002, and 2003. You can find a version of this tip for the ribbon interface of Word (Word 2007 and later) here: Putting Your Index after Your Endnotes.

Author Bio

Allen Wyatt

With more than 50 non-fiction books and numerous magazine articles to his credit, Allen Wyatt is an internationally recognized author. He is president of Sharon Parq Associates, a computer and publishing services company. ...

MORE FROM ALLEN

Defining Styles

Styles are a powerful component of Word. You use them to determine the way that your text should appear. This tip ...

Discover More

Opening Multiple Workbooks at Once

Need to open a bunch of workbooks from within Excel? It's easy to do when you construct a selection set in the Open ...

Discover More

Getting Bookmark Information in VBA

Bookmarks are a handy way to "mark" locations within a document. If you are creating a macro that processes the document ...

Discover More

Create Custom Apps with VBA! Discover how to extend the capabilities of Office 2013 (Word, Excel, PowerPoint, Outlook, and Access) with VBA programming, using it for writing macros, automating Office applications, and creating custom applications. Check out Mastering VBA for Office 2013 today!

More WordTips (menu)

Jumping to a Relative Endnote

Endnotes are easy enough to add and accumulate in a document. For this reason, Word makes it easy to jump from one ...

Discover More

Changing How Footnote References Appear

Footnote references normally appear as superscripted digits, both in the main body of your document and in the footnotes ...

Discover More

Default Numbering Format for Endnotes

The default format for endnote numbers is lowercase Roman numerals. If you want the numbers to use a different format, ...

Discover More
Subscribe

FREE SERVICE: Get tips like this every week in WordTips, a free productivity newsletter. Enter your address and click "Subscribe."

View most recent newsletter.

Comments

If you would like to add an image to your comment (not an avatar, but an image to help in making the point of your comment), include the characters [{fig}] (all 7 characters, in the sequence shown) in your comment text. You’ll be prompted to upload your image when you submit the comment. Maximum image size is 6Mpixels. Images larger than 600px wide or 1000px tall will be reduced. Up to three images may be included in a comment. All images are subject to review. Commenting privileges may be curtailed if inappropriate images are posted.

What is seven minus 7?

2016-06-19 10:37:27

marcia

I have a book manuscript with about 70 footnotes appearing within the document. I want to automatically put an index page at the end of my document that will list all the footnotes used within the manuscript with the page numbers where they appear and in alphabetical order. Is there a way to do this?


This Site

Got a version of Word that uses the menu interface (Word 97, Word 2000, Word 2002, or Word 2003)? This site is for you! If you use a later version of Word, visit our WordTips site focusing on the ribbon interface.

Videos
Subscribe

FREE SERVICE: Get tips like this every week in WordTips, a free productivity newsletter. Enter your address and click "Subscribe."

(Your e-mail address is not shared with anyone, ever.)

View the most recent newsletter.