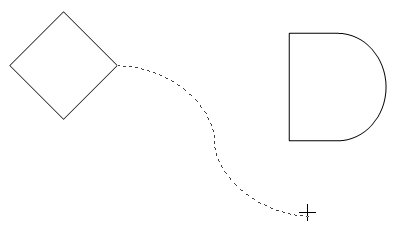
AutoShapes are a great way to add common graphic flourishes to your document. If you are using Word 2002 or Word 2003, the drawing capabilities of Word allow you to define connectors that link different AutoShapes together. These connectors are available if you create your drawing within the drawing canvas, and they are dynamic in nature. This means that even if you move the connected AutoShapes around on the canvas, the connectors stretch, bend, and move as necessary to keep the links valid.
To see how connectors work, try this if you are using Word 2002 or Word 2003:

Figure 1. One end of the connector is anchored, and the mouse is being moved to the other AutoShape.
Now you can move the original AutoShapes around, and the connector remains connected to the two connection points you selected. You can add additional AutoShapes, as desired, with any connectors you desire.
You should be aware that connectors are only available between AutoShapes that are placed within the drawing canvas. If you try to create a connector involving an AutoShape that is outside of the drawing canvas, connectors are no longer available from the menus or ribbon.
WordTips is your source for cost-effective Microsoft Word training. (Microsoft Word is the most popular word processing software in the world.) This tip (5487) applies to Microsoft Word 2002 and 2003.

Do More in Less Time! An easy-to-understand guide to the more advanced features available in the Microsoft 365 version of Word. Enhance the quality of your documents and boost productivity in any field with this in-depth resource. Complete your Word-related tasks more efficiently as you unlock lesser-known tools and learn to quickly access the features you need. Check out Microsoft 365 Word For Professionals For Dummies today!
AutoShapes are very useful for adding common drawing shapes to your document. You can make the AutoShapes easier to ...
Discover MoreEver wonder how to add a curved line to your document? With a little practice, adding curves is simple. Here's how.
Discover MoreOnce you have connectors established between different AutoShapes on your drawing canvas, you may need to move the ...
Discover MoreFREE SERVICE: Get tips like this every week in WordTips, a free productivity newsletter. Enter your address and click "Subscribe."
There are currently no comments for this tip. (Be the first to leave your comment—just use the simple form above!)
Got a version of Word that uses the menu interface (Word 97, Word 2000, Word 2002, or Word 2003)? This site is for you! If you use a later version of Word, visit our WordTips site focusing on the ribbon interface.
Visit the WordTips channel on YouTube
FREE SERVICE: Get tips like this every week in WordTips, a free productivity newsletter. Enter your address and click "Subscribe."
Copyright © 2026 Sharon Parq Associates, Inc.
Comments