When you print a document, Word attempts to figure out the best printing method, based on the characteristics of your document. If you have a regular document to print, and you display the Print dialog box, the Print What drop-down list is set to Document. However, if you have the Track Changes feature turned on, then the behavior of the Print dialog box differs.
When you turn on Track Changes, Word automatically changes the viewing mode to Final Showing Markup. This mode is obvious if you have the Reviewing toolbar displayed, and if you display the full View menu you will see the Markup toggle is selected. When you later display the Print dialog box, provided you have made at least one tracked edit, you will see that Document Showing Markup is now selected in the Print What drop-down list. (See Figure 1.)
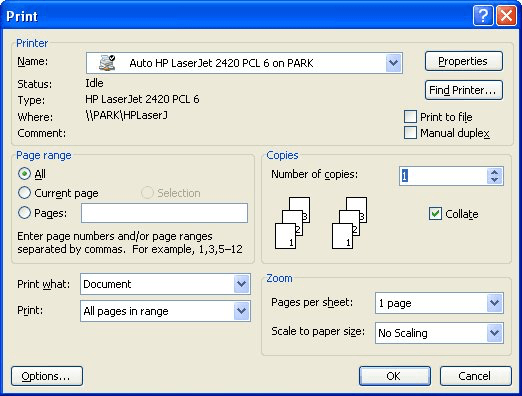
Figure 1. The Print dialog box.
If you don't want to print your markup, it can get bothersome to continually remember to change the Print What setting to Document. There is no way to change the value of this setting to some other default; it is set on-the-fly, each time you display the Print dialog box.
You can, however, create a macro to do your printing. The macro could then be assigned to a toolbar button or a shortcut key, so it can be quickly executed. The following macro prints one copy of the current document, as if you had selected Document in the Print What drop-down:
Sub PrintDoc()
    Application.PrintOut Range:=wdPrintAllDocument, _
      Item:=wdPrintDocumentContent, Copies:=1
End Sub
The Item parameter is the one that specifies what should be printed. If you wanted to print the document with markup, then Item should be set to wdPrintDocumentWithMarkup, whereas wdPrintDocumentContent prints just the document, without markup.
Note:
WordTips is your source for cost-effective Microsoft Word training. (Microsoft Word is the most popular word processing software in the world.) This tip (3790) applies to Microsoft Word 97, 2000, 2002, and 2003.

Create Custom Apps with VBA! Discover how to extend the capabilities of Office 365 applications with VBA programming. Written in clear terms and understandable language, the book includes systematic tutorials and contains both intermediate and advanced content for experienced VB developers. Designed to be comprehensive, the book addresses not just one Office application, but the entire Office suite. Check out Mastering VBA for Microsoft Office 365 today!
Have you ever printed a document, only to see that the page numbers are incorrect on the printout? If so, it could be due ...
Discover MoreYou may want to use a macro to process and then print your document. Part of that printing may involve specifying which ...
Discover MoreSerious users of Word often display non-printing characters on-screen so they can see them easier. If you want those ...
Discover MoreFREE SERVICE: Get tips like this every week in WordTips, a free productivity newsletter. Enter your address and click "Subscribe."
There are currently no comments for this tip. (Be the first to leave your comment—just use the simple form above!)
Got a version of Word that uses the menu interface (Word 97, Word 2000, Word 2002, or Word 2003)? This site is for you! If you use a later version of Word, visit our WordTips site focusing on the ribbon interface.
Visit the WordTips channel on YouTube

FREE SERVICE: Get tips like this every week in WordTips, a free productivity newsletter. Enter your address and click "Subscribe."
Copyright © 2026 Sharon Parq Associates, Inc.
Comments