Written by Allen Wyatt (last updated July 19, 2025)
This tip applies to Word 97, 2000, 2002, and 2003
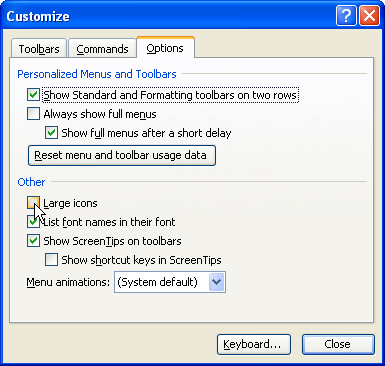
Depending on the resolution on your monitor and your personal preferences, you can adjust the size that Word uses for displaying icons by following these steps:

Figure 1. The Options tab of the Customize dialog box.
You can also, if you prefer, change the icon size in a macro. This is done by setting the .LargeButtons property of the CommandBars collection to either True or False. The correct syntax follows:
CommandBars.LargeButtons = True
This line turns on the large icons, whereas setting the property to False turns them off.
Note:
WordTips is your source for cost-effective Microsoft Word training. (Microsoft Word is the most popular word processing software in the world.) This tip (190) applies to Microsoft Word 97, 2000, 2002, and 2003.

Learning Made Easy! Quickly teach yourself how to format, publish, and share your content using Word 2021 or Microsoft 365. With Step by Step, you set the pace, building and practicing the skills you need, just when you need them! Check out Microsoft Word Step by Step today!
Need to know if a number in a macro is odd or even? It's easy to figure out with the simple calculation shown in this tip.
Discover MoreCreate a macro and you are faced with the (sometimes) challenge of debugging it. Here's how to make that task as simple ...
Discover MoreWant your macro to change the Hidden attribute for some text in your document? It's easier to change than you might think.
Discover MoreFREE SERVICE: Get tips like this every week in WordTips, a free productivity newsletter. Enter your address and click "Subscribe."
There are currently no comments for this tip. (Be the first to leave your comment—just use the simple form above!)
Got a version of Word that uses the menu interface (Word 97, Word 2000, Word 2002, or Word 2003)? This site is for you! If you use a later version of Word, visit our WordTips site focusing on the ribbon interface.
Visit the WordTips channel on YouTube
FREE SERVICE: Get tips like this every week in WordTips, a free productivity newsletter. Enter your address and click "Subscribe."
Copyright © 2026 Sharon Parq Associates, Inc.
Comments