Changing the Context (Shortcut) Menus

Written by Allen Wyatt (last updated September 17, 2022)
This tip applies to Word 97, 2000, 2002, and 2003


1

When you right-click on an item within Windows, a Context menu is displayed. The items listed on the Context menu vary, depending on the item on which you are right-clicking. Within Word, Context menus are referred to as Shortcut menus. (It is unclear why Word would use different terminology than Windows does.) Word allows you to modify the Shortcut menus which appear when you right-click on an item within your document. As an example of the process you can follow to make changes, try these steps. (These steps assume you want to change the Shortcut menu that appears when you right-click on text within your document.)

  1. Choose Customize from the Tools menu. Word displays the Customize dialog box.
  2. Make sure the Toolbars tab is selected. (See Figure 1.)
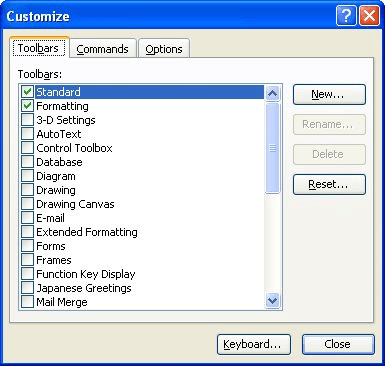
  3. Figure 1. The Toolbars tab of the Customize dialog box.

  4. Scroll through the list of toolbars, and select the Shortcut Menus item. A floating Shortcut Menus toolbar appears.
  5. The toolbar has three items on it. These items represent the three categories of Shortcut menus used by Word.
  6. Click on Text, then choose Text from the drop-down list. This displays the actual Shortcut menu that appears when you right-click on text within your document.
  7. Within the Customize dialog box, click on the Commands tab. (See Figure 2.)
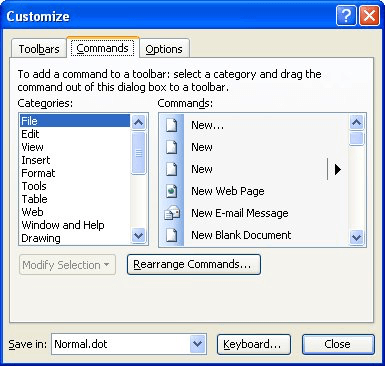
  8. Figure 2. The Commands tab of the Customize dialog box.

  9. Using the Categories list, choose the type of item you want to add to the Shortcut menu. This modifies the commands listed in the Commands list.
  10. Drag items from the Commands list to the position where you want them to appear on the Shortcut menu.
  11. To rename an item on the Shortcut menu, right-click on it and specify the name.
  12. To delete an item on the Shortcut menu, drag the item off the menu.
  13. Repeat steps 7 through 10 to continue modifying the menu.
  14. Close the Shortcut Menus toolbar.
  15. Click Close in the Customize dialog box when you are done.

WordTips is your source for cost-effective Microsoft Word training. (Microsoft Word is the most popular word processing software in the world.) This tip (389) applies to Microsoft Word 97, 2000, 2002, and 2003.

Author Bio

Allen Wyatt

With more than 50 non-fiction books and numerous magazine articles to his credit, Allen Wyatt is an internationally recognized author. He is president of Sharon Parq Associates, a computer and publishing services company. ...

MORE FROM ALLEN

Selecting a Paper Source

Some printers allow you to print on paper from different sources. For instance, a printer may have multiple paper trays, ...

Discover More

Spell-Checking from the Keyboard

If you hate to take your hands from the keyboard, even to right-click on a word, you'll love the information in this tip. ...

Discover More

Deleting Every X Rows

Grab some info from a source other than Excel, and you may find the need to delete a certain pattern of rows from a ...

Discover More

Create Custom Apps with VBA! Discover how to extend the capabilities of Office 2013 (Word, Excel, PowerPoint, Outlook, and Access) with VBA programming, using it for writing macros, automating Office applications, and creating custom applications. Check out Mastering VBA for Office 2013 today!

More WordTips (menu)

Resetting Menus to Their Default

After a few weeks, months, or years of editing Word's menus, you may forget what the original menus looked like. Don't ...

Discover More

Custom Menu Stays, but Options Disappear

It can be disconcerting when a custom menu you've used for years suddenly loses all the options it previously contained. ...

Discover More

Deleting Menu Items

Want to get rid of some menu options so that they can't be selected? It's easy to do when customizing Word by using these ...

Discover More
Subscribe

FREE SERVICE: Get tips like this every week in WordTips, a free productivity newsletter. Enter your address and click "Subscribe."

View most recent newsletter.

Comments

If you would like to add an image to your comment (not an avatar, but an image to help in making the point of your comment), include the characters [{fig}] (all 7 characters, in the sequence shown) in your comment text. You’ll be prompted to upload your image when you submit the comment. Maximum image size is 6Mpixels. Images larger than 600px wide or 1000px tall will be reduced. Up to three images may be included in a comment. All images are subject to review. Commenting privileges may be curtailed if inappropriate images are posted.

What is 7 - 7?

2023-07-14 16:54:10

Peter Straton

Needs to be updated for modern versions of Word (e.g. 2019, 365)


This Site

Got a version of Word that uses the menu interface (Word 97, Word 2000, Word 2002, or Word 2003)? This site is for you! If you use a later version of Word, visit our WordTips site focusing on the ribbon interface.

Videos
Subscribe

FREE SERVICE: Get tips like this every week in WordTips, a free productivity newsletter. Enter your address and click "Subscribe."

(Your e-mail address is not shared with anyone, ever.)

View the most recent newsletter.