Written by Allen Wyatt (last updated August 23, 2025)
This tip applies to Word 97, 2000, 2002, and 2003
Nathan finds it bothersome to continually display the AutoText tab of the AutoCorrect dialog box when he wants to edit a series of AutoText entries. He is wondering if there is perhaps some file or different way that he can make wholesale edits to the entries.
AutoText entries are stored in templates, most often in the Normal template. There is no special file that you can load up and edit directly. Instead, you need to use the tools that Word has provided for the purpose.
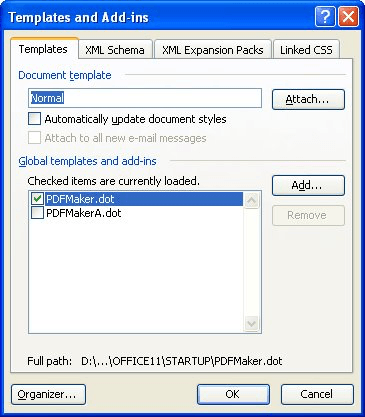
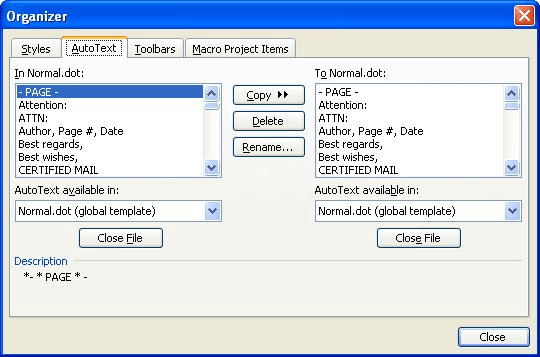
If all you need to do is delete a number of AutoText entries, one tool that will make the task easier is the Organizer. Follow these steps:

Figure 1. The Templates and Add-ins dialog box.

Figure 2. The AutoText tab of the Organizer.
Another way to delete lots of AutoText entries is to use a macro. The following macro provides a simple way to step through each AutoText entry and make a decision as to whether you want to delete it or not.
Sub DeleteAutoTextEntries()
    Dim I As AutoTextEntry
    Dim vAnswer As Variant

    For Each I In NormalTemplate.AutoTextEntries
        vAnswer = MsgBox("Delete AutoText Entry" & vbCr _
          & "Name: " & I.Name & vbCr _
          & "Value: " & I.Value, vbYesNoCancel, _
          "Delete AutoText Entries")
        Select Case vAnswer
            Case vbYes
                I.Delete
            Case vbCancel
                Exit Sub
        End Select
    Next I
End Sub
The macro assumes that the AutoText entries are in the Normal.dot template; if you have them in a different template, you can change the NormalTemplate reference so that a different template is used. The macro displays, in a dialog box, each AutoText entry and you have the chance to delete it or not. You can also click the Cancel button (or press Esc) and the macro is ended right away.
Note:
WordTips is your source for cost-effective Microsoft Word training. (Microsoft Word is the most popular word processing software in the world.) This tip (325) applies to Microsoft Word 97, 2000, 2002, and 2003.

Learning Made Easy! Quickly teach yourself how to format, publish, and share your content using Word 2021 or Microsoft 365. With Step by Step, you set the pace, building and practicing the skills you need, just when you need them! Check out Microsoft Word Step by Step today!
In some instances, Word may actually refuse to save any of your AutoText entries in the Normal.dot template. There are a ...
Discover MoreOnce you've created an AutoText entry, you may believe that it is "set in stone" and cannot be changed. Not so! You can ...
Discover MoreThe AutoText feature of Word is a great tool for adding common text or phrases with a minimum of fuss. What do you do if ...
Discover MoreFREE SERVICE: Get tips like this every week in WordTips, a free productivity newsletter. Enter your address and click "Subscribe."
There are currently no comments for this tip. (Be the first to leave your comment—just use the simple form above!)
Got a version of Word that uses the menu interface (Word 97, Word 2000, Word 2002, or Word 2003)? This site is for you! If you use a later version of Word, visit our WordTips site focusing on the ribbon interface.
Visit the WordTips channel on YouTube
FREE SERVICE: Get tips like this every week in WordTips, a free productivity newsletter. Enter your address and click "Subscribe."
Copyright © 2026 Sharon Parq Associates, Inc.
Comments