Please Note: This article is written for users of the following Microsoft Word versions: 97, 2000, 2002, and 2003. If you are using a later version (Word 2007 or later), this tip may not work for you. For a version of this tip written specifically for later versions of Word, click here: Repeating Table Rows with Manual Page Breaks.
Word includes a great table editor that allows you to create and edit tables to present all sorts of information. You can format your tables so that a number of the rows will be repeated at the top of a page, if the table should happen to extend onto multiple pages. This allows you to designate certain rows as headers, and those rows will appear at the top of each page of the table. (Exactly how you format a table row to repeat at the top of each page has been discussed in other issues of WordTips.)
When formatting your tables, you may be in for a surprise if you use a manual page break to control where the table breaks between pages. If you insert a manual page break in a table, you'll quickly find that the rows won't repeat any more. The reason is very simple—when you insert a manual page break, you are manually breaking the single table into two tables. Thus, the rows in the first table are independent of the rows in the second table. If the first table actually extended to the second page, then the rows would repeat. But this is not the case; the first table is entirely on a single page, and the second table starts at the top of the second page, so no rows repeat.
The problem here is how, exactly, to get a single table (not two tables) to break across pages where you want it to break. If this can be done, then Word will take care of repeating the rows, as desired. There are a few ways you can accomplish this task.
One way to force page breaks in a table without using a manual page break is to insert a new row below the point of the desired break. While in Print Layout view, drag the bottom line of the table row so that it is nearly at the bottom of the page. This should force the next row onto the next page. If the new row goes onto the next page, shorten the row slightly until it ends the previous page. Then select the new row and choose Format | Borders and Shading. On the Borders tab (See Figure 1.) remove the three vertical lines and the bottom line and set the Apply To drop-down list to Cell. After clicking OK, the new row should appear invisible, and your table appears to break as you want it.
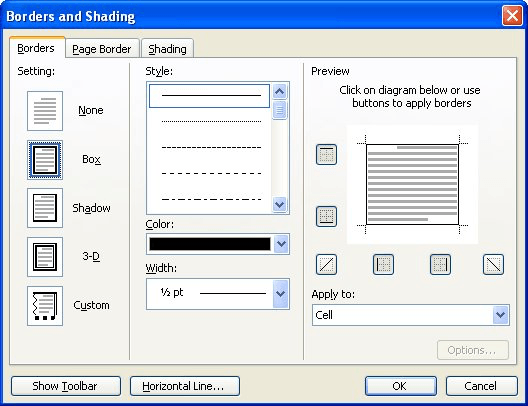
Figure 1. The Borders tab of the Borders and Shading dialog box.
Perhaps the most satisfactory solution is to use Word's paragraph formatting to determine where the table will break between pages. Identify the row that you want at the top of the new page, and then select that row. Choose Format | Paragraph to display the Paragraph dialog box. On the Line and Page Breaks tab (See Figure 2.) choose Page Break Before. What you've just done is to force Word to start all the paragraphs in the row at the top of a new page. Word automatically does this when you click OK, and the row now begins on the new page—with any repeated header rows that you specified for the table.

Figure 2. The Line and Page Breaks tab of the Paragraph dialog box.
The above solution works great if you are doing the "final tweaks" on a table and simply want to specify where the breaks should occur. If you are still editing your table extensively by adding additional information to it, then the "Page Break Before" solution may not be the best because adding new table rows before the formatted row may result in Word extending your table across more pages than you really want. For instance, if you add a couple of rows before the formatted row, then you might end up with the first-page part of the table, a couple of rows on the second spill-over page, and then the balance of the table forced onto a third page because of the "Page Break Before" formatting. The solution is to make sure that you don't apply the "Page Break Before" formatting until you are just about done with the table.
If your only reason for applying "Page Break Before" formatting is to make sure that Word doesn't split a row so that part of it is on one page and part on the next, then a better solution is to follow these steps:
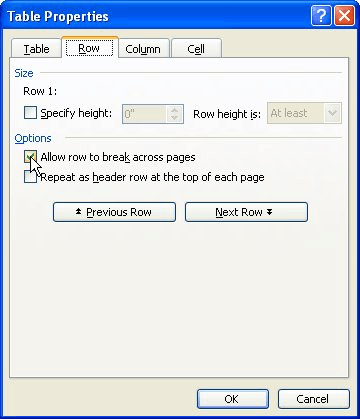
Figure 3. The Row tab of the Table Properties dialog box.
Now you have instructed Word to make sure that none of the rows in the table will straddle a page break. This may provide more satisfactory results if your only desire is to make sure that rows aren't split.
WordTips is your source for cost-effective Microsoft Word training. (Microsoft Word is the most popular word processing software in the world.) This tip (289) applies to Microsoft Word 97, 2000, 2002, and 2003. You can find a version of this tip for the ribbon interface of Word (Word 2007 and later) here: Repeating Table Rows with Manual Page Breaks.

Create Custom Apps with VBA! Discover how to extend the capabilities of Office 365 applications with VBA programming. Written in clear terms and understandable language, the book includes systematic tutorials and contains both intermediate and advanced content for experienced VB developers. Designed to be comprehensive, the book addresses not just one Office application, but the entire Office suite. Check out Mastering VBA for Microsoft Office 365 today!
Do you want your table rows to be split between pages? Word allows you to format the table so that rows stay together and ...
Discover MoreNeed to adjust the space between individual cells in a table? Word gives you a good deal of control over this spacing, as ...
Discover MoreNeed to make your table a different size? It's easy to do, using the same general technique you use when resizing a ...
Discover MoreFREE SERVICE: Get tips like this every week in WordTips, a free productivity newsletter. Enter your address and click "Subscribe."
2016-08-23 12:37:15
Ron
Kristine
On the "Home" tab go to "Praragraph" then click on the little arrow in the lower right of the box. It will open a new box.
2016-08-21 13:44:17
Kristine
this doesn't make sense. there is no way to use Format/Paragraph command while in a table. You can only access this command when you are in the body of the word document. I cannot see how to use this tip.
2016-03-12 04:50:56
erica dyson
I think keep with next on the row is best.
Got a version of Word that uses the menu interface (Word 97, Word 2000, Word 2002, or Word 2003)? This site is for you! If you use a later version of Word, visit our WordTips site focusing on the ribbon interface.
Visit the WordTips channel on YouTube

FREE SERVICE: Get tips like this every week in WordTips, a free productivity newsletter. Enter your address and click "Subscribe."
Copyright © 2026 Sharon Parq Associates, Inc.
 Please Note:
This article is written for users of the following Microsoft Word versions: 97, 2000, 2002, and 2003. If you are using a later version (Word 2007 or later), this tip may not work for you. For a version of this tip written specifically for later versions of Word, click here:
Please Note:
This article is written for users of the following Microsoft Word versions: 97, 2000, 2002, and 2003. If you are using a later version (Word 2007 or later), this tip may not work for you. For a version of this tip written specifically for later versions of Word, click here:
Comments