Written by Allen Wyatt (last updated November 1, 2025)
This tip applies to Word 97, 2000, 2002, and 2003
The Outlining toolbar in Word contains a number of tools that are very helpful, and not just when you are working in Outline view. Most notably it contains two tools that are helpful for tables of contents. One tool, Update TOC, is great for updating the TOC while you are developing the document. The other tool, Go To TOC, allows you to jump back to the TOC from any place in the document.
Because these tools are so helpful, some people like to display the Outlining toolbar all the time. It displays automatically when you switch to Outline view, but at other times you must choose View | Toolbars | Outlining to display it. Getting the Outlining toolbar to display at all times is a bit trickier. The only way to do this is by using a macro that runs automatically when you start Word. You can do this by adding the following macro to the Normal.dot template:
Sub AutoOpen()
    CommandBars("Outlining").Visible = True
End Sub
If you prefer not to use a macro, you should consider simply giving up on the Outlining toolbar and creating your own custom toolbar. If all you are interested in is the TOC-related tools, this is a very easy thing to do:
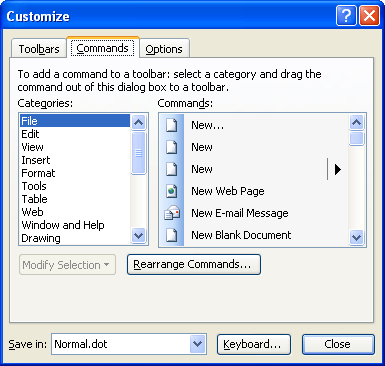
Figure 1. The Commands tab of the Customize dialog box.
With the two tools appearing on a different toolbar, you no longer need to display the Outlining toolbar all the time.
Note:
WordTips is your source for cost-effective Microsoft Word training. (Microsoft Word is the most popular word processing software in the world.) This tip (205) applies to Microsoft Word 97, 2000, 2002, and 2003.

Discover the Power of Microsoft Office This beginner-friendly guide reveals the expert tips and strategies you need to skyrocket your productivity and use Office 365 like a pro. Mastering software like Word, Excel, and PowerPoint is essential to be more efficient and advance your career. Simple lessons guide you through every step, providing the knowledge you need to get started. Check out Microsoft Office 365 For Beginners today!
Word 2002 and Word 2003 use dynamic toolbars that can adjust themselves based on usage patterns of the tools. This can ...
Discover MoreA few methods for finding an errant toolbar in Word.
Discover MoreWord allows you to create custom toolbars that can speed how you work with various tools and macros. When you first ...
Discover MoreFREE SERVICE: Get tips like this every week in WordTips, a free productivity newsletter. Enter your address and click "Subscribe."
There are currently no comments for this tip. (Be the first to leave your comment—just use the simple form above!)
Got a version of Word that uses the menu interface (Word 97, Word 2000, Word 2002, or Word 2003)? This site is for you! If you use a later version of Word, visit our WordTips site focusing on the ribbon interface.
Visit the WordTips channel on YouTube

FREE SERVICE: Get tips like this every week in WordTips, a free productivity newsletter. Enter your address and click "Subscribe."
Copyright © 2026 Sharon Parq Associates, Inc.
Comments