Please Note: This article is written for users of the following Microsoft Word versions: 97, 2000, 2002, and 2003. If you are using a later version (Word 2007 or later), this tip may not work for you. For a version of this tip written specifically for later versions of Word, click here: Keeping a Picture Title with the Picture.
Denis has a document that uses landscape orientation. He inserted a picture in the document and, following the picture, added the title for the picture. The title line was separated from the picture by one blank line and the title line was followed by one blank line. To ensure that the picture occupied as much of the page as possible without exceeding the page margins, Denis increased the picture size, in Word, until the final blank line disappeared from the page, and then he saved the file. (The final blank line overflowed onto the next page.)
When Denis reopened the file, the title curiously appeared on the following page rather than following the picture, as desired. When he repeated the sizing operation, although he can reduce the size of the picture by as much as fifty percent or more, he cannot get the title to move back to the same page as the picture.
It is most likely that this problem is caused by paragraph formatting. In order to see what is happening in Word, you'll want to turn on non-printing characters so you can see where the actual paragraph breaks are. (You turn on the display of non-printing characters by clicking the Show/Hide tool on the toolbar. When you do, you should see a backwards P character appear at the end of each paragraph. These don't print; they are purely for information.)
With the non-printing characters displayed and based on the description of the problem, you should see only two of the backwards P characters—one to the right of your picture and one to the right of your picture title. If you see any addition backwards P characters, delete them. This action, alone, may solve the problem.
If it does not solve the problem, then perform the following steps:
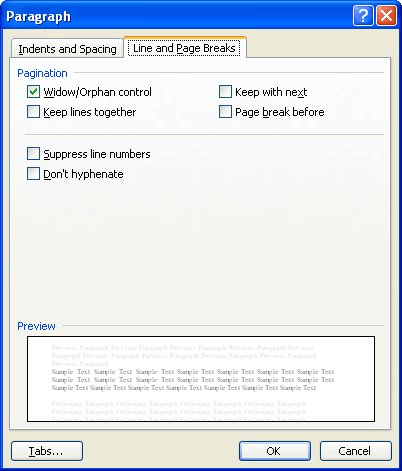
Figure 1. The Line and Page Breaks tab of the Paragraph dialog box.
Your picture and picture title should now stay together, on the same page.
You may also want to consider modifying how you group your pictures and titles together. Some people find it handy to create a text box and size the text box so that it is as large as you want your picture to be. Then, insert the picture into the text box, press Enter once, and type your picture title. The picture and the title are, in this way, contained within a single text box. The benefit is that the text box is treated as a single unit by Word, allowing you to ensure that it remains on a single page.
Finally, you could always load your picture into a graphics program and add your title within that program. In this way the title because a part of the image itself, and you wouldn't need to worry about trying to add the title within Word.
WordTips is your source for cost-effective Microsoft Word training. (Microsoft Word is the most popular word processing software in the world.) This tip (9716) applies to Microsoft Word 97, 2000, 2002, and 2003. You can find a version of this tip for the ribbon interface of Word (Word 2007 and later) here: Keeping a Picture Title with the Picture.

The First and Last Word on Word! Bestselling For Dummies author Dan Gookin puts his usual fun and friendly candor back to work to show you how to navigate Word 2019. Spend more time working and less time trying to figure it all out! Check out Word 2019 For Dummies today!
Word allows you to easily add images to your documents. For documents intended for monochrome printers, grayscale images ...
Discover MoreWord allows you to add more than text to your documents; you can also add graphics. Once added, you can modify the size ...
Discover MoreDocuments are often made up of more than just text. If you have drawing objects in your document, you will doubtless need ...
Discover MoreFREE SERVICE: Get tips like this every week in WordTips, a free productivity newsletter. Enter your address and click "Subscribe."
There are currently no comments for this tip. (Be the first to leave your comment—just use the simple form above!)
Got a version of Word that uses the menu interface (Word 97, Word 2000, Word 2002, or Word 2003)? This site is for you! If you use a later version of Word, visit our WordTips site focusing on the ribbon interface.
Visit the WordTips channel on YouTube

FREE SERVICE: Get tips like this every week in WordTips, a free productivity newsletter. Enter your address and click "Subscribe."
Copyright © 2026 Sharon Parq Associates, Inc.
 Please Note:
This article is written for users of the following Microsoft Word versions: 97, 2000, 2002, and 2003. If you are using a later version (Word 2007 or later), this tip may not work for you. For a version of this tip written specifically for later versions of Word, click here:
Please Note:
This article is written for users of the following Microsoft Word versions: 97, 2000, 2002, and 2003. If you are using a later version (Word 2007 or later), this tip may not work for you. For a version of this tip written specifically for later versions of Word, click here:
Comments