Please Note: This article is written for users of the following Microsoft Word versions: 97, 2000, 2002, and 2003. If you are using a later version (Word 2007 or later), this tip may not work for you. For a version of this tip written specifically for later versions of Word, click here: Using Non-Printing Notes.

Using Non-Printing Notes

Written by Allen Wyatt (last updated March 15, 2025)
This tip applies to Word 97, 2000, 2002, and 2003

Word has a text attribute that has been around since the early days of Word for DOS. Hidden text is an attribute that allows you to enter information that you can easily suppress. You can turn it off so it does not appear on the screen, or you can turn it off so it doesn't print. To format text as hidden, follow these steps:
  1. Select the text you want hidden.
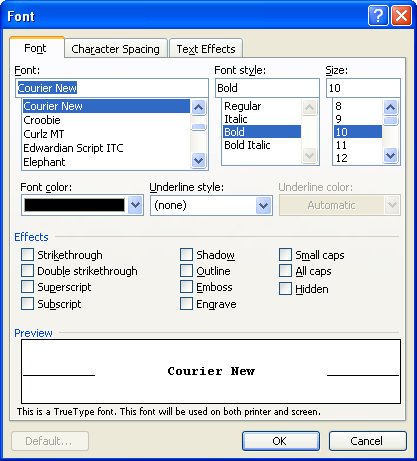
  2. Select Font from the Format menu. Word displays the Font dialog box. (See Figure 1.)
  3. Figure 1. The Font tab of the Font dialog box.
  4. Click on the Hidden check box. (The check box isn't hidden; it is named "Hidden.")
  5. Click on OK.
Hidden text shows on the screen with a dotted underline. Unfortunately, this is easy to miss as you are reading the document on the screen, so it is a good idea to use a text color to highlight your hidden text. For instance, it could be green as well as hidden. In this way, your notes and messages are much harder to miss. You can even define a character or paragraph style that has the hidden attribute set, along with the color attribute to make the text more noticeable. You can control whether hidden text is displayed or printed. To control the display of hidden text on the screen, follow these steps:
  1. Choose Options from the Tools menu. Word displays the Options dialog box.
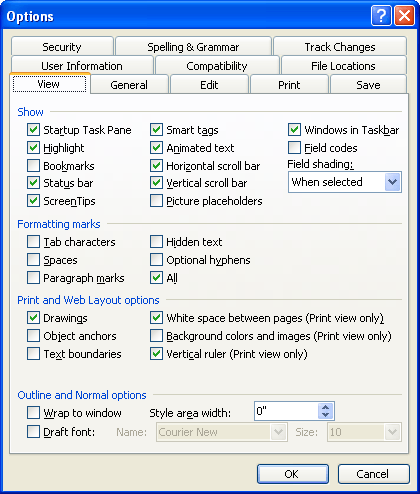
  2. Make sure the View tab is selected. (See Figure 2.)
  3. Figure 2. The View tab of the Options dialog box.
  4. Clear the Hidden Text check box if you don't want it displayed, select the check box if you do want it displayed.
  5. Click on OK.
Controlling the printing of hidden text is an entirely different matter. Word allows you to control whether hidden text is printed with your document. To do this, follow these steps:
  1. Select Options from the Tools menu. Word displays the Options dialog box.
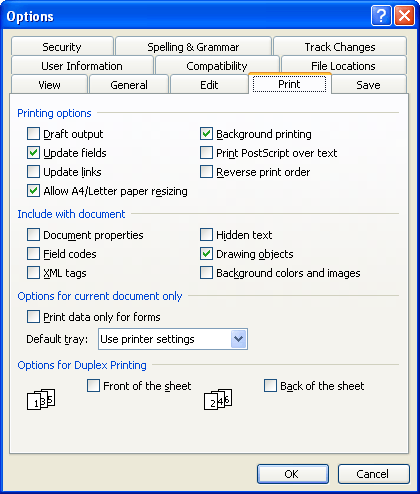
  2. Make sure Print tab is selected. (See Figure 3.)
  3. Figure 3. The Print tab of the Options dialog box.

  4. Click on the Hidden Text check box. If the check box is selected Word prints hidden text.
  5. Click on OK.

WordTips is your source for cost-effective Microsoft Word training. (Microsoft Word is the most popular word processing software in the world.) This tip (1135) applies to Microsoft Word 97, 2000, 2002, and 2003. You can find a version of this tip for the ribbon interface of Word (Word 2007 and later) here: Using Non-Printing Notes.

Author Bio

Allen Wyatt

With more than 50 non-fiction books and numerous magazine articles to his credit, Allen Wyatt is an internationally recognized author. He is president of Sharon Parq Associates, a computer and publishing services company. ...

MORE FROM ALLEN

Pasting Multiple Paragraphs Into a Single Cell

Copying information from one program (such as Word) to another (such as Excel) is a common occurrence. If you want to ...

Discover More

Automatically Advancing by a Month

Excel allows you to perform quite a few operations using dates in your worksheet. Sometimes, however, the answer may not ...

Discover More

Indexing Based on a Range of Letters

Word provides many options for creating indexes. One option allows you to specify that the index contain only entries ...

Discover More

Do More in Less Time! An easy-to-understand guide to the more advanced features available in the Microsoft 365 version of Word. Enhance the quality of your documents and boost productivity in any field with this in-depth resource. Complete your Word-related tasks more efficiently as you unlock lesser-known tools and learn to quickly access the features you need. Check out Microsoft 365 Word For Professionals For Dummies today!

More WordTips (menu)

Creating Custom Underlines

Word provides a wide assortment of underlines that you can apply to your text. If the assortment isn't wide enough for ...

Discover More

Engraving Text

Word allows you to format your text in a number of different ways. One rather esoteric way to format your text is by ...

Discover More

Changing Character Color

Need to easily change the color of some selected text? A quick way to do it is with a custom macro that sets just the hue ...

Discover More
Subscribe

FREE SERVICE: Get tips like this every week in WordTips, a free productivity newsletter. Enter your address and click "Subscribe."

View most recent newsletter.

Comments

If you would like to add an image to your comment (not an avatar, but an image to help in making the point of your comment), include the characters [{fig}] (all 7 characters, in the sequence shown) in your comment text. You’ll be prompted to upload your image when you submit the comment. Maximum image size is 6Mpixels. Images larger than 600px wide or 1000px tall will be reduced. Up to three images may be included in a comment. All images are subject to review. Commenting privileges may be curtailed if inappropriate images are posted.

What is 5 - 0?

There are currently no comments for this tip. (Be the first to leave your comment—just use the simple form above!)


This Site

Got a version of Word that uses the menu interface (Word 97, Word 2000, Word 2002, or Word 2003)? This site is for you! If you use a later version of Word, visit our WordTips site focusing on the ribbon interface.

Videos
Subscribe

FREE SERVICE: Get tips like this every week in WordTips, a free productivity newsletter. Enter your address and click "Subscribe."

(Your e-mail address is not shared with anyone, ever.)

View the most recent newsletter.