Please Note: This article is written for users of the following Microsoft Word versions: 97, 2000, 2002, and 2003. If you are using a later version (Word 2007 or later), this tip may not work for you. For a version of this tip written specifically for later versions of Word, click here: Protecting Tracked Changes.
Written by Allen Wyatt (last updated November 5, 2022)
This tip applies to Word 97, 2000, 2002, and 2003
Vikas has a document on which many people in his office work. The original author of the document turns on Track Changes, and then sends the document to others. Unfortunately, it is possible for other people to turn off Track Changes or to accept/reject changes done by others who previously worked on the document. Vikas wonders if there is a way that Track Changes can be locked so that only the original author can turn it off and a way that only the original author can accept/reject changes.
Theoretically, there is a way. What you need to do is to protect the document so that only tracked changes can be made by other editors. The way you do this differs from one version of Word to another. If you are using Word 97 or Word 2000, follow these steps:
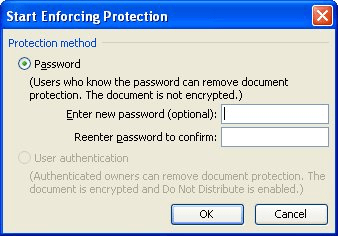
If you are using Word 2002 or Word 2003, follow these steps:

Figure 1. The Start Enforcing Protection dialog box.
With these protections in place, people can view and edit your document with the changes being shown as regular Track Changes edits. Further, nobody can accept or reject changes without knowing the original password used to protect the document.
There is, of course, a big caveat to all of this, and it bears repeating any time people start to talk about protection. In Word, document protection will only provide protection for those who decide to "play nice." There are ways around the protection—the most notable of which is that an editor can simply copy all of the text from the edited document into a new document and start passing around that new document as if it were the original document. There is, unfortunately, no way around such behavior with Word documents.
WordTips is your source for cost-effective Microsoft Word training. (Microsoft Word is the most popular word processing software in the world.) This tip (577) applies to Microsoft Word 97, 2000, 2002, and 2003. You can find a version of this tip for the ribbon interface of Word (Word 2007 and later) here: Protecting Tracked Changes.

The First and Last Word on Word! Bestselling For Dummies author Dan Gookin puts his usual fun and friendly candor back to work to show you how to navigate Word 2019. Spend more time working and less time trying to figure it all out! Check out Word 2019 For Dummies today!
When the Track Changes feature is turned on, Word, by default, displays the edits made by each document editor in ...
Discover MoreEver wonder how to customize the way the Track Changes feature displays revision bars at the side of changed material? ...
Discover MoreWord can easily (and handily) keep track of changes you make in your document. You may not want all your changes tracked, ...
Discover MoreFREE SERVICE: Get tips like this every week in WordTips, a free productivity newsletter. Enter your address and click "Subscribe."
There are currently no comments for this tip. (Be the first to leave your comment—just use the simple form above!)
Got a version of Word that uses the menu interface (Word 97, Word 2000, Word 2002, or Word 2003)? This site is for you! If you use a later version of Word, visit our WordTips site focusing on the ribbon interface.
Visit the WordTips channel on YouTube
FREE SERVICE: Get tips like this every week in WordTips, a free productivity newsletter. Enter your address and click "Subscribe."
Copyright © 2026 Sharon Parq Associates, Inc.
Comments