Written by Allen Wyatt (last updated July 20, 2020)
This tip applies to Word 97, 2000, 2002, and 2003
One problem that Paul has come across is when he selects a series of different parts of the document and he wants to cycle through them, he can't find the way to do this. For example, sometimes Paul might select all of the instances of a particular type of style, such as Heading 2. If he wants to cycle through each of the selected instances, there is no way that he can discern.
There are several ways to select items in a document. One of the most common methods is to use Find and Replace to select all instances of, say, a particular word or phrase. These instances can be highlighted, but there is no way to step through them with the items still highlighted or selected; Word simply does not have that capability as part of Find and Replace.
Another common method for selecting items is to select instances of a style by using the Styles and Formatting pane. Click the down-arrow at the right of a style name (in the Styles and Formatting pane) and you can choose the Select All option. Word dutifully selects all instances of that particular style. Even though you can select them all, you still cannot cycle through the items that are selected.
It appears that the only solution in these instances is to scroll through the document, visually looking for anything selected or highlighted.
There is one other thing that might be tried, however. This involves using the Document Map, and it involves a bit of setup. (Because of the amount of setup, you probably won't want to use this approach for everyday, run-of-the-mill navigation of selected items.)
The Document Map usually shows headings in a document, but you can tell Word to show other elements. Make sure you are viewing your document in Print Layout view and open the Document Map (View | Document Map). If your document already contains some paragraphs that use the standard heading styles, these will show up in the Document Map.
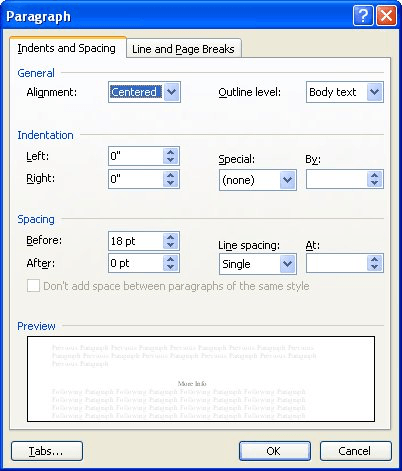
In your document, select the items you want selected. For instance, you can use the Styles and Formatting pane to select all instances of a particular style. With the items still selected, following these steps:

Figure 1. The Indents and Spacing tab of the Paragraph dialog box.
The selected items now show up in the Document Map. Although they may not remain selected in the main document, they do continue to show up in the Document Map. You can click on any of the items in the Document Map and you then see that item in the main document.
WordTips is your source for cost-effective Microsoft Word training. (Microsoft Word is the most popular word processing software in the world.) This tip (9316) applies to Microsoft Word 97, 2000, 2002, and 2003.

Create Custom Apps with VBA! Discover how to extend the capabilities of Office 365 applications with VBA programming. Written in clear terms and understandable language, the book includes systematic tutorials and contains both intermediate and advanced content for experienced VB developers. Designed to be comprehensive, the book addresses not just one Office application, but the entire Office suite. Check out Mastering VBA for Microsoft Office 365 today!
As you navigate through a document, you may have a need to move forward or backward a specific number of lines. This is ...
Discover MoreWhen you need to get around a long document, a really helpful method is to use the Outline view built into Word. This tip ...
Discover MoreOne way you can navigate through a document is to jump from section to section. Here's the traditional way to quickly get ...
Discover MoreFREE SERVICE: Get tips like this every week in WordTips, a free productivity newsletter. Enter your address and click "Subscribe."
There are currently no comments for this tip. (Be the first to leave your comment—just use the simple form above!)
Got a version of Word that uses the menu interface (Word 97, Word 2000, Word 2002, or Word 2003)? This site is for you! If you use a later version of Word, visit our WordTips site focusing on the ribbon interface.
Visit the WordTips channel on YouTube
FREE SERVICE: Get tips like this every week in WordTips, a free productivity newsletter. Enter your address and click "Subscribe."
Copyright © 2026 Sharon Parq Associates, Inc.
Comments