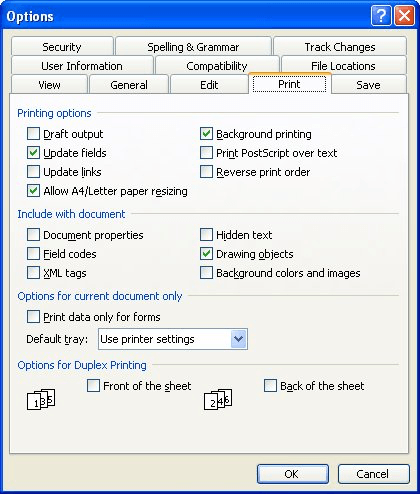
Word 2003 includes the ability to handle XML-based information in documents. As part of this capability, Word allows you to print XML tags when you print a document for which they are appropriate. If you have an XML document, and a schema is attached and applied to the document, then you can follow these steps to print the XML tags:

Figure 1. The Print tab of the Options dialog box.
It is interesting to note that even though XML is touted as a feature of Word 2003, full XML features are not available for all variations of the product. All variations of Word 2003 can save XML documents with the Word XML schema, but only the Word provided with Office 2003 Professional or the stand-alone version of Word 2003 include all the XML capabilities.
WordTips is your source for cost-effective Microsoft Word training. (Microsoft Word is the most popular word processing software in the world.) This tip (3904) applies to Microsoft Word 2003.

Learning Made Easy! Quickly teach yourself how to format, publish, and share your content using Word 2021 or Microsoft 365. With Step by Step, you set the pace, building and practicing the skills you need, just when you need them! Check out Microsoft Word Step by Step today!
Want your document to print out the same on printers other than your own? This may be an elusive quest, as explained in ...
Discover MoreIf you routinely need to print more than one copy of a document, you'll love the ideas presented in this tip. There's ...
Discover MoreNeed to print a copy of a document but you don't care if it looks as "pretty" as you want the final printout to look? You ...
Discover MoreFREE SERVICE: Get tips like this every week in WordTips, a free productivity newsletter. Enter your address and click "Subscribe."
There are currently no comments for this tip. (Be the first to leave your comment—just use the simple form above!)
Got a version of Word that uses the menu interface (Word 97, Word 2000, Word 2002, or Word 2003)? This site is for you! If you use a later version of Word, visit our WordTips site focusing on the ribbon interface.
Visit the WordTips channel on YouTube
FREE SERVICE: Get tips like this every week in WordTips, a free productivity newsletter. Enter your address and click "Subscribe."
Copyright © 2026 Sharon Parq Associates, Inc.
Comments