Please Note: This article is written for users of the following Microsoft Word versions: 97, 2000, 2002, and 2003. If you are using a later version (Word 2007 or later), this tip may not work for you. For a version of this tip written specifically for later versions of Word, click here: Adding a Break to Your Document.
As you are typing in Word, you will notice the program automatically keeps track of where you are. When your document no longer fits on a single page, Word automatically inserts a page break (indicated by a thin dashed line when viewing your document in Normal view) and wraps your text to the next page.
There may be times, however, when you want to insert a break in your text automatically. Word supports the following types of breaks:
To insert a break in your document, follow these steps if you are using Word 2007:
If you are using a version of Word prior to Word 2007, follow these steps instead:
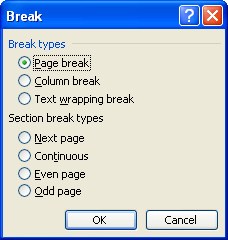
Figure 1. The Break dialog box.
WordTips is your source for cost-effective Microsoft Word training. (Microsoft Word is the most popular word processing software in the world.) This tip (183) applies to Microsoft Word 97, 2000, 2002, and 2003. You can find a version of this tip for the ribbon interface of Word (Word 2007 and later) here: Adding a Break to Your Document.

The First and Last Word on Word! Bestselling For Dummies author Dan Gookin puts his usual fun and friendly candor back to work to show you how to navigate Word 2019. Spend more time working and less time trying to figure it all out! Check out Word 2019 For Dummies today!
Do you have just a line or two of text that "spills over" onto another printed page? Here are some ways you can compress ...
Discover MoreSection breaks are used to divide a document into two or more sections that can be independently formatting. If you want ...
Discover MoreWord allows you to add several types of "breaks" into your document. If you later want to remove any of them, you can use ...
Discover MoreFREE SERVICE: Get tips like this every week in WordTips, a free productivity newsletter. Enter your address and click "Subscribe."
2019-05-21 12:19:11
Justin
Hi,
Thanks for all the wonderfully helpful tips!
BTW, Re Page Breaks (above): A friend showed me that you can also get a page break with the keyboard shortcut Ctrl+Enter.
Thanks
2014-11-12 12:31:29
Liz Bacon
I am looking to hire a word expert for a clinet job I have going - any leads?
Got a version of Word that uses the menu interface (Word 97, Word 2000, Word 2002, or Word 2003)? This site is for you! If you use a later version of Word, visit our WordTips site focusing on the ribbon interface.
Visit the WordTips channel on YouTube

FREE SERVICE: Get tips like this every week in WordTips, a free productivity newsletter. Enter your address and click "Subscribe."
Copyright © 2026 Sharon Parq Associates, Inc.
 Please Note:
This article is written for users of the following Microsoft Word versions: 97, 2000, 2002, and 2003. If you are using a later version (Word 2007 or later), this tip may not work for you. For a version of this tip written specifically for later versions of Word, click here:
Please Note:
This article is written for users of the following Microsoft Word versions: 97, 2000, 2002, and 2003. If you are using a later version (Word 2007 or later), this tip may not work for you. For a version of this tip written specifically for later versions of Word, click here:
Comments