Please Note: This article is written for users of the following Microsoft Word versions: 97, 2000, 2002, and 2003. If you are using a later version (Word 2007 or later), this tip may not work for you. For a version of this tip written specifically for later versions of Word, click here: Using Track Changes.
Written by Allen Wyatt (last updated January 18, 2020)
This tip applies to Word 97, 2000, 2002, and 2003
Word includes a feature that allows you to see what changes have been made to a document. These changes, known as markup, are primarily created using the Track Changes feature of Word. To turn on Track Changes, use these steps if you are using Word 97 or Word 2000:
If you are using Word 2002 or Word 2003, you still select Track Changes from the Tools menu, but doing so displays the Reviewing toolbar, and the Track Changes tool on the toolbar is selected.
Now, as you make changes to your document, your changes are shown on-screen using marks that are very similar to those used manually by editors for years.
The exact way in which markup is shown depends on the version of Word you are using. If you are using Word 97 or Word 2000, text that is added is shown as underlined and text that is deleted is shown with a line through the middle. If you are using a later version of Word, added text is still shown as underlined, but deleted text is shown at the right of the document in elements called "balloons."
If desired, you can change the way in which Word shows the markup. To specify how the edits should be noted, follow these steps:
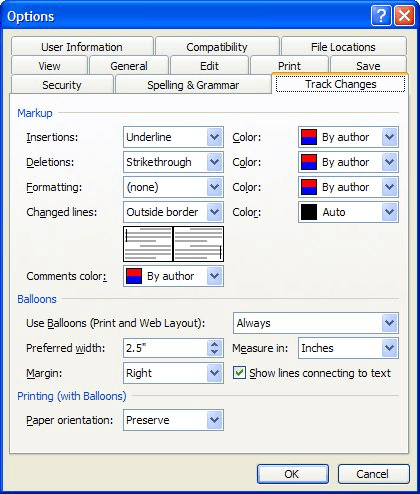
Figure 1. The Track Changes tab of the Options dialog box.
After you are through making changes in the document, or if you receive a document from someone else that is marked up, you need to go through a process of examining each revision and deciding whether to keep it or toss it out. This is done by searching for the changes and then making your decision on a case-by-case basis. You do this in the following manner if you are using Word 97 or Word 2000:
If you are using Word 2002 or Word 2003, then you need to follow these steps to resolve changes:
WordTips is your source for cost-effective Microsoft Word training. (Microsoft Word is the most popular word processing software in the world.) This tip (3889) applies to Microsoft Word 97, 2000, 2002, and 2003. You can find a version of this tip for the ribbon interface of Word (Word 2007 and later) here: Using Track Changes.

Do More in Less Time! Are you ready to harness the full power of Word 2013 to create professional documents? In this comprehensive guide you'll learn the skills and techniques for efficiently building the documents you need for your professional and your personal life. Check out Word 2013 In Depth today!
The Track changes feature in Word is a great help in editing documents, particularly if you are working with others or ...
Discover MoreTrack Changes is a great tool for developing documents. If you want to copy text from one document to another, with ...
Discover MoreWord can easily (and handily) keep track of changes you make in your document. You may not want all your changes tracked, ...
Discover MoreFREE SERVICE: Get tips like this every week in WordTips, a free productivity newsletter. Enter your address and click "Subscribe."
There are currently no comments for this tip. (Be the first to leave your comment—just use the simple form above!)
Got a version of Word that uses the menu interface (Word 97, Word 2000, Word 2002, or Word 2003)? This site is for you! If you use a later version of Word, visit our WordTips site focusing on the ribbon interface.
Visit the WordTips channel on YouTube

FREE SERVICE: Get tips like this every week in WordTips, a free productivity newsletter. Enter your address and click "Subscribe."
Copyright © 2025 Sharon Parq Associates, Inc.
 Please Note:
This article is written for users of the following Microsoft Word versions: 97, 2000, 2002, and 2003. If you are using a later version (Word 2007 or later), this tip may not work for you. For a version of this tip written specifically for later versions of Word, click here:
Please Note:
This article is written for users of the following Microsoft Word versions: 97, 2000, 2002, and 2003. If you are using a later version (Word 2007 or later), this tip may not work for you. For a version of this tip written specifically for later versions of Word, click here:
Comments