Please Note: This article is written for users of the following Microsoft Word versions: 97, 2000, 2002, and 2003. If you are using a later version (Word 2007 or later), this tip may not work for you. For a version of this tip written specifically for later versions of Word, click here: Spell Check Misses Misspelled Words.
Written by Allen Wyatt (last updated May 6, 2021)
This tip applies to Word 97, 2000, 2002, and 2003
Barbara related a problem that she ran into with a Word document: She ran a spell check and Word did not detect several misspelled words. Barbara is wondering why this would happen.
There are several reasons why this situation could occur, which means that you need to do some analysis of the problem document (and Word itself) to figure out what is going on.
If the problem occurs in only one document or with some occurrences of misspelled words in a particular document, then that means that the problem is with the document itself. The most common reason is that the text has somehow been formatted so that Word ignores it when checking spelling or grammar. You can find out if this is the case by first selecting the word that was missed during the spell check. Then select Tools | Language | Set Language. Word displays the Language dialog box.
If you are using Word 97, check the list of available languages to see if the (no proofing) option is selected. If you are using a later version of Word, look at the Do Not Check Spelling or Grammar check box to see if it contains a check mark. If either of these settings is true, then Word ignores the selected text when checking either spelling or grammar. Don't change the setting yet; you still have some detective work to figure out the actual problem.
Go ahead and dismiss the Language dialog box for now. You now need to figure out how pervasive the "no proofing" or "do not check" setting is within the document. First check to see if this setting is related to whatever style is used to format the selected text. (How you check style settings has been covered in other issues of WordTips.) If the setting is made in the style, then any other text formatted with that style in the document will also be skipped during a spelling check. The solution, in that case, is to either use a different style that allows the proofing, or change the style so that the style permits proofing.
If the setting is not made in the style, then that means that someone specifically turned off the proofing for the particular text. While you can explicitly change it for this particular instance of the word, you might need to change it a lot of other places in the document, as well. If you are sure that you want the entire document to be proofed, then you should simply select the entire document (press Ctrl+A), display the Language dialog box again, and select the language you want used for proofing (Word 97) or clear the Do Not Check Spelling or Grammar check box (later versions of Word).
If you've checked the proofing setting in the Language dialog box and found no problem there, or if the problem of missing misspelled words occurs in more than one document, then the problem is likely with the spelling checker itself. In this case, the most likely scenario is that someone was previously doing a spell check on the document and, when the misspelled word was presented for review, clicked the "Add" button. This action means that the misspelled word is never again flagged as wrong since it is now added to the custom dictionary on the system.
One quick way to check if this is the problem is to take the document and spell-check it on a different system. Unless both systems share a common custom dictionary or have the same misspelled word in their individual custom dictionaries, you should note that on the second system the misspelled word is properly flagged as misspelled.
If you don't have access to a second machine, or if you think both machines may be using the same custom dictionary, then try these steps:
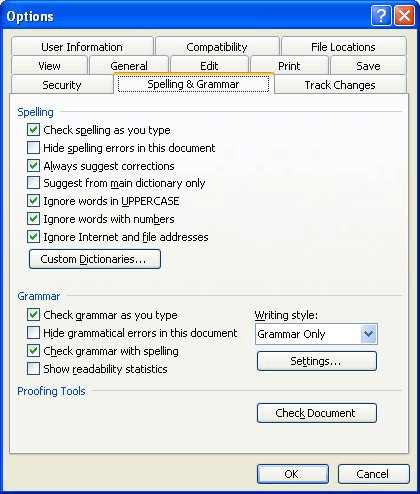
Figure 1. The Spelling & Grammar tab of the Options dialog box.
If the spelling check flagged the misspelled words this time, then the problem is in one of your custom dictionaries. You can correct the problem by following these steps if you are using Word 97 or Word 2000:
The steps for editing a custom dictionary are different in Word 2002 and Word 2003:
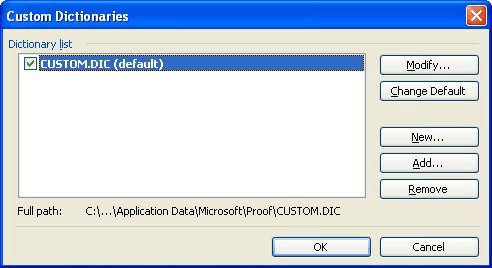
Figure 2. The Custom Dictionaries dialog box.
If the problem is still not resolved, then it could be because of some of the other proofing settings on your system. For instance, if the misspelled words that are being missed are all in uppercase letters, then they are not being caught because Word, by default, doesn't proof words that are all in uppercase. Display the Spelling & Grammar tab of the Options dialog box again and make sure the Ignore Words in Uppercase check box is cleared. If the misspelled words have digits in them, you will also want to clear the Ignore Words with Numbers check box.
WordTips is your source for cost-effective Microsoft Word training. (Microsoft Word is the most popular word processing software in the world.) This tip (501) applies to Microsoft Word 97, 2000, 2002, and 2003. You can find a version of this tip for the ribbon interface of Word (Word 2007 and later) here: Spell Check Misses Misspelled Words.

Learning Made Easy! Quickly teach yourself how to format, publish, and share your content using Word 2021 or Microsoft 365. With Step by Step, you set the pace, building and practicing the skills you need, just when you need them! Check out Microsoft Word Step by Step today!
The rules of professional editing often require that editorial changes in a quote be noted with brackets. These brackets, ...
Discover MoreWhat do you do when Word's spelling check marks some common, everyday words as wrong? Here are some ideas of places you ...
Discover MoreNeed to make sure that Word includes abbreviations when you check a document's spelling? Here's how to make sure that ...
Discover MoreFREE SERVICE: Get tips like this every week in WordTips, a free productivity newsletter. Enter your address and click "Subscribe."
2016-11-05 15:15:10
Detect Language Automatically issue.
Political correctness might suggest that we should detect our working language automatically, but many of us are working exclusively in American English, so …
Occasionally, Word arbitrarily resets some text (sometimes much of the text) to another language, based on words that appear early in the document, especially within informally formatted documents. I used to work for a company on San Ignacio Avenue in San Jose, California. With that address in the early front matter, many odd spelling errors showed up, and tracked changes reported words switched to Portuguese (Brazil) [though the words in the address are all Spanish].
For American documents you should consider setting the language explicitly to English (U.S.). To determine the language of suspected text, click within the text. The language, which appears on the status bar, should be English (U.S [truncated in the available space]. If any other language appears:
Press CTRL+A to select the entire document (or do this within individual style settings).
From the menu, click Tools > Language > Set Language to open the Language dialog box.
Select English (U.S.) and clear the Do not check spelling or grammar check box.
Clear the Detect language automatically check box.
Click OK.
Got a version of Word that uses the menu interface (Word 97, Word 2000, Word 2002, or Word 2003)? This site is for you! If you use a later version of Word, visit our WordTips site focusing on the ribbon interface.
Visit the WordTips channel on YouTube

FREE SERVICE: Get tips like this every week in WordTips, a free productivity newsletter. Enter your address and click "Subscribe."
Copyright © 2025 Sharon Parq Associates, Inc.
 Please Note:
This article is written for users of the following Microsoft Word versions: 97, 2000, 2002, and 2003. If you are using a later version (Word 2007 or later), this tip may not work for you. For a version of this tip written specifically for later versions of Word, click here:
Please Note:
This article is written for users of the following Microsoft Word versions: 97, 2000, 2002, and 2003. If you are using a later version (Word 2007 or later), this tip may not work for you. For a version of this tip written specifically for later versions of Word, click here:
Comments