Word includes a handy feature that allows you to easily create labels containing any wording you would like. For instance, you might like to have some labels that contain your return address, or others that serve as labels for products or collection items.
The first step in creating labels, believe it or not, doesn't even require Word. It involves running down to your local office supply store (OK—you can use a catalog or shop online if you want) and picking up the labels you want to use. If you haven't looked lately, it seems there are hundreds of different types of labels, each designed for a different purpose.
To use labels with Word, I've always had the best success when using Avery labels, although you can look for their equivalent. The numbers assigned by Avery to their labels have in some sense become a standard for labels. In fact, many other vendors produce labels that use the same part numbers as Avery labels. These numbers will come in very handy when you start using Word to create your labels.
Once you have the labels you are ready to sit down and become creative. Simply follow these steps within Word:
- Display the Envelopes and Labels dialog box. You do this in Word 97 and Word 2000 by choosing Tools | Envelopes and Labels. You do this in Word 2002 and Word 2003 by choosing Tools | Letters and Mailings | Envelopes and Labels.
- Make sure the Labels tab is selected. (See Figure 1.)
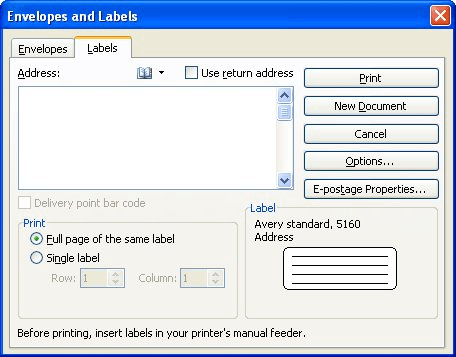
Figure 1. The Labels tab of the Envelopes and Labels dialog box.
- In the Address box, enter the text you want to appear on the label. Regardless of what Word says, this does not have to be an actual address, but can be any text. (If you want to use your actual return address, you can click the Use Return Address check box.)
- Click once on the label in the lower-right corner of the dialog box, or click on the Options button. Word displays the Label Options dialog box. (See Figure 2.)
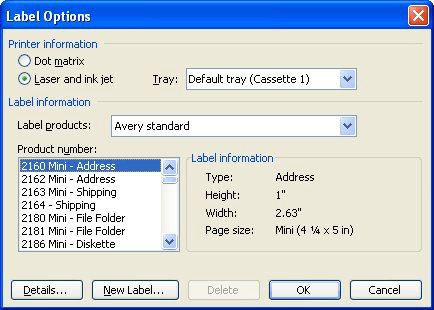
Figure 2. The Label Options dialog box.
- At the top of the dialog box, specify the characteristics of the printer you will use to create your labels.
- If you did not get Avery labels (or labels that include an Avery number), use the Label Products drop-down list to select who made your labels.
- In the Product Number list, select your label from those provided. Notice that the labels represent the product lines of the label manufacturer you selected in step 6.
- Click on OK. Word closes the Label Options dialog box.
- In the Print area at the lower-left corner of the dialog box, specify whether you want to print an entire sheet of labels or a single label. (If you are going to reuse this label at all, it is much easier to print an entire sheet of the labels.)
- If you chose to print a single label, specify the position on the page where the single label should print.
- If you chose to print a single label, click on Print. The dialog box is closed and the label is printed.
- If you chose to print a full sheet of labels in step 9 click on New Document. Word closes the dialog box and creates an entire document that represent what your label sheets will look like. (You could choose Print if you wanted, but the New Document option is much more versatile.)
- Make any adjustments to the contents of the document. This means you can individualize each label, change fonts, change positioning, or do any other formatting task you want.
- Print your document (the labels) as you normally would any other document.
WordTips is your source for cost-effective Microsoft Word training.
(Microsoft Word is the most popular word processing software in the world.)
This tip (1840) applies to Microsoft Word 97, 2000, 2002, and 2003. You can find a version of this tip for the ribbon interface of Word (Word 2007 and later) here: Creating Labels.
Author Bio
Allen Wyatt
With more than 50 non-fiction books and numerous magazine articles to his credit, Allen Wyatt is an internationally recognized author. He is president of Sharon Parq Associates, a computer and publishing services company. Learn more about Allen...
Appending to a Non-Excel Text File
Does your macro need to add information to the end of a text file? This is called appending and is done using the ...
Discover More
Combining Word Documents
At some point you may want to insert one Word document inside another Word document. An easy way to do this is to use the ...
Discover More
Too Many Edits Prevent Pasting
Sometimes Word can be rather cryptic in the error messages it provides. One such cryptic message warns about "too many ...
Discover More
Counting Characters in Text Boxes
When you do a word count, the value that is returned does not include any text contained in text boxes. This may not be a ...
Discover More
Ignoring Punctuation in Names
If you have a word that includes punctuation as part of the word itself, then you may be frustrated by how Word treats ...
Discover More
Converting a Text Box to a Frame
These days, most people using Word know what text boxes are but have no idea about frames. Yet, for some purposes, frames ...
Discover More


 Please Note:
This article is written for users of the following Microsoft Word versions: 97, 2000, 2002, and 2003. If you are using a later version (Word 2007 or later), this tip may not work for you. For a version of this tip written specifically for later versions of Word, click here:
Please Note:
This article is written for users of the following Microsoft Word versions: 97, 2000, 2002, and 2003. If you are using a later version (Word 2007 or later), this tip may not work for you. For a version of this tip written specifically for later versions of Word, click here:
Comments