Please Note: This article is written for users of the following Microsoft Word versions: 97, 2000, 2002, and 2003. If you are using a later version (Word 2007 or later), this tip may not work for you. For a version of this tip written specifically for later versions of Word, click here: Removing Automatic Lines.
Written by Allen Wyatt (last updated June 19, 2021)
This tip applies to Word 97, 2000, 2002, and 2003
Have you ever noticed how if you type a few equal signs on a line in your document, and then press Enter, Word replaces what you typed with a double line that extends the whole width of your document? Actually, this works if you enter as few as three equal signs, dashes, or underscores. In each case, Word replaces your characters with a different type of line.
In some instances, this Word feature can be a great timesaver. In other instances, you might have really wanted the characters in your document, not the line that Word thought you wanted. In these instances there are three ways you can handle the situation.
First, you can press Ctrl+Z right after you pressed Enter and Word added the line. In this case, the line is removed and your characters remain.
Using the undo shortcut may not be practical if you don't use it right away. This leads to the second method of dealing with the line. If you later want to remove the line, it helps to understand how Word added it in the first place. When you pressed Enter at the end of your characters (the ones Word replaced with its line), Word removed the characters and added a border to the paragraph just before where you typed the characters. You can verify this in the following manner:
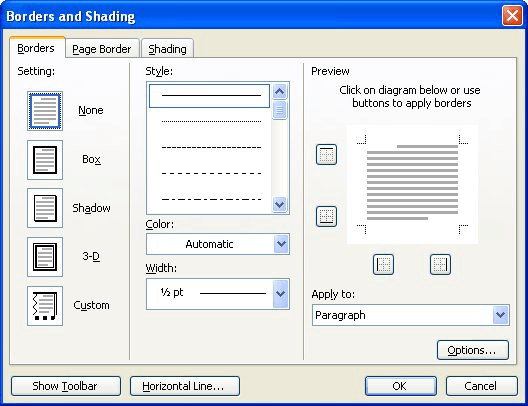
Figure 1. The Borders tab of the Borders and Shading dialog box.
The third method of dealing with the line is to simply turn off the feature that causes Word to replace your equal signs, dashes, and underscores with its own line. Follow these steps:
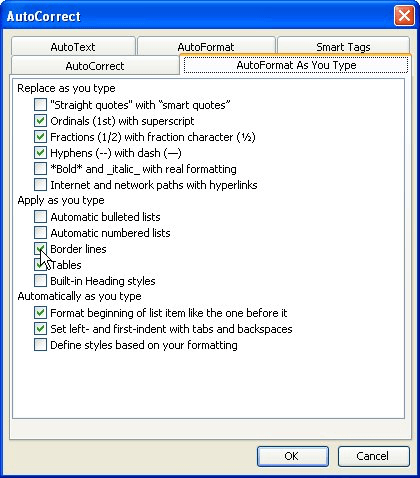
Figure 2. The AutoFormat As You Type tab of the AutoCorrect dialog box.
WordTips is your source for cost-effective Microsoft Word training. (Microsoft Word is the most popular word processing software in the world.) This tip (1814) applies to Microsoft Word 97, 2000, 2002, and 2003. You can find a version of this tip for the ribbon interface of Word (Word 2007 and later) here: Removing Automatic Lines.

Do More in Less Time! Are you ready to harness the full power of Word 2013 to create professional documents? In this comprehensive guide you'll learn the skills and techniques for efficiently building the documents you need for your professional and your personal life. Check out Word 2013 In Depth today!
Borders are easy to add around text or entire paragraphs. It may be surprising to you to learn that Word can just as ...
Discover MoreDrop shadows add a nice touch to text boxes, making it seem like they are hovering above the page. Here's the simple ...
Discover MoreWhen adding borders and shading to a document's elements, Word allows you to quickly add drop shadows to paragraphs, text ...
Discover MoreFREE SERVICE: Get tips like this every week in WordTips, a free productivity newsletter. Enter your address and click "Subscribe."
2023-01-01 11:36:36
Larry Olson
For the life of me, I cannot get rid of the auto line formatting as I type. I've turned off boarder lines and EVERYTHING in auto format and still get that irritating line.
Word for Mac, 2021
PS: love your newsletters.
2022-03-27 14:24:12
Thanks so much. This was infuriating me as I use three asterisks in all my manuscripts for scene breaks and Word 2020 suddenly began doing this. I couldn't find instructions for anything but earlier versions of Word.
Got a version of Word that uses the menu interface (Word 97, Word 2000, Word 2002, or Word 2003)? This site is for you! If you use a later version of Word, visit our WordTips site focusing on the ribbon interface.
Visit the WordTips channel on YouTube

FREE SERVICE: Get tips like this every week in WordTips, a free productivity newsletter. Enter your address and click "Subscribe."
Copyright © 2024 Sharon Parq Associates, Inc.
 Please Note:
This article is written for users of the following Microsoft Word versions: 97, 2000, 2002, and 2003. If you are using a later version (Word 2007 or later), this tip may not work for you. For a version of this tip written specifically for later versions of Word, click here:
Please Note:
This article is written for users of the following Microsoft Word versions: 97, 2000, 2002, and 2003. If you are using a later version (Word 2007 or later), this tip may not work for you. For a version of this tip written specifically for later versions of Word, click here:
Comments